Wednesday, April 13, 2016

A Kitchen Flashback—and Some Thoughts

Last week here in Boston, it was pretty crappy. Weather-wise, that is.

When it came to the Reiton household, however, we were great! My parents were here! Woohoo! It's always so fun to have my mom and my dad here: they appreciate everything, they love to eat, and my dad grew up here, so it's like he is coming home. It's just awesome.

What was like coming home for me, this week, was cooking with my mom.  Actually, I specifically mean baking with my mom.

Until this weekend, dear readers, this was a sight I had not seen in 25 years:

Learning to knead dough from my mom

The only difference 25 years ago was that my mom's bowl was much bigger because she was most likely making a double batch. And maybe she wasn't so vein-y 25 years ago. That's about it. What I do remember being exactly the same: she was always on the floor with the bowl between her knees. Her sleeves were rolled up. And she was madly kneading dough for the week's bread.

That bread dough is something that I have dreamt about for years.  I've tried to make it, but it just doesn't come out the same as Mom's.  I think she has done it for so long, she's just got that thing where she just knows when it is right. Which only comes with practice. And failures. And lots of French toast and croutons.

But you know what? That's what makes cooking worth it. Things never come out perfectly the first time. 

And you know what? Who the hell cares??? It's food for YOU. You aren't cooking in the Queen's kitchen, for God's sake. And if it all really comes out crappy, it still fills your belly AND is a cooking lesson, to boot.  So if you just can't get your fill because it's just too God-damn-AWFUL, go eat a bowl of cereal, for crying out loud! Quit complaining! There are people who will have eaten nothing for a week in this world, so get over it. Seriously. 

Those whiny words: "I can't..." ??? 

Pffffft.

If you keep practicing, one day it will come out great. No doubt about it. Pay attention and keep trying.

And that's my cooking lesson for you for today. Straight from my mom. Who has no idea that she's influenced this sailor-mouthed, gin-and-tonic-influenced blog post about trying and failing in the kitchen.

And learning. Always, always learning.

Friday, March 18, 2016

Dry Your Beef!: A Lesson on Browning, Involving Some Beef and a Towel

It's almost spring here in Boston.  I was clearing out the yard yesterday, and I uncovered all kinds of buds peeping up out of the ground.  I even saw my first robin the other day! Woohoo!

But although the weather is teasing, my stomach isn't quite there, yet.  The air is still cool enough on a regular basis that I'm still enjoying my soups and stews and hot yerba mate lattes.  And with stew-making comes beef browning, and holy cow (no pun intended), have I learned a fabulous lesson!

Regardless of the fact that I write a food blog, I can be the world's dumbest cook.  I forget steps all the time.  Like--a biggee: TASTE to season before you serve.

Nope.  Forget to do that ALL THE TIME. Even for my guests when you would think I would want to show off.  I just get too damn excited, and I put out the meal, and then when I go to take my first bite, I find myself thinking, "Damn it! I forgot again!"

Sigh.

Another one? Mise en place. That is the fancy French way of saying get your shit together before you start to cook.  It is also why I have a plethora of ramekins and small bowls: to measure out all the ingredients first so that when the clock is ticking down the two minutes I have before I need to add the minced garlic, I'm not left still trying to frantically peel that persnickety paper off the garlic clove as my timer goes off to now please add the garlic...  Again, I just get too excited about starting, or I'll think, "Oh, this first step takes 10 minutes to brown? I've got plenty of time to get everything else together, then..."

Yeah, no. Fail.  EVERY TIME.

BUT.  I think I may have cured myself of another one of my "I-always-forget"s for good, and that is drying off the beef before I brown it.

Always forget that.  Always.  Except for the other night.  Not sure what made me remember...BUT, I did.  And, wowzers, NOW I know why Julia obsesses about this so much! Because the end results are BEAUTIFUL.


Drying beef before browning makes a difference!

Look at that color! That crust! No squishy, steamy-grey beef chunks here! No, sir! 

You take that paper towel and go pat that beef dry before you salt it and drop it into the hot, oily stew pot (or skillet or whatever), and this is what you get! Tell me you aren't in love! 

My only other tips: if you are browning cubes for stew, do the cubes in batches so they don't touch. Touching means steaming.  Ew.  And I don't brown every side.  I'm too impatient.  I just brown two sides.  So there.

Want to show off your browned beauties? Send us a picture in the comments below!

Sunday, February 14, 2016

John Besh's Brown Butter and Vanilla Waffles

What's left of brown butter and vanilla waffles

That's it.  That's all that's left of them.  Four waffles piled in the most golden, glorious, butter-soaked stack you ever did see. They smelled so mouth-wateringly good coming off the waffle iron, I couldn't resist diving in for a few bites before the photo shoot.  And then—I just couldn't stop.

So, this is it, dear reader.  This is the photo you are going to get of John Besh's Brown Butter and Vanilla Waffles.

Sorry.

The recipe comes from his second cookbook, My Family Table: A Passionate Plea for Home Cooking.  Like his first book, My New Orleans, this cookbook is delightfully readable, full of anecdotes and personality and conversation, beginning with a plea that, when I read it the first time, made me say out loud, "THIS is why I write my blog!" 

Besh understands that cooking, at the heart, is a way to express love for one another.  It is not a form of entertainment.  It is not a competition. And the reality is is that our entertainment industry has become overrun with food shows—food shows that intimidate many budding home cooks, not inspire them.  Besh aims, in My Family Table, to take on that intimidation and turn it into confidence by showing you how he cooks at home for his family.  For his friends.  For real. 

This is why I love this man (remember our Besh-obsessed honeymoon in NOLA?).  He can out-chef the best chefs out there, but at the heart, he is a family man who loves people and loves food; his cookbooks are a testimony to that. When I cook with him, I feel like he gets me, unlike the many, many other celebrity chefs out there who seem to be more into themselves than anything else.

So.  If you don't own a Besh cookbook, yet, I would highly recommend going and ordering My Family Table on Amazon.  When you get your book, after you read his inspiring introduction, open it up to page 110, and make yourself the Brown Butter and Vanilla Waffles.  

You will not—NOT—regret your decision.  Either one of them.


Friday, February 12, 2016

A Valentine Treat: Baked Alaska

When I go home for Christmas, I become a bit of a kitchen hog—as in, I totally take over.  Thank God my siblings and parents get my obsession.  You know how when you really love something you want to share it with everyone? (Hello, DUH, Rachael...you write a FOOD BLOG.)

Well, I think I've rubbed off a bit on my brother, Arthur.  He is quickly becoming the King of Desserts in our family. Want to know how to make a gourmet s'more? Macarons? Lemon meringue pie? Ask him. He'll try anything if he's got the tools.  I personally think he should go to a baking school and open up the best damn bakery in Berkeley... While we were home together, he made the best lava cake I have ever eaten in my entire life.  I tried to replicate it when I got home and failed.  I think I cut the recipe in half and forgot to do something in relation to that.  Anyway.  His lava cakes? OMG.

chocolate lava cake

One dessert he had recently made with his friend, Luna, was Baked Alaska, and he was dying to make it for us.  Nobody was about to say 'no,' so one night he whipped together a batch and recruited me to help. I had never even eaten it before, so I was pretty excited to see what this famous dessert was all about. And, wow, was I shocked at how simple it was! It is made with just three things: pound or sponge cake and ice cream (both of which we bought) and meringue (egg whites beaten with sugar and a wee bit of cream of tartar).

Here are some photos to show a bit of the process.  I think it is simple enough that some of you might want to try it for your sweetums (or your own awesome self!) for Valentine's Day.

First, the pound cake is cut into rounds using a biscuit cutter (or a water glass, if you don't have a cutter) and laid out onto a sheet pan:

Baked Alaska cake rounds

Next, the ice cream is packed into a standard muffin tin lined with foil and refrozen.  (I think you could probably pack the tin without the foil and just flip the ice cream mounds out onto a cookie sheet after laying a hot towel across the bottom to loosen them.) When the ice cream was hardened, he removed the ice cream discs, placed them on top of the pound cake rounds, then topped each mound of ice cream with another piece of pound cake:

The foundation of Baked Alaska


These stacks then got stuck in the freezer again.  While they were freezing, he made the meringue (I believe it was an Italian meringue, which comes out more marshmallow-y and yummy than the kind of meringue you make for a lemon meringue pie.  Sarah over at CraftyBaking shares some good info about meringue here):

Making the meringue for Baked Alaska

Adding the meringue to Baked Alaska

(Please forgive my mother's horrid mixer.  I almost took my KitchenAid with me and then didn't because it weighs a ton.  I then got mad at myself that I didn't... No offense, Mom. ;)  I think the meringue would have come out stiffer if we had had my KA.  A tip from me to you, dear reader: a KitchenAid mixer is SO WORTH EVERY PENNY.  There is nothing like it, I promise you.  I just have the basic Artisan model. I don't know what I ever did without it. Check out Reviews.com's post on how KitchenAid stands up to other mixers, as well as their post on how the different KitchenAid models stand up to each other. I think you will find the information incredibly detailed and useful.)

Anyway.  After the meringue was finished, Arthur and I had fun (clearly) coating the frozen cake and ice cream stacks with big, swoopy plops.  


If I remember correctly, Arthur froze these again until after dinner.  He then broiled the whole sheet on high for a couple minutes to toast the meringue.  Here's what they looked like as he was plating them:

Serving up Baked Alaska!

A gorgeous mess, yes? Again, I think they would have held their shape better if we had used a better mixer and gotten that meringue a little bit stiffer.  But you should have tasted them.  Holy cow! We even froze the leftovers and ate them the next night, and they still were delish!

So—THAT is Baked Alaska! It's pretty damn easy! I had no idea. And impressive.  It takes some time, but nothing is difficult.  

I'm sorry I don't have a recipe, but if I come across a good one, I'll come back and post it here.  Unless Arthur shoots me his... 

And if you make some, post some pics in the comments below! I would love to see what you did!

Wednesday, February 10, 2016

The Cooking and Eating of Vegetables: The Simple Truth

When I was growing up, my mother was a huge proponent of "Eat your veggies."  Like, HUGE.  Not in a disturbing "Here's a cupcake (i.e. bran muffin)!" kind of way but an I-will-serve-salad-with-dinner- EVERY-night-alongside-another-vegetable-on-the-plate kind of way.  I cannot remember sitting down for dinner once without there being vegetables in a variety of forms on the table.

By the time I had entered this world, frozen vegetables had kicked canned veggies out of the kitchen for good (thank GOD), so, yes, my veggies tended to be "zapped" in that monstrous new-fangled machine that took up almost the entire counter in our kitchen called a "microwave."  But no matter—we were getting our veggies.  My mother even figured out how to microwave frozen vegetables to be "California-style."

Needless to say, because of my childhood home dining experiences, as an adult, eating dinner without two vegetables on my plate seems like half-assed meal planning and flat-out vaguely scary.  Like, "Now I may not be able to poop tomorrow" scary.  And "Maybe I should go take that multi-vitamin..." So I buy and cook a lot of veggies.  A LOT.  To the point I get comments at the checkout in the grocery store. The other day the teenage bagger was trying to guess what I was going to use each vegetable for. Then he picked up this one (pardon the stock photo): 

fennel bulbs
https://pixabay.com/static/uploads/photo/2016/01/11/10/04/fennel-1133309_960_720.jpg

This is the vegetable that always gets a lot of questions, the most common one being, "What IS this?"

This delightful root vegetable can be found under two different names in the produce section: fennel or anise.  It can be eaten raw or cooked, and it has become one of my all-time favorite veggies.  It's seeds are what give Italian sausage that distinctive peppery, pungent, almost licorice-y flavor and are what most people think of when you say "fennel."

I use the seeds in my pasta sauce and in my meatballs, but I have mostly learned that I love the fennel bulb the most.  I love it straight up, unadulterated, sliced and then roasted.

You heard me, people.  ROASTED.  The prime way, and easiest way, may I add, to cook vegetables.  Roast them in your oven or toaster oven, or even pan-roast them in a skillet.   I don't care which way.  But roasting vegetables does two things that I just absolutely love: 1) it changes the flavor of the vegetable completely because it essentially is slowly caramelizing all the sugar in the veggie.  The flavors become deeper, more mellow.  And 2) because your veggie is slowly being cooked in a single layer by hot air or a hot surface, you have more control of how cooked it gets.  You can fork several pieces every 10 minutes or so and see how "done" they are.  Some veggies I like with a bit of bite left, like zucchini or carrots or cauliflower.  Others I like until they are just soft enough to bit straight through, like potatoes or the hard squashes or this fennel, here.  There is just not a simpler, more delicious way to cook vegetables.  Not to mention the prep time is, like, two minutes. Look how gorgeous...:
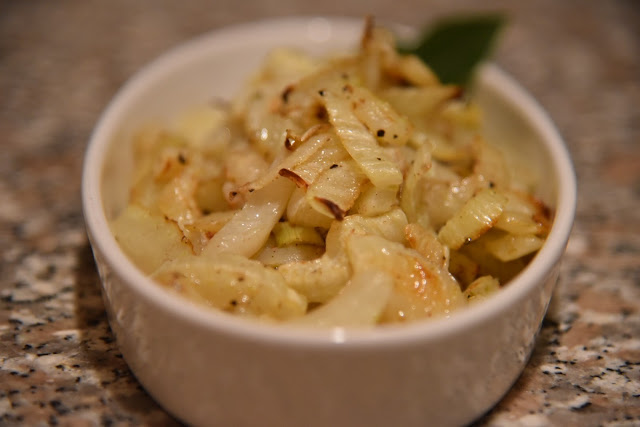
roasted fennel

 On the far, far opposite side of my Favorite Ways to Cook Vegetables spectrum is cooking vegetables in water.  In any kind of water. If you come across a recipe that tells you to boil a vegetable, RUN—hard and fast.  Boiling is a technique that leaches the vitamins out of your veggies so fast and reduces their deliciousness to a murky-tasting pile of mush.

Don't even let the French talk you into it.  They may call it something fancy: braising.  It sounds nice, doesn't it? So nice that I tried it the other night.  Julia talked me into it.  So I took these gorgeous leeks:

trimmed leeks

and put them in a pot of water.  I stupidly thought the butter would make a difference...  She told me to simmer them for some God-awful amount of time, which I convinced myself was because they were leeks and that somehow would make them better.

braised leeks

And then when MOST of the water had simmered off, I put it all (including the water that was left) into a roasting pan and roasted them for another quarter of an hour.  Here's what ended up on my plate:


I know.  I know.  I mean, LOOK AT THEM.  They scream "overcooked," "mushy," "slimy," and "I-won't-need-teeth-to-eat-this" right from the plate! But, being the experimenter that I am, I tried them, anyway, with a very timid bite...

I almost titled this post, "Mastering the Gag of French Cooking," but I decided to come at it from a more positive angle.  And to not offend the devoutest of Julia Child's fans.  

So.  Learn from me.  Roast your veggies.  Roast them.  It's the easiest.  The yummiest.  The best.

Here's how:

Ingredients: 
  • your veggie or veggies of choice, cut up however you want; just try to make the pieces all the same size
    •  (NOTE: if using multiple types of veggies, roast similar "hardnesses" together so that they can be done in the same amount of cooking time OR add veggies that are softer/will cook faster to the pan a bit later after the longer-cooking ones)
  • olive oil or your favorite type of oil (I like the flavor of olive oil best)
  • kosher salt
  • fresh ground black pepper

Equipment needed:
  • a medium bowl
  • a sheet pan or a casserole dish or skillet to lay your veggies out in a single layer 
    • (NOTE: the more wiggle room the veggies have where they aren't doing a whole lot of touching, the better the browning will be.  Too much contact makes them steam more than brown). 
  • aluminum foil or parchment paper to line the pan (easier clean up; skip if you don't have any)
  • a flat metal or plastic flipping spatula

Directions: 
  • Preheat your oven to 425°.  If using a toaster oven, do 375° to 400°, depending if it is tiny or big.  If you are using a skillet on the stove top, heat it over medium heat.
  • Line your pan with foil or parchment for easy clean up.  If using a skillet, just leave it alone.
  • Place your veggies in the bowl.
  • Drizzle the veggies with olive oil.  Toss the veggies with the oil really well with your hands.  If the veggies don't all look coated, drizzle with more oil and keep tossing.  You want the veggies coated well but not swimming in oil.  
  • Sprinkle the veggies with salt and pepper and give them one last good toss to coat.
  • Dump the veggies in the pan and spread them out in a single layer. If you are using a skillet, use a spoon or spatula to spread them out; you don't want to burn your fingertips on the hot skillet...
  • Place the pan in the hot oven and roast for 10 minutes.  Take the pan out of the oven, toss the veggies to recoat and flip, then put them back in the oven for another 10 minutes.  If you are using a skillet, toss them a bit more frequently.  You want browning, but the smaller surface area can make them cook faster.
  • After the second 10 minutes, you are going to be making a judgement call on how well done you want your veggies.  Spear a couple pieces with a fork to test how crunchy they are. When they feel good to you, remove them from the oven and dump them in a serving dish.  Garnish however you want.
  • Eat with abandon.

Bonus Tip!  If I feel like jazzing my veggies up a bit, I'll toss them with a little something extra when I add the salt and pepper.  Something like:
  • lemon zest from the peel of one lemon
  • a few smashed garlic cloves (don't even peel them!)
  • a couple shallots quartered lengthwise right through the root
  • a sprinkle of a favorite spice or spice blend
  • a few good shakes of my Regan's orange bitters
Get creative! I bet you it will taste delish.  And if it doesn't? Well, you don't know until you try, right?

So go get roasting! Comment below and share what you've tried! And if you have any questions, please ask below.  I am happy to help!


Tuesday, February 9, 2016

Put Some Blueberries On It!: Learning to Make Green Salads with Fruit

I have always been a fan of blueberries, ever since I was a kid.  Even after I threw up blueberry pancakes in the back of our Volkswagon Beetle when I was four years old, my love for those little suckers didn't fade.  When we moved to Pennsylvania and settled into a home right smack in some woods full of blueberry bushes, I thought I had died and gone to heaven.  It might have taken an hour to fill a measly cup with those tiny berries, but I didn't care.  I had blueberries in my backyard.

As an adult, they are still my go-to berry. I use the dried wild ones in my scones. Frozen blueberries  get tossed into my random smoothie.  And I buy a package every week to top off my plain Greek yogurt.

But you want to know what I've gotten really into lately?

Blueberries go great on salad!

You got it! Salads. SO yummy.  Their little bursts of sweet, and sometimes tart, flavor add such wonderful contrast to the pungent flavors of shallots or red onion and a sprinkle of gorgonzola or feta cheese.  And the juice they release blends wonderfully with a simple olive oil and vinegar dressing.  Simply drizzle your salad with olive oil first and toss the greens to coat them, then sprinkle on a bit of good balsamic vinegar, a pinch of kosher salt, and a few grinds of fresh cracked black pepper.  Toss again, and you've got an absolutely delicious salad that is super healthy, thanks to blueberry's super antioxidant powers.  

Give it a shot and let me know what you think! Have another weird salad topping of choice? Send us a comment and let us all know!

Sunday, February 7, 2016

Defrosting Your Fridge: Ideas for What to Do with That Food!

Happy belated New Year, all! I can't believe we are well into 2016 already. Where does the time go?
I haven't written a word to you all for over a month! It appears that the holidays were busy and then some! It feels good to be back.  In between all the traveling and company, I've been slowly hashing out my New Year's resolution to create a daily routine (as routine as a pilot's wife can get). Getting back to you all will be part of my writing goal (but I've got some other projects in the works, so I'm going to need you to share).

One of my other New Year's goals is to get better at experimenting in the kitchen.  There are so many foods that I buy at the store that I can make at home (yogurt, ricotta, kombucha, etc.  Notice the fermentation theme, here).  I've just been lazy and haven't taken the time to read up on it and to try it. 

Well, Fate decided to lend a hand and throw us a broken fridge to help me get that ball rolling...

A few weeks ago, Chef Reiton and I noticed that we were getting random pools of water appearing from beneath our fridge.  After a bit of inspection and research, we learned that the little hose in the back of the fridge that allows the defrost water to drain can get clogged, causing the water to leak out onto the floor and into the bottom of the freezer drawer (we wondered where that huge sheet of ice was coming from...). Thanks to Google and those who share their knowledge on home refrigerator repair, we discovered how to solve the problem ourselves instead of having to call our friendly but expensive Whirlpool repairman.  

The down side? We had to defrost the fridge.  

Crap. 

Thankfully, 1) the winter storm that hit Boston on Friday was bigger than was expected, so the 7 inches of snow piled on our back deck could serve nicely as a natural cooler.  2) We tend to shop twice a week for food, so we didn't shop for the second half; the dinners just became compilations of random scavenged foods as we tried to use up what was in the fridge and freezer, just in case repairs didn't go as quickly or smoothly as we wanted.

Well, despite our interesting meal combos, we were still left with:
  • a bunch of cheese (we have a good-cheese fetish, admittedly)
  • lots of pickled items in jars
  • butter
  • half-n-half
  • a frozen leg of lamb
  • a few random vegetables
  • some chicken wings and a carcass
The cheese, jars, and lamb leg got stuck out in the snow in a plastic storage tub.  But those veggies and the chicken?

Well, my New Year's resolution of experimenting started halloo-ing from the back of my brain, and so I pulled out a wonderful little book, The Essential Book of Fermentation by Jeff Cox, given to me for my birthday by our dear friends, Joe (now my boss—I'm officially a copy editor!) and Marie.  

What was I going to ferment? That gorgeous purple cabbage that had been sitting all lonely and forlorn in my fridge, that's what.  In five minutes flat, that baby was slivered into shreds and sprinkled with sea salt and caraway seeds:

the start of sauerkraut

All I had to do was completely man-handle that pile of shreds for 10 minutes, scrunching and crushing and squeezing and mixing, until I got it to be a juicy, purple, tender mess:


I covered the surface with some plastic wrap, put a plate facedown on top so that all the cabbage was covered up, then I pressed the plate down hard, pushing all the shreds down underneath their own purple juices.  Now the cabbage was ready to ferment, slowly developing into that amazingly health food: sauerkraut.  If you've never had it homemade, you are missing out.  It is entirely different from the sweet, vinegary kind you get at the store.  And homemade fermented sauerkraut contains bacteria GALORE that will make your gut incredibly happy.  Like, really insanely happy.  In fact, a lot of nutritionists say that eating sauerkraut every day does wonders for your body.  Some food for thought...

As for the other vegetables and chicken parts that sat on the counter—you regular readers guessed it...

CHICKEN STOCK.

making chicken stock

Chicken wings and a carcass and a bit of leftover roasted chicken got dumped in the Crock-Pot and covered with a quartered onion, old celery, leftover herbs, a hunk of carrot, sliced up shrivel-y ginger root and turmeric root, a wrinkled serrano chile pepper, and the frozen scraps left from making spiralized zucchini noodles.  I filled the pot with water, put it on high until it all came to a boil, then turned it down to low.  That was yesterday afternoon, and she's still going strong.  I topped it off with a bit more water this morning, and I'll probably let it go until tomorrow afternoon.  The more nutrients I can suck out of those bones, the better. And if you could just smell my house right now... Man.

I'm happy to say that the fridge fixing went ridiculously smoothly.  It took me longer to take advantage of the empty fridge and give it a good scrub down than it did for the repair.  Here she stands, all clean and shiny, ready and waiting for that homemade sauerkraut and chicken stock.

defrosting fridge

The only question is, what do I experiment on making next???

Wednesday, December 9, 2015

Moroccan Spiced Nuts: A Recipe

As anyone who comes to my house for dinner knows, when it comes to appetizers, I am a huge fan of the cheese plate.  To me, there is nothing more stimulating to my appetite than a couple nice cheeses, a beautiful seasonal fruit or some nice salty olives (only if I can get good ones that do not come from a jar!), and a toasty bowl of spiced nuts.

I've toyed with a number of spiced nut recipes over the years, and I believe I've finally come up with a recipe that I am very happy with, evidenced by the fact that I, my dog, and my uncle Fred could not stop eating them.  These nuts aren't spicy as in "Dear God, these are hot!" They are spicy as in "Mmmm... these flavors make my mouth happy."

I know the spices are rather unusual, but don't freak out by their weirdness.  Give them a try, and you will see what I mean by your mouth being happy.  (I bet you dinner that you wouldn't be able to guess all of them if I didn't tell you!)

Speaking of telling, let's get you a photo and the recipe:

Moroccan spiced nuts recipe

Makes almost 2 cups

Special tools needed: parchment paper

Ingredients: 
  • 1 1/2 cups mixed nuts, raw or already roasted
  • 1/4 cup unsalted raw pumpkin seeds (sometimes called "pepitas")
  • 2 oz. real maple syrup (for God's sake, do NOT use the fake stuff here! Make that EVER!)
  • 1 Tblsp. olive oil
  • 1/2 tsp. ground cumin
  • 1/2 tsp. hot paprika (I used Hungarian)
  • 1/2 tsp. ground turmeric
  • heaping 1/2 tsp. kosher salt

Directions:

1.  Preheat the oven to 350°.  Lay out a large sheet of parchment paper for cooling.

2.  Dump everything in a medium bowl and toss toss toss with a wooden spoon (wooden spoons grab and move saucy things better, in my humble opinion). Make sure all the nuts are coated really well.  If you have to wait for the oven to finish heating up before Step 3, retoss everything before you pour the nuts onto the baking sheet.

3.  Pour the mixture out onto a baking sheet, and spread the nuts out into an even layer.  Pour any goo in the bottom of the bowl on top of the nuts.

4.  Put the pan in the oven for 10 minutes, then take out the pan, shut the oven door, and toss everything with a flat spatula to recoat the nuts.  Spread it into an even layer again, then roast for another 10 minutes.  Toss and spread again.  Roast for a final 5 minutes (unless things are looking pretty toasty. Then stop.).

5.  Scrape the nuts onto the sheet of parchment paper.  Spread them out into a single layer again, and let everything cool to at least warm.  If you are having trouble with the nuts sticking to your spoon or spatula as you move them, wet the spatula, then move the nuts.  Don't worry about the nuts sticking together too much.  After they cool you can break them apart.

6.  Serve your spiced nuts immediately, or cool them completely and store in an airtight container.

That's it! They take about 5 minutes to whip together and 25 minutes to roast (during which you can sit back and wait for that heavenly toasted, nutty aroma to start filling your house).

To serve, pair up with a couple ripe pears ready to slice and some Sartori cheese (you can find some at most any big grocery, and any flavor is OMG). You'll have a cheese plate made in heaven.

Print up the recipe by clicking the image below, and let me know in the comments what you think!

Nuts to you!


Sunday, December 6, 2015

The Ruby Slipper Cafe — New Orleans, LA — A Restaurant Recommendation

It's a frosty morning here in Mass.  I'm sitting here thinking of the weekend I just spent in New Orleans on the way to my cousin's wedding.  Christmas wreaths and garland hung on every lamp post along Canal Street—and I was wearing flip flops and a short-sleeved shirt.  I have to say, I didn't quite like it.  Part of that holiday-ish feeling comes from wanting to curl up in your house with the people (and animals) you love beside a roaring fire, not the air conditioner.

But when I ignored the Christmas decorations, I felt wonderful as I wandered those old city streets.  I hadn't been back to NOLA since our foodie honeymoon (read about Day One here, then read forward by clicking "Newer Post" at the bottom of each post for a rehash of the whole five days.) Boy, was it good to be back! We found a few more fantastic restaurants in our quick trip, all of which I cannot wait to visit again.

One of the restaurants we stumbled across is a cafe on Magazine Street called The Ruby Slipper Cafe.  It opened its doors post Katrina and has quickly become a local chain because it is so flipping good.  They called themselves "The Ruby Slipper" because the owners found that "there's no place like home."  I love it.  And the home vibe is truly a part of this place.  You don't feel like a customer; you feel like you have  known every employee for years, and they are just welcoming you back home for a bite to eat.

Okay, maybe not a bite to eat.  How about a pile to eat? Huge quantities.  And while we are on the topic of "home," everything is homemade.  From scratch.  Like, really.  If they don't do it themselves, they get small local bakeries, farms, coffee roasters, etc. to do it for them.  You can smell it.  You can taste it.  It is gosh darn DELICIOUS.

Chef Reiton got the Chicken St. Charles, a form of eggs Benedict: crispy fried chicken breasts on top of buttermilk biscuits and topped with poached eggs and Ruby's cream sauce.

Chicken St. Charles at The Ruby Slipper Cafe, New Orleans, LA

I got the Migas, a bed of crispy tortilla strips piled with scrambled eggs, chorizo, tomato, cilantro, onion, and cheese, served aside a spicy sour cream and sliced avocado.

migas at The Ruby Slipper Cafe, New Orleans, LA

A special thank you goes to our server, Ronald.  Wonderful service.  Best smile ever.  Here he is after pouring me yet another cup of the best coffee I have ever had (seriously.  We bought a bag.):

Ronald of the Ruby Slipper Cafe, New Orleans, LA

The AMAZING coffee at The Ruby Slipper Cafe, New Orleans, LA

Crazy good.  I may have a hard time even wanting to try other restaurants for breakfast the next time we visit.  

(As if that would be a bad thing...)

Monday, November 16, 2015

Using Offal Isn't So Awful...Really: Learning to Use Turkey Guts

This past weekend, Chef Reiton and I had the kids home for our "Thanksgiving" since we won't get to see either of them on the actual holiday.  We spent Friday night experiencing the "T," wandering the North End, and trying out Carmelina's amazing pasta and Modern Pastry's fresh cannoli:


YUM to both.  

Saturday was to be "Thanksgiving," so while the rest went winter coat shopping, I stayed home to work on a classic Thanksgiving dinner.  Little did I know what I would discover in my solitary moments in the kitchen that afternoon.

Right before he left, Chef Reiton pulled out the Cook's Illustrated cookbook The Best New Recipe and said, "Let's make this gravy for our dinner tonight."

"Yeah, sure!" I agreed, quickly noting that he was leaving the book open to a particular page and then turning back to what I was doing.  And then he left.

I finished setting out pots and pans and got ready to stoke the fires, then turned to read the recipe.

The recipe that was titled: "Giblet Pan Gravy."

GIBLET.  As in guts.  Innards.  Organs.  Gizzards.  Offal.

Never in my life had I touched giblets, much less cooked with them.  I quickly scanned the recipe to see if I could somehow skip the giblet part.  But alas—it is hard to skip the main ingredient that the recipe is named for.  

I read on in further detail.  What the recipe largely wanted me to do was to make a stock from the giblets.  And the neck.  And the tail.  Which I had to CUT OFF.  Oh, Lord, could this get any worse?

But, really, I thought, trying to calm myself down, a stock isn't so bad. I didn't have to cut anything up.  All I had to do was brown up the whole lot of parts in their entirety and then add some herbs and broth and water and let it all go.  I could do that...

So I did.

Turkey giblet stock for Thanksgiving dinner

As I stood over what looked to me like witches' brew, steam began to rise up out of the pot and bubbles started blurping on the surface.  I took a stir or two when suddenly... DEAR GOD.

It smelled like Thanksgiving.

Oh, for all you believers in a no-giblet/organs/offal Thanksgiving dinner, you must believe me.  That smell that we associate with Thanksgiving, that amazing aroma that our grandmothers' kitchens always had for the holidays that we just haven't been able to replicate and we never knew why?

Offal is why. 

It is the ingredient that releases that intensely dark meaty fragrance into the air—and into your gravy.  I silently praised my husband for once again unknowingly teaching me a lesson about the adventures of food...and then found myself stirring the pot ridiculously more times than was probably necessary.

As the simmering time drew to its close, I read on to my next steps in the gravy making: strain the broth, cool the gizzards...

then chop them up and save them to add to the gravy LATER???

HELL, NO!!!

Related Posts Plugin for WordPress, Blogger...

Visit Me on Pinterest!