Showing posts with label fruit. Show all posts

Friday, June 22, 2018

Toast-less Avocado Toast: The Paleo Version

Food fads both fascinate and frustrate me. Being one who loves to learn anything new in the kitchen—whether it be a new taste for something or a new technique—I'm open to most (most, mind you) anything.

And so when I hear that such-and-such is so flipping good, and I see blog posts and magazine articles singing its praises, and menu after menu offering said food, I usually will give it a try. See my post on grain bowls as an example...

What frustrates me, on the other hand, is when something in the food world just gets OVERDONE. Like, there is nothing else. I see this with ingredients, flavors, techniques.

Take the word "umami," for instance. The word "umami" was first used by Kikunae Ikeda in 1908. 1908!!! But it is used now as if it is the newest and most insanely incredible taste that has ever been discovered. If I hear or read the word "umami" one more time, I'm going to take my bottle of coconut aminos and throw it out the window! (Although I do encourage you to read the "Umami" Wikipedia article for a rather fascinating explanation of its meaning.)

So when I keep reading articles about entire restaurants being dedicated to this whole avocado toast craze??? I admit, I've been rolling my eyes. Really? All you serve is toast with avocado schmeared on top and sprinkled with random crap? I mean, come on.

And then, one day last week I had nothing to eat in the kitchen except a perfectly ripe avocado...

So, this is what happened:

Avocado sprinkled with lime juice, toasted hazelnuts, olive oil, salt and pepper

Avocado. Fresh squirt of lime juice. Sprinkle of toasted hazelnuts. Drizzle of olive oil. Salt. Pepper.

My brain's response after my first dreamy, creamy bite from my spoon: DEAR GOD, THANK YOU FOR THIS FOOD.

What was I eating? I was eating a toast-less version of avocado toast, and it was divine

Thursday, March 15, 2018

Paleo Plantain French Fries

When you are limited on where your starches come from in a paleo diet, you get creative.

Ladies and Gentleman, the plantain french fry!


Paleo Plantain French Fries

NO, they don't taste exactly like a potato french fry. Of course they don't. They are made from a plantain, not a potato, so don't sit and whine that they aren't the same. They aren't gonna be the same, whiner.

But I'd rather have a salty, crispy-tender plantain fry to munch on than NONE at all.

And I'll leave off the six pounds I've lost in the past two weeks, too.

Thank you, meat and veggies.

Want to make them? We used three plantains for two of us.

Ingredients:
  • green plantains with no yellowing
  • coconut oil
  • kosher salt

Special Tools:
  • a bowl or colander
  • paper towel
  • paring knife
  • skimmer or slotted metal spatula

Directions:
  1. Place the paper towel in the bowl or colander. It will absorb some of the oil from the fries.
  2. Using a paring knife, cut off the tops and bottoms of the plantains. Score through the skin along the natural ridges of the plantain. Slide your thumb under the end of one of the strips and pop the skin up. Slide your thumb up the plantain to remove the strip. Peel all of the plantains completely. 
  3. Start heating the coconut oil in a small saucepan over medium heat. You want a depth that will more than coat the french fry, about 1/2 an inch. (And don't worry about waste. You can reuse this oil to make more fries another time.)
  4. Meanwhile, cut a plantain in half crosswise. Now cut the halves in half lengthwise. Cut the four pieces in half lengthwise again. Turn those pieces on their sides and cut them in half. You may have a few pieces that need turning and cutting in half one more time, depending on the size of your plantains. You should have square-ish fries. Repeat for all of the plantains.
  5. Look back to the oil. You want it hot but not smoking. Test it by tossing in a scrap of plantain. If it immediately bubbles rapidly, it's ready.
  6. Carefully drop in a small handful of fries. Stir gently to move the fries around a bit so they don't stick together. Fry until the plantains are a nice golden brown, stirring occasionally. Remove them from the oil with the skimmer or spatula, tapping the skimmer on the side of the saucepan to allow excess oil to drip back into the saucepan. Dump the fries into the paper towel-lined bowl and immediately sprinkle with kosher salt. 
  7. Repeat until all the fries are done. If you want to keep the fries warm in the oven, you can do so, but I liked snacking while I fried...

Enjoy!

Wednesday, August 30, 2017

Learning to Cook Like Grandma: Blanching and Peeling Peaches

Can someone please do me a favor?

The next time I poopoo some "old-fashioned," "time-consuming" technique that our grandmas and their grandmas have done for centuries...

TELL ME I DON'T KNOW WHAT THE HELL I'M TALKING ABOUT.

Like, seriously. Geez Louise.

Backstory: my stepson is coming to visit. I want to make him his favorite dessert of all time: fresh peach pie. This entails peeling and cutting up eight big, fat peaches.

In the past, I've "known better" because "the-newfangled-way-has-to-be-better," so I've peeled the peaches with one of these (called a "vegetable peeler"):


(No, I don't know why it is on a chain, either.)

Peeling peaches "my way" resulted in:
  • mangled peaches
  • peaches being shot across the counter or into the sink after slipping from my grip
  • a dramatic loss of perfectly good peach flesh that did not end up in the pie (or anywhere else delicious and purposeful)
Clearly, my way is better than Grandma's, right???

Sigh. I'm such an arrogant ass.

Thank God for waves of "you-know, maybe-I-WILL-try-that-blanching-thing-that-all-the-old-recipes-tell-you-to-do..."

Folks, this is what you get when you blanch and ice peaches before peeling them:

An unpeeled, blanched peach beside peaches that have been blanched and peeled

I KNOW, RIGHT???? The skin peeled off in sheets like paper! No loss of deliciousness! And it would have taken me the SAME amount of time to mangle the peaches with a vegetable peeler than it did to blanch and peel them.

What did I do? Well, by gum, I'll tell you, even though I'm no grandma!
  1. Boil a small pot full of water that is deep enough to cover the largest peach.
  2. While you are waiting for the water to boil, take a paring knife (in the picture above) and carefully score a big 'X' in the bottom of each peach (opposite the stem side).
  3. Now get a big bowl of ice water.
  4. When the water is boiling, gently drop in a peach. Slowly count to 30 as you gently move it around to evenly boil all sides. Remove the peach and drop it in the ice water.
  5. Drop another peach in the boiling water. Count to 30. Remove the peach and drop it in the ice water. Remove the previously iced peach and put it on a plate/cutting board.
  6. Repeat until all the peaches are blanched.
  7. Pick up the first peach you blanched. Take the tip of your knife blade and slide it under the peach skin where it comes to one of the points on the 'X.' Place your thumb on top of the skin (so the skin is sandwiched between the knife blade and your thumb) and gently pull downward. Ta-daaaaa!!!! Repeat all the way around the peach.
  8. Repeat with all the peaches.
Oh my word, my world was changed. My arrogance was duly spanked, yes. And it did smart a bit...

But now there will be PIE.


Sunday, November 13, 2016

Make the Most of Your Food Budget: Smart Produce Shopping Tips

I have to admit it: I'm a grocery shopping junkie. I LOVE to grocery shop. Part of it is probably related to the fact that I love to cook, so it's kind-of like shopping for shoes, for me.

Yes, I'm serious. Some people treat themselves with shoes. I treat myself with food. 

SO. Where am I going with this? Well, because I spend so much time at the grocery store—AND, yes, because I am rather detail-oriented—I notice little things at the grocery...things that save me money. 

Like, produce pricing. If you have never noticed, the pricing format for fruits and veggies is not all the same, and there are ways that the grocery store prices and displays produce that could be having you spend more money on those veggies than you need to. 

So. I thought I'd pass along two tips that you can keep your eye out for when you do your next grocery shop, and maybe you'll save some money. Let's take a look:
Tip #1 - Some items are sold as "each" and some by pound. If your item is labeled as "each," buy the biggest beauty you can find. If it is sold by the pound, feel free to buy the smallest quantity you need, even if that means taking a bundle apart.
See how the fennel bulbs below are sold as $2.49/each? When I see that, I dig through the batch and choose the biggest bulb I can find.

Smart Grocery Shopping: Tips for Produce Purchases

But some items are sold by pound. Check out the broccoli rabe below:

Produce priced as "by pound"

So why do I care? Well, a lot of times these items are pre-bundled with rubber bands or twisty ties, giving the impression that you need to buy the whole bundle. But the item is being sold "by the pound," which means I can portion out and purchase only the amount that I want and need, not what is being presented as a set portion. 

Shopping with this in mind can save you money and keep you from wasting a lot of produce. That honking bunch of asparagus that ends up turning to stinky mush in your fridge? Yeah. That's what I mean. 

So, here's what you do when you are shopping for that asparagus for dinner: remove the bottom rubber band from the asparagus bundle, count out 6 spears per person (for the typical serving size) and slide them out of the bunch, then replace the bottom rubber band and toss your loose asparagus in a produce bag. You will most likely find that you didn't need nearly what was in that bunch.

Let's take a look at the next tip.
Tip #2 - Similar items can be sold in different ways: bulk, pre-packaged, organic, etc. Pay attention to the pricing. Things may not be as cheap as they seem.
We go through a lot of lemons in our house. For years, I bought lemons from the bulk bin. Note the price: it's per lemon. They are large, but they also tend to be firmer, which usually means less juice.

Produce priced as "each"

One day I happened to take a closer look at the pre-packaged lemons that I always walked past. 

Smart Grocery Shopping: Tips for Produce Purchases

What are your first thoughts? $3.99 for a bag vs. $.69 each? Hmmm... 

I'm a believer in "Don't-spend-money-to-save-money." But lemons? I go through them pretty quickly. And with closer inspection of the lemons in the bag, I found them smaller but much more plump and juicy. AND, there were TEN in a bag!

Do the math! That's $6.90 if I bought that many individually over time, but only $4.00 if I bought a bag! 

Don't get me wrong. I still check the price of the bulk lemons sold individually, just in case they are on sale. But nine times out of ten, buying the bagged lemons (or even organic once in awhile!) is much cheaper than buying them individually.

I do periodically have to remind myself: if I'm not going to actually use all those lemons (or whatever fruit/veggie I'm contemplating buying) before they go bad, it's not going to be saving me money if I'm throwing a bunch of moldy, blue lemons away. I should just buy the smaller portion instead. You just have to know your own menu and eating/cooking habits and make your own judgement from there as to how you should most wisely be purchasing your produce (which can be different from shop to shop). 

So. I hope you find these two tips useful. If you have any questions about anything, give me a shout in the comments and I'll see if I can help!

Here's to smart shopping and healthy eating!


Wednesday, September 7, 2016

Playing Around with Paletas: A Peach-Basil Popsicle Recipe

What a summer this has been! For those of you who visit often, you've gathered that I've been a bit out of my usual loop these past few months. I would make excuses, but I can't because I've had so much fun this summer that my excuses would be a farce. I've missed writing, but I certainly have not missed my family and friends. It's been a summer to make up some seriously lost time, and I've had a blast.

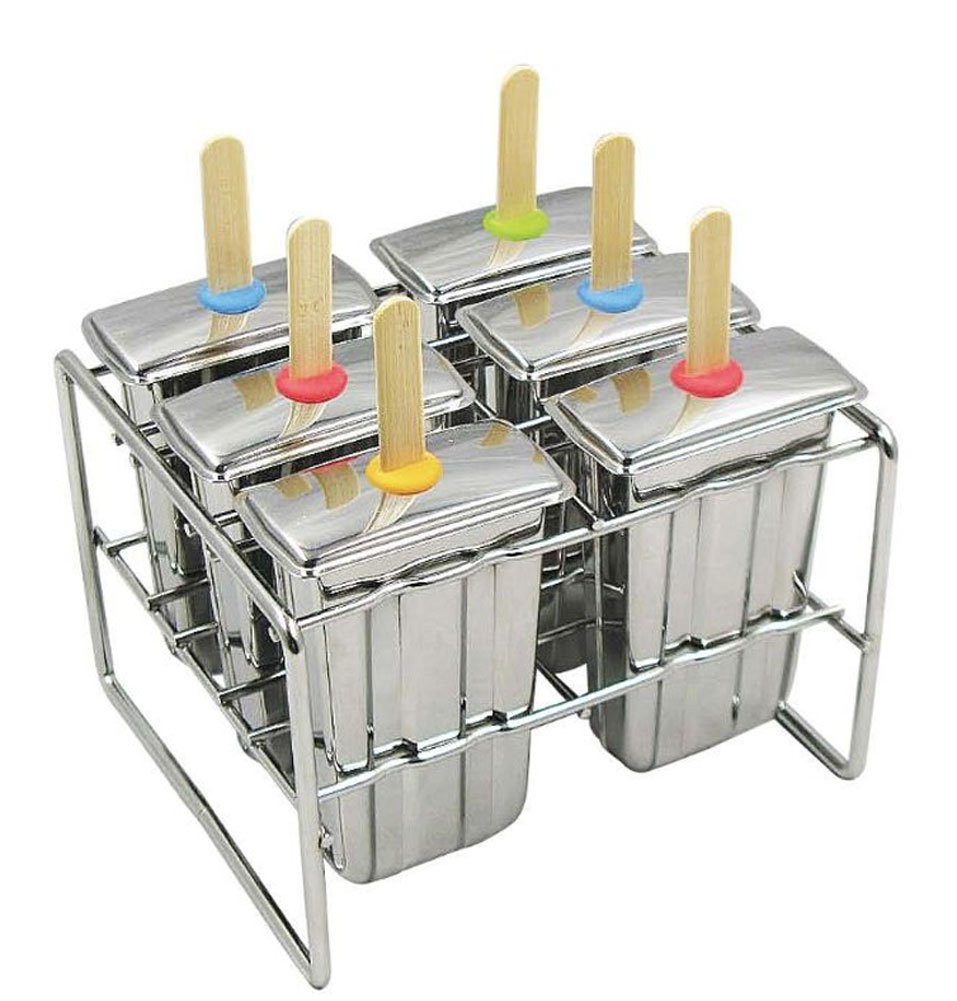
One of my favorite events this summer was having Michael come visit twice! I love cooking for him again when he is back, and this second summer visit from him prompted me to buy something that I have been wanting to buy in a long, LONG time: namely, a popsicle mold. 

I know, I know... How old am I? (cough) Do I have small children? (NO.) 

It's just...every time the heat of summer rolls around and I see photographs of frosty, melty, fruity paletas (i.e. Spanish for "popsicles," kind-of), I have this longing to pureé a bunch of fruit and make some myself.

The only problem? I have never been able to find a popsicle mold that suits my tastes, and I've been SUPER picky about what I want in one. It must:
  • be easy to clean
  • be BPA-free
  • use popsicle sticks that can get accidentally tossed/lost and not ruin the entire set
  • be warp-free
  • be easy to freeze without making a huge mess of my freezer
  • be the classic popsicle shape
Some of you are probably wondering how on earth I ever found my husband if my laundry list for a POPSICLE MOLD is this stringent.

Well. Regardless of what you may think of my picky nature, I FOUND ONE. I paid a small fortune for it, true. But I believe it is going to last me just short of forever. Check it out:

Onyx Stainless Steel Popsicle Mold Set

It's the Onyx Stainless Steel Popsicle Mold from Amazon. It currently costs about $40, but DUDE. Look at it! It's STAINLESS STEEL. It comes with its own super-stable holder. The little silicon rings in the lids hold the (included!!!) bamboo sticks perfectly in place. No crooked popsicles/too-short handles/wimpy plastic here! I am seriously in love. A mom designed it because she couldn't find the perfect popsicle mold, either. Figures. GO, MOMS!

SO. I ordered the popsicle mold, got it in the mail a few days before Michael got into town the second time, and whipped up a couple trial recipes that I concocted after reading around on the internet. NO, they were not recipes for adult-flavored popsicles. I made them from mostly fruit with yogurt or herbs and a little bit of sugar. That's it. Not even water (I hate icy ice-pops...). The blueberry-yogurt one pictured below that Chef Reiton is not sure of (and the one farther down with Marley longingly gazing on) still needs some work, but here's a quick recipe to use up those late summer peaches and basil that are still hanging on—a recipe for peach-basil paletas that got the family approval!

Playing Around with Paletas: A Popsicle Recipe

Peach-Basil Paletas (makes 6 pops or 2 cups of pureé):

Peel 4 medium ripe peaches with a paring knife and cut them into chunks. Place the peach chunks into a small pot and simmer them with 1/4 cup sugar for 10 minutes, stirring occasionally. Remove the pot from the heat, then add 8 fresh basil leaves. Pour the mixture into a blender (or use an immersion blender) and blend until smooth. Pour the mixture into a glass measuring cup (for easy pouring) and pour into the molds evenly. Let cool to room temperature. Freeze overnight.

Let me know if you try them out or do something different! I'm thinking about trying a strawberry-basil one next...

Playing Around with Paletas: A Popsicle Recipe

Thursday, June 23, 2016

A Strawberry Tequila Shrub: A Refreshing Change of a Cocktail

Well, folks, summer is finally upon us. I've been spending a lot of it with friends and family so far, hence the temporary disappearance and lack of CAF-related writing (although I've done a little freshening up—like the new header...).

It's been fun, but the burn to write never leaves me. This morning's to-do list of house-cleaning and laundry is being ditched.  I concocted the most delicious summer cocktail the other day, and I have to write about it. I can fold laundry later, damn it—while sipping a strawberry tequila shrub.

Remember when I wrote about making a strawberry shrub last summer? (If not, you will find the post HERE, then click the link that connects to the Bon Appétit recipe and make one! It's easy!) Well, I made a batch for a spring party we went to, and the leftover bit has been staring me in the face every time I open the fridge.

The other afternoon I couldn't take it anymore, and I mixed up 1 oz. reposado tequila and 1 1/2 oz. strawberry shrub over ice in a Collins glass (use a highball if you don't have a Collins), then topped it off with 6 oz. ginger ale and garnished it with half a strawberry.

Oh, happy day, it worked! Fruity and zingy with that tequila bite. Delightful. Refreshing. A perfect drink for a hot summer day.

Even the dog was happy with it.

Strawberry Tequila Shrub cocktail

Give it a try. I think you will be happy you did.

Tuesday, February 9, 2016

Put Some Blueberries On It!: Learning to Make Green Salads with Fruit

I have always been a fan of blueberries, ever since I was a kid.  Even after I threw up blueberry pancakes in the back of our Volkswagon Beetle when I was four years old, my love for those little suckers didn't fade.  When we moved to Pennsylvania and settled into a home right smack in some woods full of blueberry bushes, I thought I had died and gone to heaven.  It might have taken an hour to fill a measly cup with those tiny berries, but I didn't care.  I had blueberries in my backyard.

As an adult, they are still my go-to berry. I use the dried wild ones in my scones. Frozen blueberries  get tossed into my random smoothie.  And I buy a package every week to top off my plain Greek yogurt.

But you want to know what I've gotten really into lately?

Blueberries go great on salad!

You got it! Salads. SO yummy.  Their little bursts of sweet, and sometimes tart, flavor add such wonderful contrast to the pungent flavors of shallots or red onion and a sprinkle of gorgonzola or feta cheese.  And the juice they release blends wonderfully with a simple olive oil and vinegar dressing.  Simply drizzle your salad with olive oil first and toss the greens to coat them, then sprinkle on a bit of good balsamic vinegar, a pinch of kosher salt, and a few grinds of fresh cracked black pepper.  Toss again, and you've got an absolutely delicious salad that is super healthy, thanks to blueberry's super antioxidant powers.  

Give it a shot and let me know what you think! Have another weird salad topping of choice? Send us a comment and let us all know!

Wednesday, November 11, 2015

A French Apple Tart Recipe for My American Veterans

Happy Veterans Day, family, friends, and strangers alike! Thank you, THANK YOU for your service to this great country of ours. Let us all be sure to pause today to think on both the emotional and physical sacrifices that millions have made to provide a homeland of peace for all of us.

In honor of our selfless men and women of service, I thought I would share with you the apple tart that I made for my parents a few days ago (how on earth did apples become associated with American pride?). It's a tarte tatin, really, not an apple pie—an apple tart made by caramelizing apples in sugar and butter and then plopping a pie crust on top and baking it. This is my I-kind-of-remember-how-this-goes version. I tend to do that a lot when I travel and cook. So this may not be the official French way of preparing it. But it was still pretty damn good.

You are going to want to make the pie crust first. While it is chilling in the fridge, you can peel and cut up the apples and get the caramel and caramelization going. So, first, here's the recipe for the dough:

Dough Ingredients and Directions:
  • 1 1/4 cups (6 1/4 oz.) all-purpose flour
  • 1/2 tsp. salt
  • 1 Tblsp. sugar
  • 10 Tblsps. unsalted butter (1 1/4 sticks)
  • 3 Tblsp. ice cold vodka
  • 1 Tblsp. ice water

1.  In a food processor, combine only 3/4 cups all-purpose flour, salt, and the sugar, then pulse together with a few 1-second pulses to blend. Drop in the cold butter, cut into 1/4-in. slices, and process for about 10 seconds. The mixture will look like curds the size of cottage cheese. Scrape down the sides and the bottom and redistribute the mixture evenly around the bowl. Sprinkle the remaining flour over the top, then pulse about 5 or 6 more times. The dough will come together into a ball, and then redistribute itself around the bowl. Dump the mixture into a medium bowl.

2.  Mix together the vodka and ice water. Sprinkle the dough with the mixture, then take a rubber spatula and start smashing, folding, and flattening the vodka-water into the dough, pressing the spatula down into the dough to help mix in the liquid. It's going to look like it's not going to do anything at first; just give it time and keep flipping, smashing, folding, and pressing; it will get there. The dough is going to resemble Playdough when you are done. (If it looks too dry, sprinkle in the tiniest amount of ice water--like 1/2 tsp. at a time).

3.  Gather the dough into a ball, then dump it onto a square of plastic wrap. Lay another piece of plastic on top, then flatten the ball into a 4-inch disc. Wrap it tightly in plastic wrap and lay it in the fridge for at least 45 minutes.

Now, preheat the oven to 375°.

For the apples and caramel: 
  • 3 medium to large apples, peeled, cored, and cut into 8 wedges (I use one of these to make it easy, then I just trim away any of the tough core bits left)
  • 1/2 cup (1 stick or 8 tablespoons) unsalted butter
  • 1/2 cup brown sugar, packed
  • 1/2 cup white sugar
  • ground cinnamon
  • a couple pinches of kosher salt
1.  To a 10 to 12-inch skillet with relatively straight sides, add both the sugars and the butter.  Place on a burner and turn the heat on to medium to medium-low, depending on your burner.  Stir constantly with a wooden spoon until the sugar and butter have melted and are completely combined.  This takes awhile, but be patient; you don't want the butter separating.  Let the caramel slowly bubble for a couple minutes as you continue stirring.

2.  Place the apple slices on top of the caramel, nestling them into the sugar mixture, making two concentric rings.  Sprinkle with two pinches of kosher salt and a heavy dose of ground cinnamon.  Let the mixture bubble for a couple minutes together while you roll out the dough.

caramel apple tarte tatin

best pie dough ever!


3.  Roll out the dough on a floured surface to be just barely bigger than the skillet.  Wrap the dough around the rolling pin to make it easier to move (use a metal spatula or bench scraper if necessary to get it up off the counter), then unroll the dough on top of the apples.  Tuck the edges of the dough down into the caramel sauce.

4.  Place the skillet in the oven and bake for 35-40 minutes, depending on your oven.  You want a nicely browned crust.

golden brown crust

5.  Let the tart cool in the skillet on a wire rack.  If you flip it too soon, the caramel will still be too warm and will run off the tart.  When it is cool and you are ready to dive in, take a small rubber spatula, wet it, then run it around the edge of the skillet, loosening the crust and caramel.  Now take your plate or platter, lay it upside down over the top of the skillet, hold the pan and plate together like you would a sandwich, and then—FLIP!

tarte tatin

See? Ridiculously simple.  If you are terrified of pie crust or are in a terrible rush, buy a pack of Pillsbury, for heaven's sake.  But this dessert is just TOO easy to not make.  And yummyyyyyyyyy.

tarte tatin with vanilla ice cream

Have a wonderful holiday, all!


Tuesday, October 6, 2015

How to Compose Yourself (and Your Salad)!: A Composed Salad Recipe with Baby Arugula, Red Pear and Shallot

I used to laugh at that term—a composed salad—when I was a kid.  Personification would kick in, and all I could think of was a salad sitting up straight and tall, eyes downcast, hands in her lap, waiting with great grace for her turn to be eaten.

Salads are not my favorite thing to make.  I like to eat them, but I struggle with being too impatient to put one together at the end of meal prep; I just want to eat.

Thank God for those little boxes of organic lettuces and leaves.  I know they are more expensive, but 1) they are organic, 2) I don't have to rinse any damn leaves, and 3) I don't have to chop any damn leaves.  The only thing I'm left to do is cut up some tomato and cucumber, and I can call it a day.

And the-e-e-e-en there's my husband.  Salad creation is his specialty.  He reminds me of Jonathan in the old '80s movie, Splash, who gets fired for being too artistic with his pizza-making.  That's Chef Reiton.  His salads are gorgeous.  And he looks so relaxed making them.  I bang away at the cutting board to hurry up and get it done, and he stands and meditavely slices and minces and slivers and chops.  It makes me jealous.

So the other night I determined: I was going to make a killer salad.  Not the tossed green salads I always make.  No.  I was going to make a composed salad.  A little work of art on a salad plate.

I took three ingredients:

  • a red pear with the flower blossom end sliced off and discarded
  • baby arugula
  • a small shallot, peeled, with the root end trimmed

With my mandoline on the thinnest setting, I sliced the red pear crosswise into circles until I started to hit the seeds (about half the pear).  Next I sliced the shallot into circles.

Now came the composing: 
  1. I lay the pear slices in a ring on the salad plate, overlapping the edges a bit.
  2. I placed a nice little mound of baby arugula in the center of the ring.
  3. I sprinkled the little shaved rings of shallot on top of the arugula mound. 
That was it.  To dress it I sprinkled it with a little bit of olive oil, a little bit of balsamic vinegar, a few grinds of fresh black pepper, and a teensy bit of kosher salt.

The result? GOR-GEOUS!!!!

And it took, like, 2 minutes to make! AND it was delicious! 

a composed salad with red pear, arugula and shallots

I think I may have found my new favorite thing to create! Folks, get ready for some serious salad composure! 

Sunday, October 4, 2015

Figs with Bleu Cheese and Pecans: A Fancy Schmancy but Easy Peasy Appetizer Recipe

It's fig season, people!!! Woohoooo!

Regardless of this article my brother sent me recently from Knowledge Nuts, I love fresh figs.  Second only to a warm, heavy peach dripping with juice, figs are probably my favorite fruit.  They are exquisite, if you've never had one.  Exotic.  Sensual. Bite into one and you will understand why the Renaissance painters used them in their paintings to allude to sex.

And they were $3.99 at the grocery store the other day! Imagine! $3.99 for nine plump little parcels of heaven.

I snatched up a package and a wedge of good bleu cheese, then came home and created a little appetizer to nibble in front of the fire with Chef Reiton while our chicken finished its roasting:

appetizer of figs with bleu cheese and pecans

They're pretty, aren't they? If you want an appetizer to impress that takes a whole 10 minutes to prepare from start to finish, try these out.  Here's what you've got to do (adjust quantities to suit your party size.  I used 4 whole figs for the 2 of us):

Ingredients:

  • fresh figs, halved through the stem so you've got a little "handle" to pick them up with
  • good bleu cheese
  • pecan halves

To prepare:


Heat your oven to 400° OR you can toast these if you have a toaster oven.

Lay the figs on a foil or parchment-lined cookie sheet.  I used the little pan that fits in our toaster oven.

With a butter knife and your finger, place a tiny plop of bleu cheese on top of each fig half.  You don't need much; bleu cheese is very pungent.  The size of two really big peas is a good amount.

Gently press a pecan half on top of the bleu cheese on each fig.

Roast or toast your figs for about 4 minutes.  The nuts will be toasty and the cheese bubbly.

Let them cool a minute, then plate and serve warm.

Give them a try and let me know what you think! I think you might be surprised by the wonderful mix of flavors and textures.  Soft figs with crunchy pecans.  Sweet and toasty and salty and earthy.  Delightful!

appetizer of blue cheese and pecans

Friday, October 2, 2015

Brandied Peaches and Cream at Midnight: Learning the Magic of Maceration (with Liquor)

I have a new Italian grandma.

Her name is Paula, and she lives next door.  I had the absolute pleasure of hanging out with her and her daughter, Annette, and their family this past weekend.  Derrick and I were taking out the trash (with wine glasses in hand—I know...), when they called over the fence and said to bring our wine glasses and come on over to sit by the fire!

Am I ever glad we said 'yes.'  First off, I could have only dreamed that we would have next door neighbors as nice as they.  I mean, they are the kind of people that are just genuine, you know? Nobody will ever be able to replace our Trevinos, but Paula and Annette and Justin and James look like they are certainly going to give them a run for their money.

Secondly,—well, let's just get back to Paula.  She absolutely warmed my heart.  I think I could sit and talk to her for hours.  In the 15 minutes that we were alone together conversing, I felt like I got a glimpse into an extraordinary life lived by a woman with a strength that most of us could only hope to have.  I can't wait to get to know her better.  And to cook with her...  I hear her arancini are to die for.

There are many more reasons I'm glad we said 'yes' to the fire invitation, but the one that relates the most to why I'm writing you all is because that night Paula handed me a bag of peaches picked from a very special tree in their backyard.  Yes, HOMEGROWN peaches.  Holy tamole! She told me that they were a little hard, yet, and to give them a few days...

Well, I did, and yesterday I decided that they were ready to be eaten.  TODAY.  Chef Reiton had a Chicago trip that would have him leaving just before dinner and not coming home until close to midnight, so we decided to do like we did when were dating and have a midnight dinner.  We made a big batch of chili to simmer for hours on the stove while he would be working, and while he was gone, I hatched a secret peachy dessert plan and took Paula's peaches and made this:

chopped peaces in brandy with whipped ricotta cheese and Greek yogurt

There they are, waiting in the fridge.  I'm calling my little dessert creation brandied peaches and cream, but there's not a drop of cream in there.  The "cream" is really whole milk ricotta cheese and Greek yogurt whisked together until the mixture is silky smooth (no sugar added).  The peaches I cut up really small then macerated them for a couple hours with a drizzle of organic honey, a sprinkle of nutmeg, a teensy pinch of salt, and a splash of brandy.  Then I just layered everything in little juice glasses and topped each of them with a sprig o' mint.

brandied peaches and cream

Chef Reiton and I really liked the results.  The "cream" mixture was nice and smooth and creamy.  The peaches were just peachy! But there are a few things we decided would make it even better:
  1. Use a little more Greek yogurt and a little less ricotta to get a bit more tang.  So maybe instead of doing equal parts of 1:1, maybe do 2:1.  And I could have added a couple drops of vanilla for some flavor.
  2. I plated these after only a couple hours of maceration.  Allowing the fruit to macerate for a much longer time and plating them closer to serving time would make the fruit taste that much better and keep the yummy brandied juices more evenly distributed throughout the dish as you are eating it, instead of having them settle to the bottom and only getting the best at the last...
  3. This dessert would work with lots of fruits.  I've got some raspberries in the fridge right now.  Those would be awesome.  Strawberries? Heck, yeah.  Blueberries.  Blackberries.  Plums.  Oh, man... Change the spice sprinkle to suit the fruit, and you are good to go!
  4. Another cheese to try? Mascarpone.  That's got the silk and tang going for it already.  Blend the mascarpone and yogurt in equal parts? Hmm...
Give it a try! And if you don't have brandy or honey to macerate the fruit in, try using some brown sugar to get a bit of that caramel-y flavor involved.  Yummy!

And now I am off to continue getting this little house set-up.  I want Paula to come over...

Friday, August 7, 2015

A Mel-on a Good Time!: A Kitchen Gadget Video Demonstration

Chef Reiton spoils me rotten.  Like, really.

He just got home two hours ago and handed me a bottle of Johnny Walker Bluuuuuuuuuuuue. 

I KNOW.
- - - - - - - - - - -
CUT TO:

INT. RACHAEL AND DERRICK'S DINING ROOM

We see RACHAEL standing with a group of friends who all stare at RACHAEL in disbelief as she pulls a bottle of Johnny Walker Blue out of her liquor cabinet.  RACHAEL looks sheepish as she begins to pour drinks. 

RACHAEL
                                                     (almost whining)
All I said was that I was really getting into whiskies... 

- - - - - - - - - - -

So.  Anyone want to come over?

Because then we can pull out the previous gift he gave me, too!


Any takers?

Oh, wait... Gotta run! Someone's at the door!

Thursday, August 6, 2015

A Pimm's Strawberry Shrub: Two Worlds Collided

I've recently discovered the delight of a shrub.  Not the bushy kind.  Oh, no.  No, the alcoholic kind.

Once again, my educator has been Bon Appétit with their rather practical article for the dog days of summer.  I was drawn to the shrub recipe because I had a pound of organic strawberries dangerously close to moving from glorious to gross, so before you could say "shrub, spritzes, and swizzles" ten times fast, I had this going on the stove:

Simmering strawberries for a strawberry shrub.

A little bit of water, a little bit of sugar, and that pound of strawberries simmering away.  It wasn't 15 minutes later that I had this:

Strawberry shrub before straining

Can't you just smell it? Oh, if you have never cooked strawberries, you must.  They smell fake, they smell so good.  (I tried grilling them the other night.  Chopped them up and put them on vanilla gelato.... Not bad. Smoky strawberries are quite interesting!)

These berries were cooled, strained, and then mixed with a bit of vinegar.  The result? A shrub, a.k.a. an elixir to be blended into an intoxicating beverage.

Strawberry shrub

The first concoction I made with my shrub was a blend of the shrub (duh), citron vodka, and club soda.  Refreshing.  Dangerously so.  And just so damn pretty.

Last night I decided to play, and so I muddled a slice of lemon with an ounce of shrub in the bottom of a glass, added an ounce of Pimm's, threw in some ice cubes, then topped it with about 4 oz. of club soda (you could do more or less, depending on how strong you want your drink) and stirred until well chilled.  The result?

A Pimm's Shrub

A Pimm's Shrub, at your service.  Tastes like bubbly flavored tea.

(Now I've got "Two Worlds Collide" by INXS playing in my head...)

Sunday, September 1, 2013

A Slice of Summer: The Last Fresh Peach Pie Recipe You Will Ever Need

If there is one thing above all others that I miss most about PA (besides my family), it is without a doubt the peaches.

Not many people realize that Pennsylvania's orchards are loaded with peaches, not just apples, and they are the biggest, juiciest, most peachy peaches I have ever tasted.  Granted, I have never eaten a Georgia peach off the tree—but the Georgia store peaches I have had have never compared to Pennsylvania's huge, warm, tree-ripened beauties that I ate as a kid.

With the summer coming to an end here in good ol' Wisconsin, I can't help but find myself longing for peach juice running down my arm and my tastebuds screaming with peach-induced happiness. I've tried peaches a couple times from a couple of sources this summer, and they were all awful.  Pulpy. Foamy. Dry. Flavorless. Hard. Gag.

And then the other day I was sitting beside a co-worker as she was biting into a delicious-looking specimen.  "Where did you get that?" I asked, rather intensely.

"Piggly Wiggly," she slurped.

Guess where I stopped on the way home? And, wowzers, were they good! Still not up to PA snuff, but so so so much better than anything I've had for years.

So, today, when our friends Joe and Marie invited us over for dinner at the last minute (as only good friends do), the first thought that popped into my head was: PEACH PIE!!!

I based my recipe off of Cook's Illustrated's Foolproof Pie Crust and their Fresh Strawberry Pie. Chef Reiton helped whip the crust together (and I really do mean "whip." It takes less than 5 minutes to make, then it just chills, gets rolled out, and then chills in the pie plate a little bit longer while the oven heats.).  I prepped peaches for the glaze and the filling, my mouth watering all the while.

If you are lucky enough to have amazing peaches available, make yourself a treat this weekend.  Make yourself a fresh peach pie:


Shell Ingredients and Directions:

1 1/4 cups (6 1/4 oz.) all-purpose flour
1/2 tsp. salt
1 Tblsp. sugar
10 Tblsps. unsalted butter (1 1/4 sticks)
3 Tblsp. cold vodka
1 Tblsp. ice water

In a food processor, combine only 3/4 cups all-purpose flour, salt, and the sugar, then pulse together with a few 1-second pulses to blend.  Drop in the cold butter, cut into 1/4-in. slices, and process for about 10 seconds.  The mixture will look like curds the size of cottage cheese.  Scrape down the sides and the bottom and redistribute the mixture evenly around the bowl.  Sprinkle the remaining flour over the top, then pulse about 5 or 6 more times.  The dough will come together into a ball, and then redistribute itself around the bowl.  Dump the mixture into a medium bowl.  

Mix together the vodka and ice water.  Sprinkle the dough with the mixture, then take a rubber spatula and start smashing, folding, and flattening the vodka-water into the dough, pressing the spatula down into the dough to help mix in the liquid.  It's going to look like it's not going to do anything at first; just give it time and keep flipping, smashing, folding, and pressing; it will get there.  The dough is going to resemble Playdough when you are done. (If it looks too dry, sprinkle in the tiniest amount of ice water--like 1/2 tsp. at a time).  Gather the dough into a ball, then dump it onto a square of plastic wrap.  Lay another piece of plastic on top, then flatten the ball into a 4-inch disc.  Wrap it tightly in plastic wrap and lay it in the fridge for at least 45 minutes (you can do this up to 2 days in advance).

Meanwhile, make your peach filling:

8 large ripe peaches (your thumb should readily sink into the flesh when you squeeze the peach)
1/4 tsp. salt
3/4 cup. sugar
2 Tblsp. cornstarch
1 1/2 tsp. No Sugar Sure-Jell (pink box)
1 Tblsp. fresh squeeze lemon juice

Halve the peaches, then peel and pit them.  Cut each half into four wedges, then cut each wedge into 6 chunks.  Weigh out about 14 oz. (about 2 cups) of the peach chunks, then puree them in the food processor until they are completely smooth and juiced with no little chunks (a random big chunk or two is okay, as long as the rest is totally smooth). You will need 1 3/4 cups of puree when you are done for the glaze.  You may have to adjust this a bit.  The rest of the peaches you can cover and put in the fridge.

In a medium saucepan, whisk the sugar, salt, cornstarch, and Sure-Jell.  Whisk in the peach puree, then heat the mixture over medium-high heat, stirring constantly (really be careful to scrape the edges and corners of the pan so it doesn't scorch), until it comes to a full boil.  Boil for 2 minutes, stirring constantly.  You will see the glaze turn from opaque to translucent.  Take it off the heat, then stir in the lemon juice.  Let it cool completely.

Now go back to your pie crust: heat the oven to 425 degrees.   Have a rolling pin, aluminum foil, pie plate, pie weights (use a bag of dried beans of you don't have ceramic beads) and a piece of aluminum foil ready.  Take the dough out of the fridge, generously flour the countertop, and plop your dough disc in the middle of it.  Flour your rolling pin, then roll your dough out to about 12 in. in diameter, flouring your rolling pin as needed.  (To roll evenly, start each roll in the center and press with even pressure as your roll to an edge.  Always roll two opposite sides one after the other.  For example, if I roll straight up, then I roll down next.  If I roll to the right, then I roll to the left. If I roll to 2 o'clock, I roll to 8 o'clock next.  Get my drift?) When your dough is evenly rolled out, place your rolling pin about 3 inches from the dough's edge, flip the edge up over the top of the rolling pin, then roll the pin backwards, wrapping the dough around the pin as you roll.  Use a bench scraper to help work the dough up off the counter if it sticks at all.  Take your pie plate, place the dough-wrapped rolling pin at an edge of the plate, and unroll the dough into the pie plate.  Adjust the positioning if you need to, then gently ease and press the dough down into the plate.  Refrigerate the plate for about 30 minutes to firm up the dough again (you can skip this step if you are really short on time, but the constant refrigeration keeps the butter chunks hard and will make your dough much flakier at baking).

Take a pair of scissors and trim the excess crust to about 1 inch of the edge of the pie plate.  (It is always better to have a bigger edge than less, so be careful not to get too close to the edge of the plate.)  Take the excess and flip it under itself, working your way around the plate.  Now press the edge down in whatever decorative pattern you want.  You can use the tines of a fork; you can push it down with your thumb at intervals; you can squish it with a knuckle on your right hand into the crevice of your left hand's pinched thumb and pointer finger.  Get creative.  Now prick all over the bottom and sides of the dough with a fork; this helps air escape that is going to heat and try to bubble up in and under the dough.  Put the crust in the fridge to firm up for about 15 minutes, then take the aluminum foil, gently press it into the pie plate, and dump in the weights.  Place the crust in the oven for 15 minutes.  Carefully remove the foil and weights, prick any bubbles that have formed with a fork, and continue baking the crust for another 5-10 minutes until the crust is nice and golden.  Cool it completely on a wire rack.

By this point your glaze should be cool.  Take the rest of the peaches out of the fridge, and dump them into the glaze, folding to coat every piece with your amazing homemade concoction.  Pour the filling into your cooled pie crust, then put the whole pie in the fridge.  Let it firm up for at least 2 hours, but no more than 5.  The CI guys say it will start affecting the crust at that point.  They also say to eat it all right away.  Darn.

Cut the pie into large slices, serve with freshly whipped cream, and savor those peaches as long as your will power possibly can.

Monday, August 19, 2013

An Experimental Recipe for Bob and Jerry: Mini Blueberry-Lemon Cakes

To start off this post, I must begin with: BOB AND JERRY, YOU ARE the BEST!!!

I walked into my little middle school library this morning, ready to help Bob and Jerry move some bookshelves—and they were done! I immediately yelled for no one to hear, "You guys are AWESOME!" and plunked the cake carrier I had in my hand down on the floor to survey their work.  They literally left nothing else for me to move.  Every other item on my floor plan, besides the bookshelves, had not only been put into place but thoroughly cleaned.  I'm telling you, school custodians ROCK.

So, what was in the cake carrier I had set on the floor? An experiment that came to mind a few days ago while I was at the grocery store, gazing at the plums.  They were on sale, and after making that frickin' amazing semifreddo for our anniversary party, plums have become my new friend.  I bought two, along with some peaches, blueberries, and blackberries.

Later that evening, as I was thinking of meeting Bob and Jerry and wanting to bake them something to thank them, I had this idea: what if I made little mini pound cakes in muffin tins, and what if I took slices of plum and laid them in the muffin tins first before I put in the batter, so that when I inverted the pan, I had this luscious slice of fruit on top of a golden, buttery cake?

In the book Ratio by Michael Ruhlman that I am reading (I told you it was going to come up again), he has a recipe for pound cake.  I decided to use that and then tweak it to include the fruit.   I love baking his way because he has you weigh almost everything.  I even weighed the eggs! If you don't have a kitchen scale, yet, you must acquire one.  Once you own one, you will not know what you did without it.  You can get a good one that does both grams and ounces and has a tare key (so you can weigh things in a bowl without accounting for the weight of the bowl) for under $25 on Amazon.

Anyway, with pound cake, the fat, flour, eggs, and sugar are all equal parts.  Easy squeezy to remember.  It's called pound cake because you used to use a pound of each ingredient to make the cake! That's a lot of pound cake.  So here's what I did (mildly adapted, once again) with Ruhlman's guidance:

1) While I heated the oven to 325 degrees, I gathered all of my ingredients and weighed them out or prepped them.


I buttered (with real butter) one nonstick muffin tin at this point, too.


Interestingly, Ruhlman says that allowing a finished batter to sit releases the air that you just beat into it, so you want it to go into the pan as soon as you are done beating it—hence buttering now and NOT later.

Here are the ingredients:
  • 8 oz. (2 sticks) of unsalted butter at room temperature (ideally between 65 and 70 degrees.  Never knew that before! I actually stuck a digital thermometer in it to check! Ha!)
  • 8 oz. sugar
  • 1 tsp. kosher salt
  • 8 oz. eggs, which is about 4 large eggs plus 1 yolk, also at room temperature (I cracked them into the bowl and allowed them to come to room temperature), whisked lightly to combine (which I forgot to do and it was okay)
  • zest of 1 lemon
  • 1 Tblsp. of lemon juice from that lemon
  • 1 tsp. vanilla
  • 8 oz. flour
  • 72 blueberries
  • ground cinnamon
2) Now I loaded the muffin tin: in each cup I dropped 6 blueberries then sprinkled a dash of ground cinnamon on top of them.


3) With the oven hot and everything ready to go, I now made the batter.  (Note: I use a KitchenAid stand mixer which uses a paddle.  This mixer is incredibly efficient and knocks the socks off of any hand or stand mixer that you can buy.  Again, I know they are pricey, but if you can get one, or get people to pool Christmas/birthday money together to buy you one, BEG for one.  They will change the way you cook, I swear.  Anyway, because of its power and efficiency, the times I am listing will be different, i.e. longer, if you are using a regular mixer.)
  • for 1 minute -- beat the butter on MEDIUM speed
  • for 2-3 minutes -- add the sugar and salt to the butter and beat it all together on MEDIUM-HIGH until the coloring is very pale yellow and the butter mixture has grown in volume about a third
  • for 1 minute-ish -- add the eggs slowly so they blend well into the butter mixture
  • add the lemon juice, zest, and vanilla and mix in well
  • turn the mixer down to MEDIUM-LOW and add the flour, mixing only long enough to blend the flour in--which isn't very long
That's it.  Ruhlman doesn't say anything about scraping down the sides, but I stopped the mixer a few times to do so, and then ran it again to make sure everything was mixed together well.


4) Using a number 40 ice cream scoop (I use this all the time to portion out dough and batter), I plopped a heaping scoop of batter into each cup, smoothed the tops a bit, then put the tin in the oven.


I baked them for 25 minutes, let them cool in the pan on a wire rack for 5 minutes, then inverted them out onto a cutting board.


Will I be doing this again? YES.  These babies are firm but tender, bright from the lemon and blueberries, buttery and eggy and just perfectly sweet.

But I'll try it a bit differently next time.  What I had wanted was to be able to flip these out of the muffin tin and serve them bottoms up.  I put too much batter in the cups, though, so the tops were mounded; they didn't lay flat upside down.  I need to use less batter next time.

And—did you notice? I used blueberries instead of the plums that I had mentioned. (The plums I bought weren't looking as pretty as I wanted when I sliced one open.)  Next time I'll try it with plums with a different spice and see how that goes.

So happy with these, though.  As I bit into the first one and began to chew, I felt a big smile start to spread across my face...

Friday, July 26, 2013

Summer Food Fabulousness—and Tips on Making Granita

A few months ago, my sister bought Chef Reiton and I a subscription to Bon Appétit magazine.  I started getting it near the end of the school year, and I have to admit that the first few issues lay rather neglected on the bedside table (albeit with covers longingly looked at briefly every night as I fell into bed).  I was just too busy and too tired to find the time to read them.  (You all knew that already, though--hence my long periods of silence in which you all wait with baited breath for the next post...ha ha ha.)

Gratefully, the school year ended.

The day before I left to go on yet another trip this summer, the July issue, the Grilling Issue, arrived in my mailbox.  One of my musts when I fly anywhere is to buy myself a magazine to read on the flight.  Normally I do this in the airport.  It's a fun little ritual of mine to search among the wall of magazines and find one that I have wanted to subscribe to but am too cheap to spend the $25 a year to do so.  

But as I pulled BA-July out of the mailbox, I immediately knew that my ritual was going to hell.  The magazine I wanted to read was right here in my hands.  The glossy paper of the cover added a juicy effect to the extreme close-up shot of red hot chicken skewers laid across the page, delicately sprinkled with lacy cilantro leaves and torn bits of basil.  My mouth watered.  I didn't even have to open the magazine to know that that delightful little entree was going to be mine as soon as I could possibly make it.

I continued flipping.  And drooling.  An article on frozen desserts flashed past my eyes: sherbert, popsicles, semifreddo.  And there were those chicken kebabs again, surrounded by other grilled chicken recipes: beer canned.  Smoked.  Spatchcocked?  Dear God... Is this what this magazine would do to me? Why had I waited so long???

So.  Upon return from my travels, I immediately made the Sambal Chicken Skewers for Michael and I (minus the fish sauce--I didn't have any, and have never cooked well with it when I have had it, so I just substituted soy sauce, much to the chagrin of many out there, I am sure.  Sorry.  Still want to make it? Click on the recipe name to link to BA's online recipe.)


Shortly thereafter we had Chef Reiton's family over for dinner, and so we made them some smoked spatchcocked chicken,


baby potato salad (using tarragon as our herb of choice, instead of chives),


avocado and tangerine salad with jalapeno vinaigrette (thank you, Jack Johnson. Can I come out to visit and cook with you?), 


The process for making a granita is amazingly simple.  So simple that I'm embarrassed it took me so many years to actually make one, despite the fact that I had wanted to for so long.  There are only two steps, really.

Step 1) Puree your fruit of choice, sugar, liqueur, lemon juice, and salt in a blender, then pour the puree into a mesh strainer held over a 9x13" pan.  Smash and stir the puree through the strainer with a big rubber spatula and into the pan; soon all you will have left in the strainer are seeds and/or fiber.  

(BA used 4 cups of fruit, 1/2 cup of sugar, 1 Tblsp. of liqueur, and 1 Tblsp. of lemon juice.  I'm not sure if those rations are going to work equally with all fruits, but that's what I'm going to try the next time. Keep in mind, as well, that the liqueur used here was creme de cassis (about 40 proof).  My guess is that you wouldn't want to go with anything much higher in alcohol content or you might mess with the freezing temperature too much.  No vodka, okay (which usually starts at about 80 proof)?

To help, below is a shot of the actual blackberries getting sieved, but the picture below that shows what it looks like after (I had done the same process with some raspberries).  And for a vocab lesson: this is the technique discussed when you read that you are to be "pressing on the solids."  (I always wondered what the hell that meant until I poured the puree into the strainer and it just sat there, dripping drop by drop into the pan, and I thought, "This is going to take all night!")


Step 2) Smooth the top of the fruit mixture in the pan so that it is evenly distributed (you want the mixture to freeze evenly), then put the pan in the freezer at a level position for 30 minutes.  After half an hour, take it out, scrape all the frozen parts with a fork to break up the ice, then put it back in the freezer for another 30 minutes.  Do this about 4 times (depending on the temperature of your freezer).

 Just so you can have an idea of what to expect things to look like, here's what the granita looked like after scraping #1:


scraping #2:


scraping #3:


and scraping #4, the final one with the granita being all flaky and frosty, ready to be covered and put back in the freezer until it was ready to serve.  YUM.


With that rash of cooking done, all from the BA-July edition, and with all of it being simple and delicious, we decided to make a few more items from it for our month-belated anniversary party (can you believe it? Time flies when you are having fun!)

 First was the snap pea and cabbage slaw, which multiple people asked for the recipe for:


and next was the plum semifreddo, which I did not get pictures of because it was served in the middle of the party, but here is a picture of the gorgeous plums, simmering away before being pureed, pressed through the seive, then folded into a heavenly blend of glossy meringue and whipped cream before being frozen: 


 Oh, divinely, heavenly food.  Ben Franklin was wrong: it is beer AND food that lets us know God loves us.  And God bless Bon Appetit for tempting us to make it!
Related Posts Plugin for WordPress, Blogger...

Visit Me on Pinterest!