Friday, December 16, 2016

The Spritz Cookie: A Marvel of Speed-Baking

Yesterday I decided that we needed more Christmas cookies.

[laughter and applause]

No, but really. I was having memories of all the dear, little, old ladies at my church who used to make this amazing smorgasbord of cookies unlike anything I'd ever seen in my life. The cookies were for a gathering after our church's annual Christmas talent show, a show where Mrs. Wilson always read the "12 Days of Christmas" love-letter series (HYSTERICAL; it was largely her reading of them that made them so). I always attempted to pound out a song on the piano, usually becoming so shy that I just went back to my pew and didn't play; and Mr. Hammaker, I think it was, would always play a song or two on his harmonica. It was an event that I looked forward to every year as a child, and the cookies—the cookies were a huge part of why. Screw dreams of sugar plums. My little head was full of my old ladies' cookies.

I cannot even begin to recall the names of the creations that covered those tables in my church basement, but I can still envision them: snowy meringues that shattered then dissolved into magical, sweet nothingness in your mouth. Mini wreaths, gooey-yet-crispity, dyed brilliantly green then dotted with cinnamon candies. Buttery sugar cookies with little dollops of ruby jam. Chocolate pinwheels. Tiny logs rolled in nuts. And then there were the spritz cookies.

These little guys were oddly my favorite. Small, unassuming but ADORBS. They were made from a simple butter and sugar dough that was pressed through a disc of a particular design and then baked. Christmas trees. Hearts. Snowflakes. Stars. They were so simple. Naked, without any glitz or glamor. They were dyed some delightfully obnoxious colors, though—a thrill that only kids can understand. I loved them.

Fast forward to about five years ago when I found an old cookie press at Goodwill...

And now fast forward to yesterday, with me digging out the old press, the gel food dye, and the KitchenAid. I was on a mission.

Not only are spritz cookies delish, they are so fast and so easy. Seriously. You can crank out a good five dozen cookies in no time flat. In the middle of my making them, I was inspired to share them with you, so I snapped a few pictures and took a few iPhone videos. Don't laugh. They aren't the best quality; but I think you will get a picture of why they are just so awesome. Need tons of Christmas cookies for school or church? Here you go!

The press itself has changed over time. I now see them in the form of a gun. I don't have that one nor have I ever used one. I'm assuming that it perfectly portions out the dough, which would be nice, but I have to assume that the angle would be quite uncomfortable after a single batch of squeezing out dough.

The old press, as you can (kind-of, not really) see in the picture below, is simply a tube fitted with a pressing plate which is attached to a threaded rod which is attached to a knob. It has a detachable cap that holds an exchangeable design plate. Here I've obviously used the tree plate:

The Spritz Cookie: A Marvel of Speed-Baking

To fill the tube, you remove the cap; "unscrew" the pressing plate so that it backs out of and "opens" the tube; fill the tube with dough; then screw the cap (with the design plate attached) back onto the tube. You give a few twists to the knob to get the plate to start pushing the dough—and you are ready to twist out your cookies.

Here's a picture of the tube filled with dough:


Here I have attached the desired design plate inside the cap (drop it in and twist it to lock it into place) and screwed the cap onto the tube.


Here is a short video showing how I twist the knob to get the dough press started, then how the cookies squeeze out as I turn the knob. I only turn mine about a quarter turn for each cookie.


You can see how easy it is! The cookie sheets are ungreased, so the sticky dough just glues itself to the metal. For the rare time when it does want to lift off and doesn't stick, you can see that I just placed the press back on the sheet, gave another tiny turn of the knob, and it stuck!

Ready for some massive quantities of Christmas baking? The spritz is it! Speed bake away! The recipe is easily found online. I got mine from the old Wisconsin Electric Company Christmas Cooky Cookbook. You can find their 2016 copy as a PDF file here. The Christmas Wreath cookie recipe listed uses a similar base dough that I used; however, I (obviously) did not make or use the pecan filling or the candied cherries, though. I just did plain and simple.


Have a wonderful time in the kitchen, folks, and Merry Christmas to you all!

Tuesday, December 13, 2016

The Ulu Factory's Ulu Knife: The Tiny-Chopping Love of My Life!

It's Christmas season, folks! A lot of you readers have been getting pounded with snow. So far, not out here in Boston. Just a dusting here or there. Still, it's been enough to get one in the Christmas-y mood, and so Chef Reiton and I dug out the old, "secret," family Christmas cookie recipes this weekend and baked up a storm.

The house smelled like browned butter and chocolate as we cranked out batch after batch of fudge ripples, pinwheels, palmiers, peppermint kisses. Chef Reiton's favorite? Pecan dainties.

(Insert a moaning sigh HERE)...pecan dainties. I had never even heard of them until Chef Reiton sent me a Christmas cookie tin eight Christmases ago, a token act that definitely caught my attention—and a piece of my heart (okay, and my stomach. My two friends and I ate almost the entire tinful in one sitting...). Nestled among an insane variety of cookie types were these tiny shortbread rounds, perfectly smeared with brown butter icing and sprinkled with a dusting of tinily chopped pecans. They literally melted in my mouth.

Pecan Dainties, the Christmas cookie of your dreams

Now, eight Christmases later, I was standing in our kitchen (happy sigh), preparing the pecans to be sprinkled so daintily atop the brown butter icing Chef Reiton was preparing at the stove.

I have to admit, chopping nuts is NOT something I have ever enjoyed doing. The results are always just so--unsatisfactory. Yes, I have a "chopper" (the hand-powered Pampered Chef contraption), but it is hard to get even chopping sometimes with it. A food processor either blasts nuts to powdery bits or leaves unusable, large chunks. And as for chopping nuts on a cutting board with a chef's knife? You might as well just grab a handful of nuts and throw them across the kitchen. Not much else happens in such an exercise.

As I stood staring at the bag of pecans, determining which undesirable chopping method I preferred, I suddenly thought, "The ulu knife!!!" (Two seconds later I heard Chef Reiton say, "You know, the blade might be good for chopping the pecans..." We tend to do that a LOT.)

So, what the hell are we talking about?

A number of years ago, my mother-in-law traveled to Alaska and returned with a gift that, since, I don't know how I ever lived without in my kitchen. It's called an ulu knife. It is an ancient Alaskan tool, essentially a curved blade with a handle. The Alaskans once used it for everything, from scraping seal hides to cutting meat.

While I have never used mine to scrape hides, I have used it to chop a LOT, especially herbs. Mom Reiton also gave us a bowl that is specially designed to be used with an ulu. It holds your ingredient in place while you rock the blade back and forth over the food, meaning you don't have to touch the herbs or garlic or whatever as you are chopping them (avoiding getting "little green things" all over your hands, as Chef Reiton once said in regards to chopping cilantro).

Now I could use it to avoid shooting nuts across my kitchen! Hallelujah!

I wish you could have seen it; it was a nut-chopping experience that was mind-blowing, truly. Not only did the nuts happily stay in place, but the rocking motion of the blade in the bowl created the ideal ratio of minced nuts to micro-minced nuts, giving the pecan dainties the perfect balance of pecan flavor and toothsome crunch.

The Ulu Factory's ulu knife and chopping board set

Glory be, now my nut-chopping days are forever changed, thanks to The Ulu Factory! If you want to order the set that Mom Reiton got us, click the image below. We have the 7 1/4" bowl with the 6" blade, but they have other sets, too.

The Ulu Factory's bowl and 6" blade set

Can you believe it? Your unhappy nut-shooting days are over! It will be the best $32 purchase you have ever made. Promise! And don't forget Christmas is right around the corner...the ulu set could make a kitchen-changing gift for your favorite person.

Many happy Christmas cookie-baking days to you all!

XOXO,
Rachael

Tuesday, December 6, 2016

The Corpse Reviver #4: A Suze-Q of a Cocktail

It's amusing to me that the food world, like the fashion world, seems to follow trends. If you are at all with the times, rose gold is the color to be wearing, and bourbon is the liquor to be drinking.

I've always been one who says, "Screw the fads!" and goes with what I like, fad or not. (And, therefore, I am not one to trust when it comes to fashion sense. Like, at all.)

But when it comes to cocktails, I do pay attention to what is rising on the trend horizon. And one liqueur that I am starting to see more and more is a delightful, golden concoction called Suze.

Suze is a bitter liqueur made from gentian root. It is highlighter-yellow in color and has been made by the Swiss since 1889. Suze has a sharp, earthy aroma. A sip of this pungent beverage starts sweetly but ends with a dry, tongue-tingling, bitter finish. Meant to be drunk as an apertif (sipped before dinner to stimulate the appetite), it is also used in the crafting of cocktails.

Upon tasting it the first time, Chef Reiton declared, "This reminds me of Campari!" And then I saw the wheels start turning...

What those wheels cranked out was a riff on the Corpse Reviver #3, with Suze replacing the Campari and tequila going in for the brandy—a delightfully bitter but somehow light and refreshing cocktail.

The Corpse Reviver #4: A Suze-Q of a Cocktail by Derrick Reiton

So here she is for you, folks: the Corpse Reviver #4, crafted by Chef Derrick Reiton:

In a cocktail shaker, combine equal parts Suze, Cointreau (or other clear orange-based liqueur), and reposado tequila with a half part freshly squeeze lemon juice (we tend to go larger with 1 ounce of each liqueur and 1/2 ounce of lemon juice, but you can go smaller, if you wish).

Fill the shaker at least halfway with ice, then shake like mad until the outside of the shaker is frosty and your hand is going numb, about 30 seconds. Strain through a fine-mesh strainer into a (preferably chilled) cocktail glass (this is called "double straining"). No garnish needed.

ENJOY.

Monday, November 21, 2016

Grain-Free Italian Wedding Soup: A Simple Winter Meal

I find it funny that I recently posted about how much I love to grocery shop, and the post I'm writing today came about because we were so short on food the other night! It was cold, windy, dark (I am NOT used to this dark-at-4:30 crap...), and we had NO food in the house. Like, I-feel-like-a-TOTAL-slacker kind of no-food-in-the-house. Ugh.

But desperation is the mother of creativity, right?

Right.

Wide open the pantry, fridge and freezer doors were flung, followed by some shuffling and grunting, and out came:

  • 3 hot Italian sausages
  • 1 28-oz. can of whole, peeled tomatoes
  • 1/2 a zucchini
  • 6 baby bella mushrooms
  • 4 large carrots
  • 1/2 a yellow onion
  • 1 large potato
  • 6 cups of homemade beef stock (check out how to make your own here!)

Right then Chef Reiton walked into the kitchen. "Italian wedding soup?" he asked. 

BINGO.

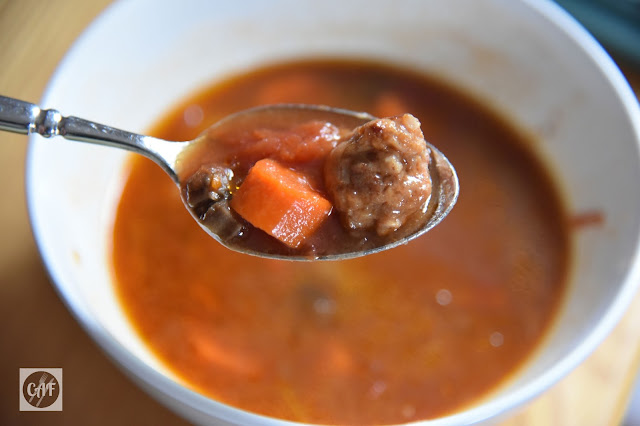
You will not believe the tastiness created by throwing these ingredients together. Not to mention, it was super easy and quick. I had it done from pulling out the ingredients to sitting down to dinner in an hour, tops. 

Don't forget: you are allowed to play. Change up the veggies to use what you have. Add pasta, if you insist (you will want to thin out the stock with some additional water, if you do). And if you want to jazz it up to another level, grate some fresh Parmesan into your bowl as a topper. 

Grain-free, gluten-free Italian wedding soup recipe

Oh, dear. Wedding or no, get ready for your diners to ask for a second bowlful!

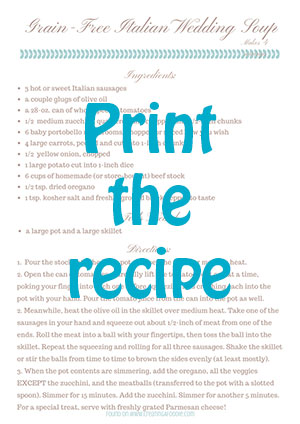
Click the recipe card below to download or print! And remember, when you've been a total slacker, don't lose faith! Just get creative!

Printable recipe card for Gluten-Free Italian Wedding Soup

Wednesday, November 16, 2016

When a Potato Isn't a Potato: The Best Mashed "Fauxtatoes" Recipe for a Paleo (or Diabetic) Thanksgiving

Many of you out there have heard of the Paleo diet, a way of eating that eliminates foods that are "new" in the agricultural evolutionary scheme of things which supposedly freak out our bodies and make a lot of weird, unhealthy crap-ola happen: potentially things like lupus, Crohn's, rheumatoid arthritis, cancer... It's been getting a lot of research, and while both sides vehemently argue its validity, I have to personally say that I have felt much, MUCH better by drastically cutting back on two of the big "no-nos" of the Paleo menu: grains of any sort and dried legumes (that includes peanuts).

Also included on some Paleo-ers "do-not-eat" list are white potatoes. I believe the argument is that the glycemic index of a white potato is quite high. With that being said, I still eat white potatoes; I just eat them a LOT less often. What I do instead is what a lot of Paleo-ers (and a lot of diabetics!) do: I make "fauxtatoes."

What the hell, you ask? 

I know. It's hokey. But here's what it is: it's cauliflower, generally steamed and then puréed to a smooth consistency to resemble mashed potatoes. 

I've been making it for several years now, and I like it. I do. But I've always been a bit annoyed with one thing (which if you've tried it, you probably know what I'm about to say): the "fauxtatoes" always come out looking a bit watery and loose. They don't have that oomph that mashed potatoes do. And I WANT that oomph. I like when they plop onto my plate, not ooze.

SO. Last night I was making fauxtatoes to accompany some chicken scallopini and sautéed Swiss chard when it suddenly hit me: why don't I try drying out my cauliflower before I purée it???

DUH.

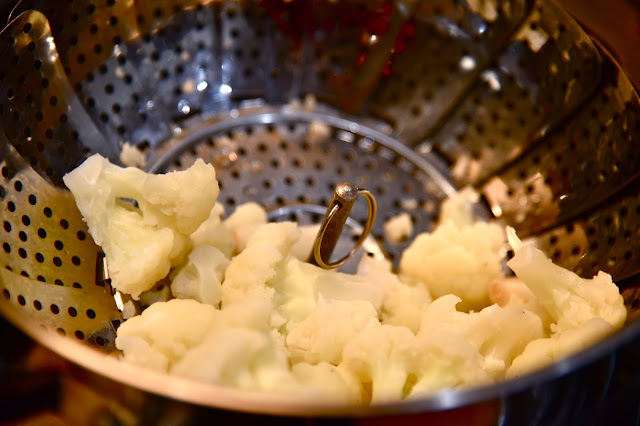
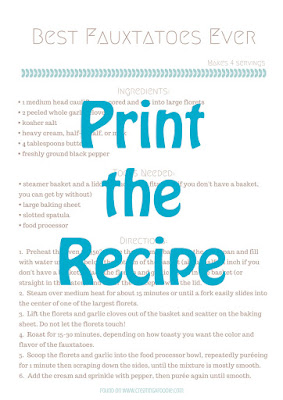
So, here's what I did: I placed my cauliflower florets (a medium-sized head, cored and cut into large florets) plus two peeled garlic cloves into a steamer basket, sprinkled them with a bit of kosher salt, and steamed them for about 15 minutes (or until I could easily slide a fork into the center of the largest piece).

Steamed cauliflower for the "fauxtatoes"

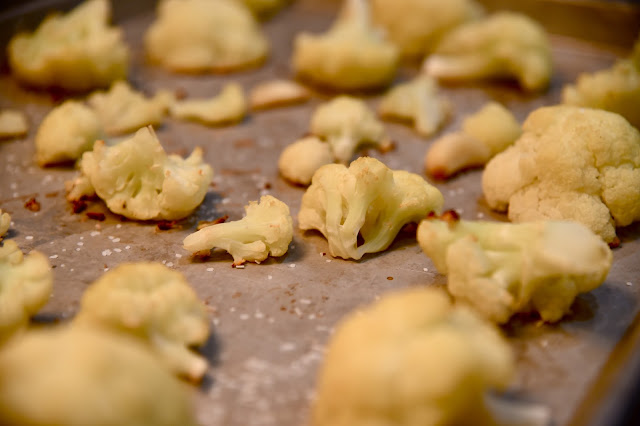
I then spread out the florets on a baking sheet, making sure to have room around each piece so that they weren't steaming each other. I sprinkled them again with a little bit of kosher salt.

Steamed cauliflower for the "fauxtatoes," ready to roast

I roasted the florets in a 350° oven for 30 minutes without tossing them until they were golden on the tops and nicely browned on the bottoms.

Roasted pre-steamed cauliflower

Then I scooped the florets and the garlic cloves into my food processor, dropped in half a stick of butter (true Paleo-ers would not use any dairy), ground in some freshly ground black pepper, and puréed for about a minute. I scraped down the sides and puréed for another minute. I kept repeating this until the mixture was almost completely smooth. I then added a tablespoon-ish splash of cream and puréed until the fauxtatoes were perfectly smooth.

Here's a glamour shot with lots of Irish butter:

The best mashed "fauxtatoes" you will eat: a puréed cauliflower recipe

When we sat down to dinner, I asked Chef Reiton if he noticed anything different. The first thing out of his mouth: "The consistency! These are like potatoes!"

YAHOOOOO! My experiment worked! But we still brainstormed things we will try next time. What if I didn't roast the florets so long? The browning definitely affected the color of the fauxtatoes, not to mention the taste. While the taste was good, we were interested in seeing what it would be like to roast them just long enough to drive off that excess water, maybe when the tops were just beginning to become brown in spots.

We also thought about eliminating the garlic. Or maybe adding a bit of sour cream instead of cream? How about some herbs? So many things to try! All will taste good, I know, but it will be fun to experiment.

SO. If you've got some diabetics coming to Thanksgiving dinner, or some Paleo eaters, give these fauxtatoes a try. They may just be the best non-potato potato you've been dreaming of! Print the recipe below, and, please, feel free to share what you think in the comments!

Happy Thanksgiving, all!

Recipe for the Best Fauxtatoes Ever!

Sunday, November 13, 2016

Make the Most of Your Food Budget: Smart Produce Shopping Tips

I have to admit it: I'm a grocery shopping junkie. I LOVE to grocery shop. Part of it is probably related to the fact that I love to cook, so it's kind-of like shopping for shoes, for me.

Yes, I'm serious. Some people treat themselves with shoes. I treat myself with food. 

SO. Where am I going with this? Well, because I spend so much time at the grocery store—AND, yes, because I am rather detail-oriented—I notice little things at the grocery...things that save me money. 

Like, produce pricing. If you have never noticed, the pricing format for fruits and veggies is not all the same, and there are ways that the grocery store prices and displays produce that could be having you spend more money on those veggies than you need to. 

So. I thought I'd pass along two tips that you can keep your eye out for when you do your next grocery shop, and maybe you'll save some money. Let's take a look:
Tip #1 - Some items are sold as "each" and some by pound. If your item is labeled as "each," buy the biggest beauty you can find. If it is sold by the pound, feel free to buy the smallest quantity you need, even if that means taking a bundle apart.
See how the fennel bulbs below are sold as $2.49/each? When I see that, I dig through the batch and choose the biggest bulb I can find.

Smart Grocery Shopping: Tips for Produce Purchases

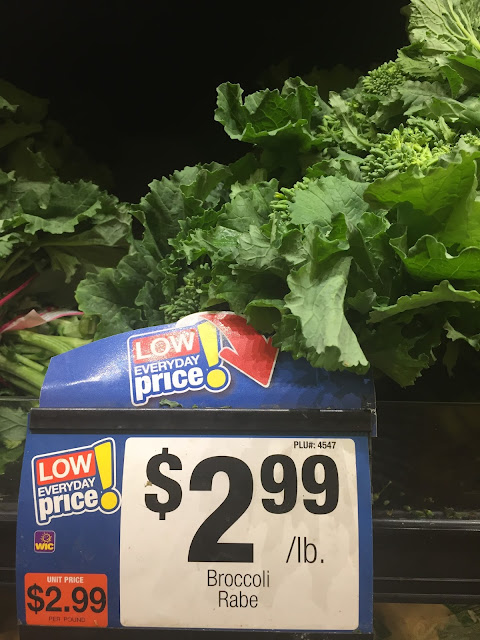
But some items are sold by pound. Check out the broccoli rabe below:

Produce priced as "by pound"

So why do I care? Well, a lot of times these items are pre-bundled with rubber bands or twisty ties, giving the impression that you need to buy the whole bundle. But the item is being sold "by the pound," which means I can portion out and purchase only the amount that I want and need, not what is being presented as a set portion. 

Shopping with this in mind can save you money and keep you from wasting a lot of produce. That honking bunch of asparagus that ends up turning to stinky mush in your fridge? Yeah. That's what I mean. 

So, here's what you do when you are shopping for that asparagus for dinner: remove the bottom rubber band from the asparagus bundle, count out 6 spears per person (for the typical serving size) and slide them out of the bunch, then replace the bottom rubber band and toss your loose asparagus in a produce bag. You will most likely find that you didn't need nearly what was in that bunch.

Let's take a look at the next tip.
Tip #2 - Similar items can be sold in different ways: bulk, pre-packaged, organic, etc. Pay attention to the pricing. Things may not be as cheap as they seem.
We go through a lot of lemons in our house. For years, I bought lemons from the bulk bin. Note the price: it's per lemon. They are large, but they also tend to be firmer, which usually means less juice.

Produce priced as "each"

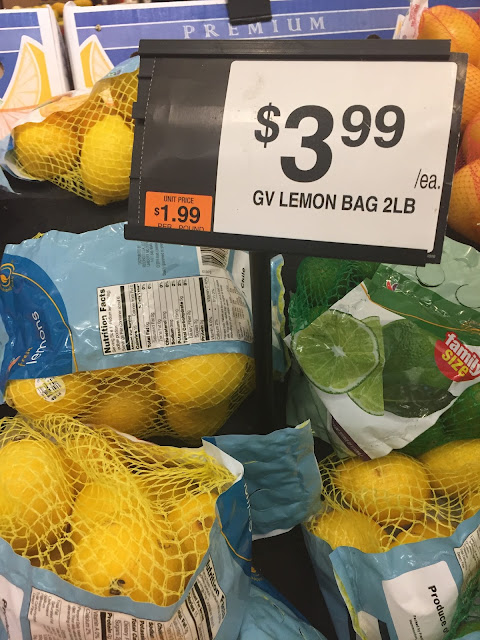
One day I happened to take a closer look at the pre-packaged lemons that I always walked past. 

Smart Grocery Shopping: Tips for Produce Purchases

What are your first thoughts? $3.99 for a bag vs. $.69 each? Hmmm... 

I'm a believer in "Don't-spend-money-to-save-money." But lemons? I go through them pretty quickly. And with closer inspection of the lemons in the bag, I found them smaller but much more plump and juicy. AND, there were TEN in a bag!

Do the math! That's $6.90 if I bought that many individually over time, but only $4.00 if I bought a bag! 

Don't get me wrong. I still check the price of the bulk lemons sold individually, just in case they are on sale. But nine times out of ten, buying the bagged lemons (or even organic once in awhile!) is much cheaper than buying them individually.

I do periodically have to remind myself: if I'm not going to actually use all those lemons (or whatever fruit/veggie I'm contemplating buying) before they go bad, it's not going to be saving me money if I'm throwing a bunch of moldy, blue lemons away. I should just buy the smaller portion instead. You just have to know your own menu and eating/cooking habits and make your own judgement from there as to how you should most wisely be purchasing your produce (which can be different from shop to shop). 

So. I hope you find these two tips useful. If you have any questions about anything, give me a shout in the comments and I'll see if I can help!

Here's to smart shopping and healthy eating!


Monday, November 7, 2016

An Old Hollywood Cocktail Party: Testing the Art of Food and Cocktail Pairing

We finally did it! (Hear me clapping?)

After years of talking about having an honest-to-goodness, old-fashioned, get-dressed-up cocktail party, we finally pulled one off. To help steer the dressing-up into a common vein, we themed the evening "Old Hollywood" and invited a smattering of our friends who love to drink great cocktails as much as we do with a glamorous, homemade invitation (love you, Paper Source! And, yes, I Photoshopped out our address!).

An Old Hollywood Cocktail Party invite

I had no idea how much our friends would get into it. One gentleman grew in a PERFECT Clark Gable mustache. His wife got a new haircut just for the party. Satin gloves, Murray's pomade, red lipstick, mink, feathers...they were everywhere! It was a scream.

A flapper ready to start the party!

A couple starlets enjoying the night

Chef Reiton could not look more dapper with his Negroni in hand

Sock garters make the outfit complete!

My husband, three hours before the party, made personalized tags for the coupe glasses with each person's initials letterpressed into the brass. (I wasn't even going to THINK about using plastic coupe glasses, are you kidding me??? I actually ordered a case of Libbey's retro coupe glasses from Webstaurantstore.com for a great price! You do have to pay shipping, but I think you will find so many amazingly cheap things on that site that you want, it won't matter! )

Personalized cocktail glass charms for each guest

The atmosphere was easy: dimmed lights, lots of candles, a fire in the fireplace, flowers everywhere, Frank Sinatra serenading.

The food and cocktails? That, my friends, took some serious research. We had to plan this baby out. I didn't want to have a cocktail party that ended with me worrying about people driving home completely sloshed. I did want to have a cocktail party that was memorable and delicious, so here is what we did...

Thanks once again to my sister's years-old birthday gift of The Flavor Bible, Chef Reiton and I created a list of classic cocktails that we love, then I matched up the flavors in each cocktail with corresponding flavors in foods. Thanks to this amazing book, I was able to create a menu of totally old-school hors d'oeuvres that still tasted fabulous AND paired beautifully with the cocktails that we were going to be serving.

Chef Reiton then wrote a spreadsheet to figure out how much of each cocktail to make, portioning it out so everyone got to try each one but ended up only drinking about three beers' worth of alcohol over the course of the evening.

Yes, we made everything from scratch. You don't need to, but we easily prepared all of the food the day before and the day of and just threw the few hot items in the oven right before they were served (the dates and the tart). To be honest, I did get a bit mixed up once and brought the melon and tart out late. Oops. I got distracted. But the plan was mostly pulled off smoothly... So, for your amusement or guidance, here you go:

Available at Arrival: Aperol Spritzers with Everything Spice-Coated Cheddar Cheese Ball (major hit), triple-creamed bleu cheese, Sartori's rosemary asiago, a variety of crackers, figs, red pears and Macoun apples to slice, marinated olives, and chili-jelly veal and beef meatballs in the Crockpot (oh, come on...how could I not?!?!)

(When everyone arrived we explained the evening's plan, how the food and cocktails were paired, that we weren't going to get them blitzed and then send them home, that the ashtray was out on the deck, etc. And theeeeeeeeen...)

Cocktail #1: The Sidecar (NO sugar rim! Gag.) with Parsi Deviled Eggs (from The Best 150 American Recipes) and bacon-wrapped dates (buy bacon; cut the strips in half or thirds; wrap a piece around a date; spear together with a toothpick; place on a cookie sheet with space between each piece; bake in 400º oven for 20 minutes, flipping halfway through. A-MAZ-ING.)

Cocktail #2: The Last Word with prosciutto-wrapped melon slices and an apple, roasted fennel, feta and arugala tart

Cocktail #3: Sage Brown Derby with chicken liver pate and crostinis and Mini Frittatas with Wild Mushrooms (also from The Best 150...)

Cocktail #4: Negroni with Cheddar Walnut Crisps and Sweet and Spicy Nuts (both from The Best 150... Great cookbook, I'm telling you!)

Cocktail #5: The Aviation with cucumber sandwiches with hummus on rye

Cocktail #6: Corpse Reviver #3 with lime-mint guac and salt-and-peppered pita toasts

Cocktail #7: Brandy Alexander with flourless chocolate cake (from Baked) and Brown Butter Dream Cookies (from...you guessed it: The Best 150...).

What an evening! The laughter! The food love! The new friendships made! I can see why people used to throw these parties all the time! Although we don't have the Hollywood budget to do this too too often, I know for sure that we will be doing this again!

Cheers, dah-lings!!!

Friday, October 14, 2016

Taberna — Old Montreal, Quebec, Canada — A Restaurant Recommendation

Well, it's been a week since Chef Reiton and I got back from a little trip we took up to Montreal. It's a quick five-hour drive from Boston, and after a different vacation plan fell through, we decided to take advantage of the city's close proximity to us and go for a visit across the border.

I have to admit, I was a smidge nervous. People I talked to beforehand kept asking, "How's your French? Everyone speaks French up there, you know..." HA! After not using it at all, despite the two years of classes in high school and a year in college, I could barely remember how to say "bonjour," much less piece together an actual sentence. And, honestly, the thought of losing the ability to easily communicate with those who were going to be around me for four days made me a little anxious. How was this trip going to go?

If I had had any idea of who we would meet within minutes of arriving in Montreal and the comfort he would give us in exploring his gorgeous city, I would have not spent the entire drive north frantically rehearsing how to say in French, "My name is Rachael. I speak a little French. I studied a little in school."

After hours of driving through the Northeast's burgeoning brilliance of fall color, Chef Reiton and I finally arrived in Old Montreal—and we were STARVING. We parked our car and dumped our bags at the loft we had rented, then headed down the street, looking for a restaurant that was open for lunch, me silently repeating "Bonjour!" over and over again in my head.

ENTER: Maxime and his absolutely delightful restaurant, Taberna.

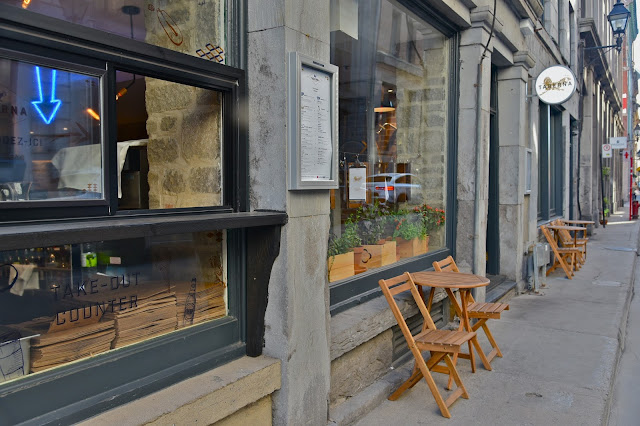
Outside Taberna in Old Montreal, Canada

The menus at Taberna in Old Montreal, Canada

Greeted at the door by a kind, smiling face and a "Bonjour! Hello!," I immediately let out a little sigh. We apparently had "TOURIST" written all across our faces. No matter. At least it eased my fear of bumbling my way through my long-forgotten French. We were immediately led past a service counter boasting a tower of delicious-looking pastries, past the open kitchen where food was being prepared, to a small table sitting in the light of the front window. My chair was graciously pulled out for me by our host (!), and we settled in for our first meal in Montreal.

What to order? It was difficult to decide. Every single item on the small menu (presented on mini clipboards) sounded delicious: piri-piri chicken, Portuguese charcuterie, croquettes, spicy grilled sausages, sardines and shrimp. And the wine list! Vinho verde—my new favorite white wine!

A few minutes later, our host returned to continue service as our waiter. He set a bowl piled with marinated olives and almonds down on the table, and then, in the most perfect French accent I had ever heard, answered Chef Reiton's question that, yes, the restaurant was Portuguese and modeled after a typical Portuguese tavern. The owner wanted to share the amazing food and warmth of his homeland with all, so he created Taberna, complete with stone walls, warm yet modern lighting and furniture, and painted wood floors.

Following a habit that I always practice, I asked our waiter his name. It was Maxime. We introduced ourselves as well and chatted about where he was from, where we were from, and what we should do while we were visiting. He then guided us through the menu a bit, took our wine order, and stepped away.

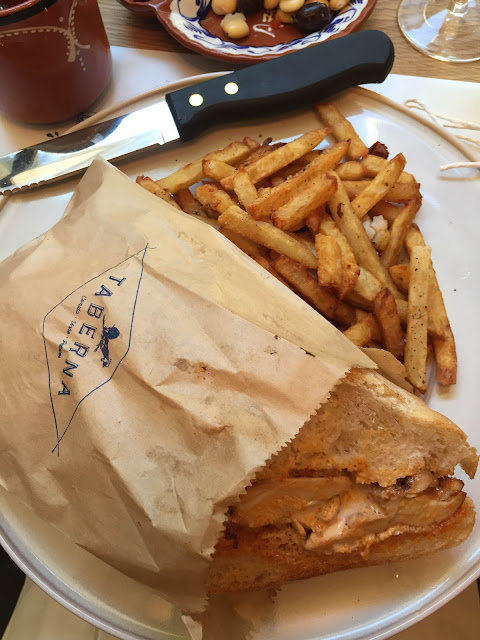
After intense but brief speculation due to our hunger pangs, Chef Reiton decided to ordered the piri-piri chicken with the 50/50 (a small salad AND fries!) and I, the piri-piri chicken sandwich with the 50/50. Having never heard of, let alone tasted, piri-piri, we were anxious to give it a shot. It was a type of pepper sauce used as a seasoning, and it sounded delicious.

Boy, was it EVER: spiced more than spicy and perfectly seasoned (although Maxime did bring Chef Reiton a little pot of a more spicy piri-piri). The salad was the most gorgeous side salad I had ever seen or tasted. Grilled peppers and squashes were scattered across the freshest of lettuces and jewel-like grape tomatoes. It was almost too pretty to eat. Even the fries were fantastic. It was plain to see and taste that the owner had not only crafted and fine-tuned a menu he loved, but the staff had likewise poured his love for his country into the food. 

Piri-piri chicken sandwich at Taberna in Old Montreal, Canada

Piri-piri chicken at Taberna in Old Montreal, Canada

As we wiped the crumbs from our hands and mouths onto our empty plates, Maxime came by and asked if we would like dessert—possibly a pastéis de natas, a Portuguese pastry?

Ohhhhhh, we would love to, but we were too full, we told Maxime. Maybe we would come back later to grab one when we had room. Maxime smiled as he cleared our plates away. Moments later he returned, the check in one hand and a bag in the other. "On me," he said. "I want you to have some." Inside were two still-warm pastéis.

Oh, world, that gesture, that kindness! We could not thank him enough—for everything. For the conversation. For such a wonderful meal. For his generosity. We told him that we would be back. And after biting into the pastéis that evening, I knew I had to go back, just to let him know how absolutely divine those pastries were.

A pastéis de natas from Taberna in Old Montreal, Canada

The next morning we walked by Taberna on the way to breakfast. Maxime was out front, cleaning up the storefront. We called to him and trotted across the cobblestone street, extolling the divinity of the pastéis as we did so. A huge smile broke out on Maxime's face. He was so happy we enjoyed them so much. How we were doing? he asked. What had we done the day before? What were we up to today? He gave us a few more suggestions of what we could do and a big smile before sending us on our way.

And that was how every morning went. Maxime and his smile became our morning's ritual. On the last day we stopped by to say good-bye—and to buy some pastéis for the road. Maxime handed us our bag of pastries, then came out from around the counter with another bag—and a hug.

Taberna and Maxime are now lodged into my memory as a food experience that will never be forgotten. They have made Montreal not just a city to visit but a place where I can feel at home. That's not an easy feat for any host to do, let alone a restaurant.

But for Taberna, well—you'll see.

Taberna in Old Montreal, Canada

Wednesday, September 28, 2016

Creating a Foodie Travel Guides: Restaurant Recommendations

It's a blustery day here in Boston—a perfect kind of day to spend an afternoon in the kitchen, baking up some classic pound cake for a dinner party tonight with my amazing family and a dear friend. The house smells like butter, eggs and sugar, thanks to Rose Levy Beranbaum and her Cake Bible. Its warm aroma and the sound of the wind outside are christening the house with homey hints of the seasons to come...

Speaking of seasons to come, most of us do a bit of traveling over the holidays, and I have taken another step at helping you fellow foodies do what you love to do best: EAT. I find that I just don't have the time to write a post about all of the restaurants that I've been to and loved—both here at home and on the road—so I've started a Travel Guides section! Woohoo! 

You can find the tab to CAF's Travel Guides located right under the header here:

Creating A Foodie Travel Guides are here: restaurant recommendations

The main page lists the cities alphabetically. Click on a city to view "calling cards" for each restaurant that I absolutely LOVED in that city (sorry, mediocre restaurants. You must become worthy...). I provide the address and a mini description of what to expect for each one. If you click on a restaurant's "card," you will be taken to the restaurant's website or its Facebook page.

I hope you find it useful. It's definitely in the beginning stages, and there is a bit of a backlog...

Here's to safe travels and fabulous eating!

Wednesday, September 7, 2016

Playing Around with Paletas: A Peach-Basil Popsicle Recipe

What a summer this has been! For those of you who visit often, you've gathered that I've been a bit out of my usual loop these past few months. I would make excuses, but I can't because I've had so much fun this summer that my excuses would be a farce. I've missed writing, but I certainly have not missed my family and friends. It's been a summer to make up some seriously lost time, and I've had a blast.

One of my favorite events this summer was having Michael come visit twice! I love cooking for him again when he is back, and this second summer visit from him prompted me to buy something that I have been wanting to buy in a long, LONG time: namely, a popsicle mold. 

I know, I know... How old am I? (cough) Do I have small children? (NO.) 

It's just...every time the heat of summer rolls around and I see photographs of frosty, melty, fruity paletas (i.e. Spanish for "popsicles," kind-of), I have this longing to pureé a bunch of fruit and make some myself.

The only problem? I have never been able to find a popsicle mold that suits my tastes, and I've been SUPER picky about what I want in one. It must:
  • be easy to clean
  • be BPA-free
  • use popsicle sticks that can get accidentally tossed/lost and not ruin the entire set
  • be warp-free
  • be easy to freeze without making a huge mess of my freezer
  • be the classic popsicle shape
Some of you are probably wondering how on earth I ever found my husband if my laundry list for a POPSICLE MOLD is this stringent.

Well. Regardless of what you may think of my picky nature, I FOUND ONE. I paid a small fortune for it, true. But I believe it is going to last me just short of forever. Check it out:

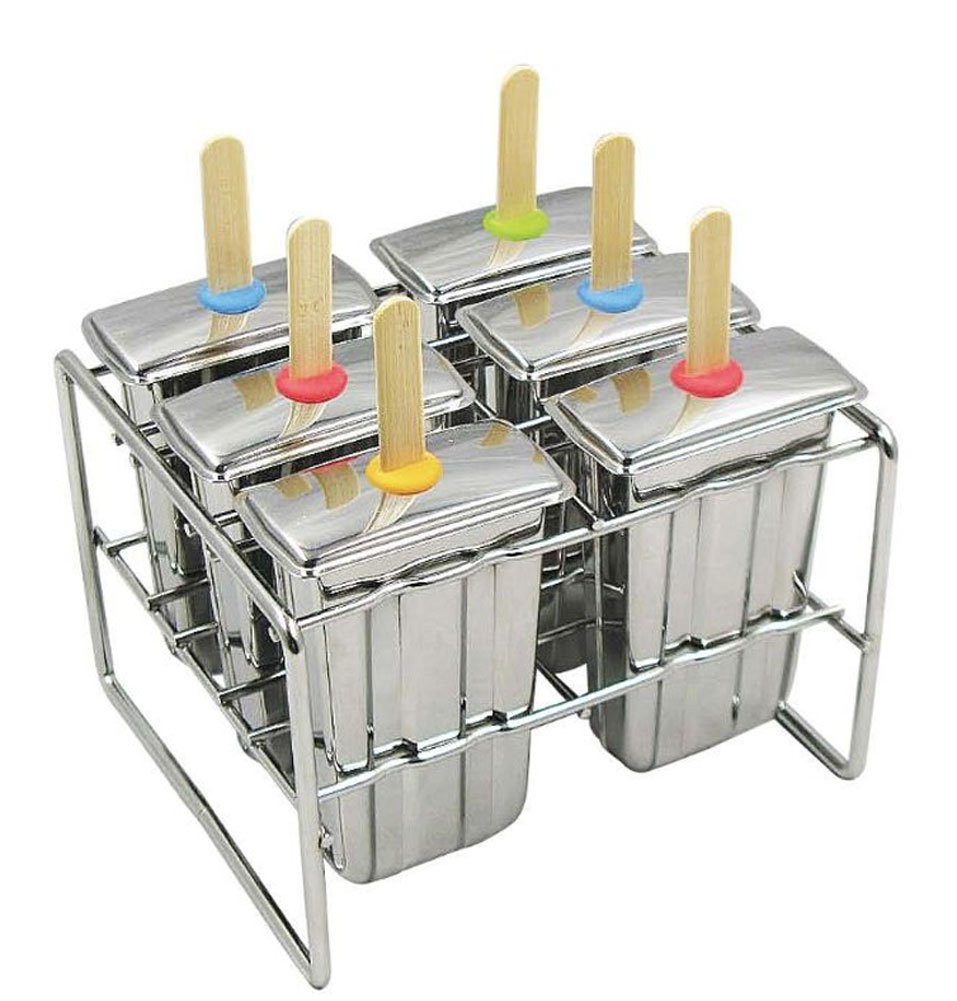
Onyx Stainless Steel Popsicle Mold Set

It's the Onyx Stainless Steel Popsicle Mold from Amazon. It currently costs about $40, but DUDE. Look at it! It's STAINLESS STEEL. It comes with its own super-stable holder. The little silicon rings in the lids hold the (included!!!) bamboo sticks perfectly in place. No crooked popsicles/too-short handles/wimpy plastic here! I am seriously in love. A mom designed it because she couldn't find the perfect popsicle mold, either. Figures. GO, MOMS!

SO. I ordered the popsicle mold, got it in the mail a few days before Michael got into town the second time, and whipped up a couple trial recipes that I concocted after reading around on the internet. NO, they were not recipes for adult-flavored popsicles. I made them from mostly fruit with yogurt or herbs and a little bit of sugar. That's it. Not even water (I hate icy ice-pops...). The blueberry-yogurt one pictured below that Chef Reiton is not sure of (and the one farther down with Marley longingly gazing on) still needs some work, but here's a quick recipe to use up those late summer peaches and basil that are still hanging on—a recipe for peach-basil paletas that got the family approval!

Playing Around with Paletas: A Popsicle Recipe

Peach-Basil Paletas (makes 6 pops or 2 cups of pureé):

Peel 4 medium ripe peaches with a paring knife and cut them into chunks. Place the peach chunks into a small pot and simmer them with 1/4 cup sugar for 10 minutes, stirring occasionally. Remove the pot from the heat, then add 8 fresh basil leaves. Pour the mixture into a blender (or use an immersion blender) and blend until smooth. Pour the mixture into a glass measuring cup (for easy pouring) and pour into the molds evenly. Let cool to room temperature. Freeze overnight.

Let me know if you try them out or do something different! I'm thinking about trying a strawberry-basil one next...

Playing Around with Paletas: A Popsicle Recipe

Thursday, June 30, 2016

How to Make Homemade Croutons

I will be the first to declare you a big, fat liar if you say this has never happened to you: you buy (or bake!) a delicious loaf of Italian/French/rye/whatever bread to top off your yummy homemade dinner—only to be left with a hunk of quickly staling bread the next day...

If you are like me, the thought of throwing it away makes you partially wither inside. Bread, considering it is basically flour and water, is SO HARD to throw away. Those memories of last night's dinner, when it was warm and soft...

And now? Huh. You could make French toast, but it's the middle of the week, and who has time for that except on weekends? You could freeze it, but frozen bread always gets weird.

Soooooo.... What do you do?

Make homemade croutons, baby! It takes five minutes to prep while the oven is warming, and in 45 minutes you can have toasty, crispity, delicious croutons for FREE. Who wants croutons out of a box when you can have these???

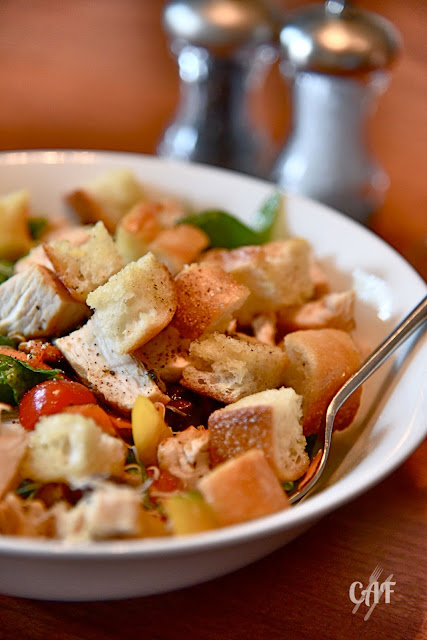
How to make homemade croutons from stale bread

I know, right???

And they are ridiculously easy to make. Here's how I do it, BUT (everyone say it with me) you can do it however the hell you want. It's not going to make a life-changing difference. Swears.

Ingredients:

  • hunk or slices of bread of any sort
  • olive oil
  • kosher salt
  • dried herbs, fresh ground black pepper, spices (optional)

Tools You Will Need:
  • a large-ish bowl, a large cookie sheet, a serrated (the one with teeth) knife, a cutting board, a metal spatula

Steps to Make:

1.  Preheat your oven to 275° F.

2.  As your oven is heating up, cut your bread into slices. I do mine about an inch thick. If you like smaller croutons, slice thinner. Then take each piece, lay it flat, and slice lengthwise and then across so that you now have bread cubes. Try to make them all relatively the same size.

3.  Dump the bread cubes in the bowl. Pour several really good glugs of olive oil into the bowl over the bread cubes. Sprinkle on the kosher salt and any additional flavors you want to add, then get in there with your hands and toss, toss, toss! You really want to make sure that all the cubes are really well-coated.

(NOTE: The amount of oil used is going to depend on the amount of bread cubes you have and how much you personally want to coat your cubes. I like to really coat mine well. I find the flavor to be better if the cubes have a good soaking of oil. You may feel differently. Try it out and see what you think. No matter what you do, they are going to taste great.)

4.  Pour the cubes out onto the baking sheet, and spread them out into an even layer with some space between them. Pop them in the oven and set the timer for 20 minutes (for smaller croutons, set it for 10). When the timer goes off, give them a toss with the metal spatula to flip them over. Shake them back into an even layer, then toast them for another 20 minutes. Larger croutons are probably going to be done at this point. If you are doing smaller croutons in 10-minute intervals, you are probably going to want to do three (3) 10-minute intervals. Just test them with a good ol' bite-test to see if they are as crispy as you desire.

Let them cool on the baking sheet on a wire rack, then seal them up in a Ziploc bag with the air squeezed out. They will remain nice and crunchy for quite awhile...

Hope you enjoy them! Store-bought ones don't even compare...

Monday, June 27, 2016

Ginger-Lime Shrimp (and a Lesson in "Deveining")

There are so many things I love about living on the ocean, but I have to say that one of the best things is the insanely fresh seafood that I can get at a seafood shop that is on the way home from picking up Captain Reiton at the airport.

The first time I went into this restaurant/shop—Belle Isle Seafood—I (somehow? There are only signs EVERYWHERE) didn't notice that they only take cash. When I went to pay with my CREDIT CARD, the girl very graciously explained that she was unable to accept it as a form of payment—this being after a five minute conversation about how much I loved living here after being in the Midwest for so long, and blah blah blah....

So, being embarrassed but being me, I made fun of myself and then asked her if she could just keep my salmon in the case and I would run back later with cash to pick it up. To this she responded (and I quote):
"Oh, no, just take it with you. You can just pay later."

Am I serious??? Yes, I'm serious.  This is the kind of town I live in. It's small. People trust you, or they will kick your ass. And I love it.

So. As I was saying: I also love the seafood, so the other night I bought a pound of fresh shrimp at Belle Isle to sauté up for dinner.  Being fresh, the shrimp weren't processed like they are when you buy them frozen or from the seafood case at the grocery store. That meant they simply had their heads cut off, and that was it. They still had their little legs. Their full, unsplit shells. Their little poopy intestine down the center of their back...

So I shelled them. Ripped off their little legs. And then—I discovered the BEST way to "devein" the shrimp!!! 

(Why is it called "deveining," by the way? It's an intestine, NOT a vein. Are they afraid to call it "de-pooping" a shrimp? Because that is what you are doing, really...)

Now, here's the problem that I've always had about shrimp that I have bought frozen that have been deveined: in the processing of the shrimp, they are practically butterflied. They are sliced open the whole way down their spine so that they flay open when they cook.

I don't want shrimp that look like butterflies on my plate. I want shrimp that look like shrimp on my plate, damn it. Appearance is very much a big deal to me when it comes to cooking, and I have always found it so unattractive to be eating shrimp that look like they've been attacked by the SNL Samurai.

SO. As I was finishing peeling and de-legging my shrimp, I wondered if I really had to slice a shrimp the entire way down it's spine to devein it...

I took a paring knife, inserted the tip blade-up into the middle of the shrimp "neck," so to speak, and sliced upwards, making about a quarter-inch long cut.  Now I could see the poop tract laying right there...

I reached in with my fingertips, grabbed the end of the "vein," and very gently but firmly pulled...

VOILA!!! It slid out! The whole thing! I had an entire shrimp in my left hand and an intestine dangling from my right! No flaying necessary!

Now I had perfectly whole, beautiful shrimp, ready to be marinated and sautéed for dinner. 

And speaking of dinner, wowzers, have I got a shrimp dish that will knock your socks off. I very slightly adapted it from Melissa Joulwan's cookbook, Well Fed. If you are looking for flavorful but easy and fast, this is it. 

If you are in a super rush, make the marinade first before you deal with your shrimp, then toss your shrimp into the marinade bowl as you clean them up. Then, as your shrimp are marinating for 20 minutes or so, you can get the rest of your sides together. Shrimp only take a few minutes to cook completely, so depending on your sides, you could have dinner on the table in about 45 minutes, from start to chow-time.

As I've pointed out with so many recipes lately, use the quantities and ingredients you have. You do NOT need to follow ingredients and measurements here exactly. It will still taste good, I promise. But here's what I used:

Ingredients for 2-3 people:
  • 1 lb. of fresh shrimp, shelled completely and "deveined" (I also give them a rinse)
  • juice from 2 juicy limes (smooth skin, heavy, feel squishy)
  • fresh ginger root, peeled and finely grated on a zester or minced up, about 1 1/2-in. worth
  • a jalapeño, seeded and minced, or a tsp. of crushed red pepper flakes
  • 3 peeled garlic cloves, finely grated on a zester or minced
  • about a quarter cup of minced cilantro
  • 1/2 tsp. kosher salt
  • 1/4 tsp. freshly ground pepper
  • 2 Tblsp. olive oil

Steps to Make:

1.  Combine the lime juice, ginger root, jalapeño or flakes, garlic, cilantro, salt and pepper in a medium bowl and whisk together with a fork. Drizzle in the olive oil and whisk rapidly to blend with the juice mixture. This is your marinade.

2.  Add the shrimp to the marinade and toss really, really well. Cover the bowl with plastic wrap and stick in the fridge for 20-30 minutes but nor really any more than 45 minutes. The lime juice will cook the shrimp. Really.

3. When your sides for dinner are almost done, heat up a large skillet on the stove on medium-high. When it is nice and hot, dump the entire contents of the bowl into the skillet. Shake the skillet to create a single even layer of shrimp. Cook for about two minutes. You will see the shrimp turning pink and starting to curl. Stir the shrimp to blend them with the sauce and to flip them onto their other side (you might need to help some of them a little). Shake the pan to make your even layer again, and cook for another 2 minutes or so.

4. Platter the shrimp and garnish with some cilantro fronds or torn cilantro leaves.


That's it! Super fast. Super easy. Super delicious! You could also skewer the shrimp and grill them, too... YUM.

Word of advice: just don't overcook them. Fresh shrimp are so tender. I had no idea. If you cook them too long, they will get rubbery and weird. Don't panic about the short cooking time. If the shrimp is all pink and curling, it's DONE.

And I promise to make something shrimpy this week and video the whole de-pooping for you...

*UPDATE: I made the video! Click here to read a more descriptive post on how to devein shrimp and to watch the video

Sunday, June 26, 2016

The Baldwin & Sons Trading Company — Woburn, MA — A Restaurant Recommendation

NOTE TO READER: The following letter is private. It is addressed to the new bar/love of my life. However, due to the nature of its delivery, I guess I am going to have to let you read it. 

Actually, please DO read it. It just may change your life forever, as well...


~          ~          ~          ~          ~          ~          ~          ~          ~

My dearest Baldwin & Sons,

I know we only met last night, but like Romeo and Juliet, one meeting is all it appears to have taken for you to become, in my book—how shall I put it?

IT.

As Shakespeare so astutely says, so will I:

How do I love thee?
Let me count the ways...

So, here we go:

Reason #1 - You are beautiful.  I know that sounds incredibly shallow, but let's be honest: no one ever is immediately struck in a GOOD way with how ugly something is. Unless it is cute-ugly. Which you are not. You are striking. Well-kempt. Hip but classy. Well-balanced. Golden. Shall I keep going?...

The Baldwin & Sons Trading Company in Woburn, MA

Reason #2 - You are kind.  See? I'm not all about the looks. In fact, I believe I have to say that your kindness is more attractive than your beauty. (It's just that I didn't know it at first, and I'm going in order of occurrence.) Your genuine interest in my husband and I upon our meeting was rare in an establishment. We weren't just clients last night; we were friends. (Am I making you blush, yet?)

Reason #3 - You serve wickedly outstanding Sichuan dishes.  And as we all know, Sichuan is hot.  Enough said.

Reason #4 - Nika.  She corresponds about reservations and other such related matters at all hours of the day or night. Who ever heard of a bar hostess doing such a thing??? I actually forwarded her notes to my husband before we even met and said, "I love these people already..." See? It was a premonition.

Reason #5 - Van.  He made me my first cocktail (see below) and then proceeded to steer the rest of my dinner-time into an experience I will not forget in a long, long time...

Reason #6 - The Trader Vic.  What an opener! A Mai Tai that shook my notion of Mai Tais to its very foundations!

Reason #7 - The Southern Belle.  Can I just say that this was a revelation as to why I need to make cinnamon syrup TODAY??? She is a cocktail that is exactly as Van designed her to be: soft and demurely sweet but who can most certainly hold her own.

Reason #8 - Mick.  He quotes The Princess Bride.  Instant soul-attraction.

Reason #9 - You are generous. 

The Baldwin & Sons Trading Company menu, Woburn, Massachusetts

Reason #10 - The Prescription Sour.  Oh, glory be... Rum and scotch together? Who knew? (Sigh.)

Reason #11 - Patrick.  He, like Van, is a master. Truly, truly a master.  I could just watch and watch and watch...

Pouring a masterpiece at The Baldwin & Sons Trading Company in Woburn, MA

Reason #12 - The Baldwin Apple Revised.  Everything about her was so sweetly irresistable: the foam. The little egg cup. The apple chips.  [asideThe frosting.

The Baldwin Apple Revised at The Baldwin & Sons Trading Company in Woburn, Massachusetts

Reason #13 - You are unlike any other bar I've ever met.  And I've been to a lot.  A LOT.


Reason #14 -  Tyler.  How do you not love chatting about cocktails with someone who has a beard that rivals the finest of all beards? How?

Reason #15 - Ran.  The giant behind it all is THE one to thank, I know. I mean, you all run like the finest piece of clockwork. It's amazing to behold. And to enjoy...

Reason #16 - You are perfection.  So don't change. Ever. Unless you want to add some more life-altering cocktails. Then I'm okay with that.


I hope that the evening was as enjoyable for you... When we awoke this morning, the first thing Derrick and I said to each other was, "Last night was awesome." And we were talking about YOU.

Thank you, thank you, thank you.

With many happy thoughts and fond memories, until we meet again,

Yours truly,

Rachael

Thursday, June 23, 2016

A Strawberry Tequila Shrub: A Refreshing Change of a Cocktail

Well, folks, summer is finally upon us. I've been spending a lot of it with friends and family so far, hence the temporary disappearance and lack of CAF-related writing (although I've done a little freshening up—like the new header...).

It's been fun, but the burn to write never leaves me. This morning's to-do list of house-cleaning and laundry is being ditched.  I concocted the most delicious summer cocktail the other day, and I have to write about it. I can fold laundry later, damn it—while sipping a strawberry tequila shrub.

Remember when I wrote about making a strawberry shrub last summer? (If not, you will find the post HERE, then click the link that connects to the Bon Appétit recipe and make one! It's easy!) Well, I made a batch for a spring party we went to, and the leftover bit has been staring me in the face every time I open the fridge.

The other afternoon I couldn't take it anymore, and I mixed up 1 oz. reposado tequila and 1 1/2 oz. strawberry shrub over ice in a Collins glass (use a highball if you don't have a Collins), then topped it off with 6 oz. ginger ale and garnished it with half a strawberry.

Oh, happy day, it worked! Fruity and zingy with that tequila bite. Delightful. Refreshing. A perfect drink for a hot summer day.

Even the dog was happy with it.

Strawberry Tequila Shrub cocktail

Give it a try. I think you will be happy you did.

Related Posts Plugin for WordPress, Blogger...

Visit Me on Pinterest!