Showing posts with label grain-free. Show all posts

Friday, June 22, 2018

Toast-less Avocado Toast: The Paleo Version

Food fads both fascinate and frustrate me. Being one who loves to learn anything new in the kitchen—whether it be a new taste for something or a new technique—I'm open to most (most, mind you) anything.

And so when I hear that such-and-such is so flipping good, and I see blog posts and magazine articles singing its praises, and menu after menu offering said food, I usually will give it a try. See my post on grain bowls as an example...

What frustrates me, on the other hand, is when something in the food world just gets OVERDONE. Like, there is nothing else. I see this with ingredients, flavors, techniques.

Take the word "umami," for instance. The word "umami" was first used by Kikunae Ikeda in 1908. 1908!!! But it is used now as if it is the newest and most insanely incredible taste that has ever been discovered. If I hear or read the word "umami" one more time, I'm going to take my bottle of coconut aminos and throw it out the window! (Although I do encourage you to read the "Umami" Wikipedia article for a rather fascinating explanation of its meaning.)

So when I keep reading articles about entire restaurants being dedicated to this whole avocado toast craze??? I admit, I've been rolling my eyes. Really? All you serve is toast with avocado schmeared on top and sprinkled with random crap? I mean, come on.

And then, one day last week I had nothing to eat in the kitchen except a perfectly ripe avocado...

So, this is what happened:

Avocado sprinkled with lime juice, toasted hazelnuts, olive oil, salt and pepper

Avocado. Fresh squirt of lime juice. Sprinkle of toasted hazelnuts. Drizzle of olive oil. Salt. Pepper.

My brain's response after my first dreamy, creamy bite from my spoon: DEAR GOD, THANK YOU FOR THIS FOOD.

What was I eating? I was eating a toast-less version of avocado toast, and it was divine. 

Wednesday, July 5, 2017

The Awesomeness of Dinner Leftovers: Breakfast Barbacoa with Eggs

What to do with leftover chipotle barbacoa from our amazing Latin dinner?

Breakfast barbacoa, baby.

Heat the chipotle beef in a skillet on medium with a bit of cotija (or whatever you've got) cheese sprinkled on top. Crack in a few eggs and sprinkle with kosher salt and freshly ground black pepper. Simmer away for a few minutes until the egg whites are mostly set.

chipotle barbacoa reheated in a skillet, topped with eggs and cotija cheese

Broil for a couple more minutes until whites are all white but yolks are still runny. Sprinkle with more cotija cheese and chopped cilantro and serve.

chipotle barbacoa in a skillet, topped with eggs, cotija cheese and cilantro

A gluten-free, primal, protein-packed breakfast with a kick. Dig in!

breakfast barbacoa made with leftover chipotle beef or barbacoa, cotija cheese, eggs and cilantro

Wednesday, May 24, 2017

Grain-free Granola: A Delicious Anomaly

Chef Reiton and I had the pleasure of having one of his sisters visit us for a night on the way home from a business trip a week or so ago. After years of living close to each other, I didn't realize how much I missed her until we sat into the wee hours of the morning, catching up, reminiscing, drinking probably too much really good wine—and thoroughly enjoying every minute of it.

One thing we always talk about when we are together is food. Not only do we all love to eat, but quite a few people in Chef Reiton's family suffer from celiac, and so we are always sharing new meals or snacks or desserts that we have discovered that are gluten-free.

During this visit, Brenda pulled out a bag of grain-free granola that one of her friends had introduced her to. She let us try it, and wow! It was quite good!

Then she let us know how much that little bag of grain-free granola cost.

I believe I may have accidentally snorted a few pecan pieces in response. Why, oh WHY, do health food companies find it necessary to drastically overcharge for a product that they promote as necessary for all? We all know why: fad = $$$. But for many consumers , it's not about a fad. Their diet is based around a serious health condition, and there is NO reason that anyone should have to pay crap-tons of money to avoid going into anaphylactic shock. It's outrageous, and so I decided to give the health food companies the ol' one-two and come up with my own damn grain-free granola recipe.

Grain-Free Granola from Creating A Foodie

The "start-up" cost for making this granola may seem high, I understand. But a whole bag of nut parts is going to make a whole lotta granola. And you are ultimately going to be spending a LOT less than the $8 pre-packaged bag of grain-free granola you buy at the store!

This is not a terribly sweet granola. It's got a warm spice and salty flavor, but it's not going to be loading you up with sugar. And I would call this a snacking granola, not a cereal. You aren't going to need much.

If you don't like honey, you may want to try agave syrup, instead. And a few tips on nuts: don't look for nuts in the baking aisle. Look for the "generic" nuts that are sold in the bulk section or in the produce section. They will be cheaper. Also, look for broken pieces, slivers, or slices, instead. Whole nuts tend to be more expensive because they have to be prettier and so take more work to get out of the shell. And feel free to substitute the type of nuts used; go for what you already have. Or add some dried fruit or a teensy bit of brown sugar if you want it sweeter. You regular readers know what I think: you are the one eating it. Make it what you want. There is no one "right" way to make most recipes!

Ingredients and directions:

In a medium bowl, blend with a whisk:
• 1/8 cup coconut oil, melted
• 1/8 cup honey

Add to bowl and blend again:
• 1/8 tsp. almond extract
• 1/2 tsp. vanilla extract

Add to bowl then stir very well to coat:
• 1/4 cup sunflower seeds
• 1/4 cup slivered almonds
• 1/2 cup cashew pieces
• 1/4 cup pecan pieces
• 1/8 cup chia seeds
• 1/2 tsp. kosher salt
• 1 tsp. ground cinnamon
• 1/4 tsp. ground ginger
• 1/8 tsp. ground nutmeg

Add:
• 1/8 cup coconut flour

Blend well with whisk again. Place a piece of parchment paper on a rimmed baking sheet. Pour granola out onto paper and spread evenly. Break up any large clumps into smaller chunks.

Bake at 325° for 10 minutes. Toss. Bake for another 10 minutes until golden. Remove pan from the oven and place on a wire rack. Cool granola completely.


Chef Reiton loves his grain-free granola

Wednesday, May 3, 2017

Yotam Ottolenghi's Cauliflower Steaks: A Vegetarian Dinner for Meat Lovers

Summer is coming fast. Maybe a bit too fast. My backside is, like, seriously not ready for it. So last night I made steak for dinner.

You heard me. STEAK. But not steak from a cow or a bison or even a pig.

I made steak from a cauliflower.

Ewww, I just heard you say.

Yeah—NO.

My go-to "I-want-to-be-vegetarian-tonight" recipe writer, Yotam Ottolenghi, has a definite place in my kitchen. When I get tired of simply sautéing my veggies, I jazz them up Ottolenghi-style. His wide use of Middle Eastern spices and flavorings add a depth to vegetable dishes you just don't see elsewhere in the veggie world.

Like these cauliflower steaks shared in Bon Appétit (April 2017), for example. Ottolenghi transforms a vegetable that many only tolerate, cutting it into thick slices then alternately pan-frying and oven-roasting it into a deep, dark caramelized hunk of beefy deliciousness. Who would think?

Ottolenghi's Cauliflower Steaks: A Vegetarian Dinner for Meat Lovers

Laid on a simple bed of puréed cauliflower laced with lemon and tahini, it is then topped with a "salsa" made from more lemon zest, parsley, olive oil and nuts.

If you want to make this a vegan dinner, simply swap out the tiny bit of butter in the recipe for more olive oil. I think the butter contributes to the beefy taste, but it will still be frickin' fantastic to be sure. 

I did make a few adjustments because I didn't have what I thought I had... Ottolenghi suggests using walnuts and a Fresno chile for the salsa. I didn't have either, so I used pine nuts instead and skipped the chile but brushed my cauliflower slices with harissa paste (both very Middle Eastern in origin). Remarkably good, oddly satisfying, and SO being made again the exact same way.

[I can still hear some of you saying "Ewww." Just—shut up and go try it. You and your butt will be thanking me and Ottolenghi. Promise.]

Want some more suggestions of what to try from Ottolenghi? Check out his veggies-only cookbook, Plenty: Vibrant Vegetable Recipes, or his team-up with his buddy, Sami Tamimi, in Jerusalem: A Cookbook. I think you and your behind will be going vegetarian more often, too.

Monday, January 30, 2017

Grain-free, Sugar-free Banana Blueberry Muffins

I just went to make these muffins this morning and almost fell over when I realized I had never blogged about them! Gee-zoo! Sorry about that! 

Grain-free, sugar-free banana blueberry muffin recipe

Those of you who don't have any food allergies or food restrictions will probably shy away from this recipe, I know. But there are a lot of you out there who have gone more than just gluten-free. You can't or won't eat a number of things besides gluten: grain of any kind, sugar, legumes, dairy. And finding good recipes that aren't just a complete mockery of the phrase "baked good" can be really hard.

While Chef Reiton and I are not diehard "primal" eaters (we won't force you to eat like us when you come over for dinner or ask us over), we do our best to limit grain and legumes as much as possible in our diets. We've both just felt so much better cutting them out, and so we take the "healthy-ish" route, for us, and leave grains for a treat when we really want pizza or pasta. That all being said, I came up with this recipe for blueberry muffins a couple years ago when I was really figuring out how to be happy in the kitchen while cutting out all my baking (which I still miss, but I've found cooking in general just makes me happy). 

These are about as close to a real muffin as I could get while still keeping it grain- and sugar-free. A lot of the primal and paleo muffin (or baked anything) recipes I've tried turn out really eggy and squishy. While these are moist and still have egg, they have a lot less egg than some, and they hold up better than the rest. They have that crumb you are looking for in a muffin, you know? They are a lot less sweet, too, being sweetened only by the banana, coconut flour and blueberries. Give them a try and let me know what you think. 

If you want to change it up, swap out the blueberries for 1/4 cup of chopped pecans, or, if you don't care so much about a bit of sugar, swap in some bittersweet chocolate chips...

Tools Needed: muffin tin, muffin liners (parchment are best, but you may have to order them), spatula, small scoop, cooling rack


Wet ingredients:
2 large, extremely ripe (black) bananas (the fermentation actually increases the flavor)
6 Tblsp. unsalted butter, melted
1/4 c. whole milk
1 egg
1 1/2 tsp. vanilla
2 Tblsp. plain whole yogurt

Dry ingredients:
1/2 c. almond flour
1/4 c. potato starch, unmodified
1/4 c. coconut flour
1/4 c. tapioca flour
1 tsp. baking soda
1/2 tsp. kosher salt

1/2 c. wild frozen blueberries (smaller) OR 1/2 c. dried wild blueberries (I love Trader Joe's, but these will add some sugar)

Directions:
  1. Preheat the oven to 350° F. Line 10 muffin tins with liners.
  2. Blend all the wet ingredients well in a mixer (or by hand), slowly drizzling in the melted butter so that it doesn't harden up in the cold ingredients. 
  3. In a separate bowl, whisk the dry ingredients together. Be sure to break up lumps and blend the flours well. 
  4. With the mixer on low, gradually add the dry ingredients to the wet. Stop the mixer and scrape down the sides of the bowl, then turn it back on for a few seconds to mix in those last bits of flour. Scrape down the paddle and bowl, then add the wild blueberries. Fold in by hand with a spatula until evenly dispersed in the batter. 
  5. Scoop heaping spoonfuls of batter into the liners with a small ice cream scoop. Pat the batter down with the spatula to level it out some. Bake for 25 minutes or until a toothpick comes out clean and dry. 
  6. Immediately remove the muffins from the tin (I use a small fork to wedge them out without burning my fingers) and cool them completely on a wire rack.
Don't forget you can click below to print the recipe! Happy baking!

Recipe card for grain-free, sugar-free banana blueberry muffins

Monday, November 21, 2016

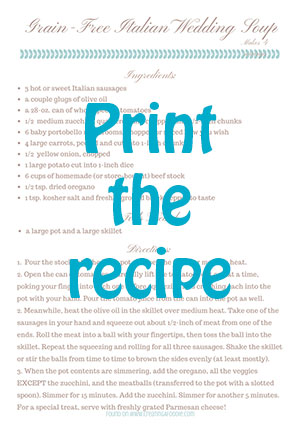
Grain-Free Italian Wedding Soup: A Simple Winter Meal

I find it funny that I recently posted about how much I love to grocery shop, and the post I'm writing today came about because we were so short on food the other night! It was cold, windy, dark (I am NOT used to this dark-at-4:30 crap...), and we had NO food in the house. Like, I-feel-like-a-TOTAL-slacker kind of no-food-in-the-house. Ugh.

But desperation is the mother of creativity, right?

Right.

Wide open the pantry, fridge and freezer doors were flung, followed by some shuffling and grunting, and out came:

  • 3 hot Italian sausages
  • 1 28-oz. can of whole, peeled tomatoes
  • 1/2 a zucchini
  • 6 baby bella mushrooms
  • 4 large carrots
  • 1/2 a yellow onion
  • 1 large potato
  • 6 cups of homemade beef stock (check out how to make your own here!)

Right then Chef Reiton walked into the kitchen. "Italian wedding soup?" he asked. 

BINGO.

You will not believe the tastiness created by throwing these ingredients together. Not to mention, it was super easy and quick. I had it done from pulling out the ingredients to sitting down to dinner in an hour, tops. 

Don't forget: you are allowed to play. Change up the veggies to use what you have. Add pasta, if you insist (you will want to thin out the stock with some additional water, if you do). And if you want to jazz it up to another level, grate some fresh Parmesan into your bowl as a topper. 

Grain-free, gluten-free Italian wedding soup recipe

Oh, dear. Wedding or no, get ready for your diners to ask for a second bowlful!

Click the recipe card below to download or print! And remember, when you've been a total slacker, don't lose faith! Just get creative!

Printable recipe card for Gluten-Free Italian Wedding Soup

Monday, June 27, 2016

Ginger-Lime Shrimp (and a Lesson in "Deveining")

There are so many things I love about living on the ocean, but I have to say that one of the best things is the insanely fresh seafood that I can get at a seafood shop that is on the way home from picking up Captain Reiton at the airport.

The first time I went into this restaurant/shop—Belle Isle Seafood—I (somehow? There are only signs EVERYWHERE) didn't notice that they only take cash. When I went to pay with my CREDIT CARD, the girl very graciously explained that she was unable to accept it as a form of payment—this being after a five minute conversation about how much I loved living here after being in the Midwest for so long, and blah blah blah....

So, being embarrassed but being me, I made fun of myself and then asked her if she could just keep my salmon in the case and I would run back later with cash to pick it up. To this she responded (and I quote):
"Oh, no, just take it with you. You can just pay later."

Am I serious??? Yes, I'm serious.  This is the kind of town I live in. It's small. People trust you, or they will kick your ass. And I love it.

So. As I was saying: I also love the seafood, so the other night I bought a pound of fresh shrimp at Belle Isle to sauté up for dinner.  Being fresh, the shrimp weren't processed like they are when you buy them frozen or from the seafood case at the grocery store. That meant they simply had their heads cut off, and that was it. They still had their little legs. Their full, unsplit shells. Their little poopy intestine down the center of their back...

So I shelled them. Ripped off their little legs. And then—I discovered the BEST way to "devein" the shrimp!!! 

(Why is it called "deveining," by the way? It's an intestine, NOT a vein. Are they afraid to call it "de-pooping" a shrimp? Because that is what you are doing, really...)

Now, here's the problem that I've always had about shrimp that I have bought frozen that have been deveined: in the processing of the shrimp, they are practically butterflied. They are sliced open the whole way down their spine so that they flay open when they cook.

I don't want shrimp that look like butterflies on my plate. I want shrimp that look like shrimp on my plate, damn it. Appearance is very much a big deal to me when it comes to cooking, and I have always found it so unattractive to be eating shrimp that look like they've been attacked by the SNL Samurai.

SO. As I was finishing peeling and de-legging my shrimp, I wondered if I really had to slice a shrimp the entire way down it's spine to devein it...

I took a paring knife, inserted the tip blade-up into the middle of the shrimp "neck," so to speak, and sliced upwards, making about a quarter-inch long cut.  Now I could see the poop tract laying right there...

I reached in with my fingertips, grabbed the end of the "vein," and very gently but firmly pulled...

VOILA!!! It slid out! The whole thing! I had an entire shrimp in my left hand and an intestine dangling from my right! No flaying necessary!

Now I had perfectly whole, beautiful shrimp, ready to be marinated and sautéed for dinner. 

And speaking of dinner, wowzers, have I got a shrimp dish that will knock your socks off. I very slightly adapted it from Melissa Joulwan's cookbook, Well Fed. If you are looking for flavorful but easy and fast, this is it. 

If you are in a super rush, make the marinade first before you deal with your shrimp, then toss your shrimp into the marinade bowl as you clean them up. Then, as your shrimp are marinating for 20 minutes or so, you can get the rest of your sides together. Shrimp only take a few minutes to cook completely, so depending on your sides, you could have dinner on the table in about 45 minutes, from start to chow-time.

As I've pointed out with so many recipes lately, use the quantities and ingredients you have. You do NOT need to follow ingredients and measurements here exactly. It will still taste good, I promise. But here's what I used:

Ingredients for 2-3 people:
  • 1 lb. of fresh shrimp, shelled completely and "deveined" (I also give them a rinse)
  • juice from 2 juicy limes (smooth skin, heavy, feel squishy)
  • fresh ginger root, peeled and finely grated on a zester or minced up, about 1 1/2-in. worth
  • a jalapeño, seeded and minced, or a tsp. of crushed red pepper flakes
  • 3 peeled garlic cloves, finely grated on a zester or minced
  • about a quarter cup of minced cilantro
  • 1/2 tsp. kosher salt
  • 1/4 tsp. freshly ground pepper
  • 2 Tblsp. olive oil

Steps to Make:

1.  Combine the lime juice, ginger root, jalapeño or flakes, garlic, cilantro, salt and pepper in a medium bowl and whisk together with a fork. Drizzle in the olive oil and whisk rapidly to blend with the juice mixture. This is your marinade.

2.  Add the shrimp to the marinade and toss really, really well. Cover the bowl with plastic wrap and stick in the fridge for 20-30 minutes but nor really any more than 45 minutes. The lime juice will cook the shrimp. Really.

3. When your sides for dinner are almost done, heat up a large skillet on the stove on medium-high. When it is nice and hot, dump the entire contents of the bowl into the skillet. Shake the skillet to create a single even layer of shrimp. Cook for about two minutes. You will see the shrimp turning pink and starting to curl. Stir the shrimp to blend them with the sauce and to flip them onto their other side (you might need to help some of them a little). Shake the pan to make your even layer again, and cook for another 2 minutes or so.

4. Platter the shrimp and garnish with some cilantro fronds or torn cilantro leaves.


That's it! Super fast. Super easy. Super delicious! You could also skewer the shrimp and grill them, too... YUM.

Word of advice: just don't overcook them. Fresh shrimp are so tender. I had no idea. If you cook them too long, they will get rubbery and weird. Don't panic about the short cooking time. If the shrimp is all pink and curling, it's DONE.

And I promise to make something shrimpy this week and video the whole de-pooping for you...

*UPDATE: I made the video! Click here to read a more descriptive post on how to devein shrimp and to watch the video. 

Saturday, May 7, 2016

The Beet Salad Recipe of Your Dreams

I don't know about you, but when dealing with vegetables, rarely does the word 'gorgeous' come to mind. Vegetables tend to look a bit—well, not the most attractive. Stand in the produce section, and take a look around. Fruit definitely wins out in the looks category. Veggies tend to remind you of gawky, bad-skinned, knob-kneed teenagers with consistently bad hair-days.

That is, until you look inside.

Suddenly, some veggies become positively striking. Like the beet I couldn't help but share in my old post Talk About Random.  Take a look at that beauty!

Maybe their gorgeousness is part of the reason why I've become addicted, but beets have suddenly turned into my go-to veggie for an easy lunch salad. Chef Reiton hates beets, no matter how hard he tries to like them, so my only way of eating them is when he isn't here. Lunchtime has become perfect for that.

"So—a beet salad???" you say (I can see that lip tweaking...).

Believe me, yes, and it's delish and incredibly easy. That is, after you roast the beets. Which is also easy. I'll even show you how tomorrow because I'm going to roast some tonight (please note: TONIGHT is key in my easy roasting and peeling method).

Alright, so back to the salad. In Real Simple's November 2015 issue there was an article on easy side dishes to create for the holidays. Modestly introducing their beet salad recipe was a small notation that their beet salad is so good, the RS crew make it all the time for their gatherings.  Intrigued, I made it for our Christmas dinner, and the entire family gave a resounding 'YES!' to it's deliciousness—despite it being made with beets.

Since then I have tweaked the recipe to fit with ingredients that I tend to have at home and that I can quickly toss together for lunch. Almost all of the ingredient amounts are to what I'm in the mood for that day. So, here you go: a beet salad that is remarkably good for you, gorgeous, and incredibly delicious.

beet salad with ricotta salata, parsley and toasted pecans

Ingredients:

  • 1 roasted beet, cooled, skinned and cut into wedges
  • a small (1-in. x 1 in.-ish) hunk of ricotta salata, a firm ricotta cheese, sold in wedges in the "nice cheese" section
  • a small pinch of the tops of some fresh Italian, flat-leaf parsley sprigs, roughly chopped 
  • chopped pecans, toasted (toss in a small skillet over medium heat until they smell nutty)
  • kosher salt and freshly ground black pepper
  • olive oil
  • red wine vinegar

Directions:
  1. Place beet wedges on a plate or in a bowl.
  2. Crumble ricotta salata over the beet wedges.
  3. Sprinkle with chopped parsley.
  4. Sprinkle with chopped, toasted pecans.
  5. Drizzle with olive oil and red wine vinegar.
  6. Sprinkle with salt and pepper.
  7. EAT!
If you want to print the recipe, click "Print this recipe" below for a download and/or a print option.

beet salad printable recipe card

Come back tomorrow for a quick how-to video on roasting and peeling beets–something I used to hate doing because the damn peel never came off easily. No more! I'll show you how.

Until then, here's to those of us who may be knob-kneed with lots of bad hair-days but strive to be beautiful on the inside! Yeah, beets!

Monday, October 19, 2015

Pan Sauces Forever: Learning the Magic of Scraping Up the Brown Bits

Have you ever eaten something and wondered how on earth it came to be considered a food?

Like beer.  Someone boiled or soaked grain in a bunch of water, but then, upon straining out the grain, left the sugary water out for so long that it fermented and got all funky. 

Then someone decided to go and drink it.  

GOD BLESS HIM.

I kind-of imagine the same thing happening with preparing meat.  Some foodie peasant daredevil was roasting his chicken/beef/pork/whatever over the fire, and, upon plating his meat, poured some water into the pan to let it soak while he was eating—and then decided to pour that water on his meat instead.

The miraculous birth of pan sauces!

I love making pan sauces.  They can be made simply with water, or they can be trumped up to all hell with wine, herbs, 'shrooms, you name it.  There is an infinite number of ways to make it, but they all have one delicious goal: to take your meat from boring to brilliant in about 30 seconds flat.

Here are some chicken cutlets I made the other night when I was bach-ing it and just wanted something super simple to make along with my roasted veggies: 

chicken cutlets with pan sauce and herbs

See those yummy juices dripping off the meat? Yeah?

I made them.

They didn't exist when I took the chicken out of the skillet.  The skillet was completely dry.  HOT and dry.

Unfortunately and most likely, so would be my chicken.

So here is why I love pan sauces so so so much.  You know what I did? 
  1. I took my skillet over to the sink.
  2. I put the pan under the faucet and turned the water on for about 2 seconds.
  3. I put the skillet back on the burner.  
  4. As the water rapidly simmered off, I madly scraped with a metal spatula at all the yummy, crusty crud that had browned and crisped itself to the bottom of the pan, stirring all the bits into the simmering water to dissolve.  
  5. When the amount of liquid in the pan boiled down to look like the amount I needed, I turned off the heat, scooped up a big blob of butter (I keep softened butter by the stove; you should, too), and plopped that into the sauce, whisking it in until it had melted.

And then I poured that deliciousness all over my chicken.  

Now.  That is a very basic pan sauce.  It is delightfully delicious, made with two ingredients that I KNOW you have in your kitchen, and it is damn fast to make.  You will love it.

If you want to get even more fancy schmancy, but not any more difficult (I swear!), try browning some sliced or chopped mushrooms or shallots or garlic in the pan before you add the water.  Or instead of using water, use broth or wine.  Or use a mix of both! There is no right or wrong.  Just do what you feel like or have on hand.

But no matter what additions you make or what you use as your liquid, always whisk in a plop of butter after you turn off the heat.  It thickens the sauce up a bit and just adds a nice richness to the flavor.

To top it all off—literally—try sprinkling on some fresh herbs after you pour on the sauce.  I used cilantro in the pic above because I had seasoned my chicken with some cumin and cayenne.  (If you aren't sure if an herb will go well with your seasonings, tear open a leaf and then sniff it together with your spices.  If it smells good together, it will taste good together.)

And that is that, my friend.  

PSF!

(Pan Sauces Forever)

Tuesday, October 6, 2015

How to Compose Yourself (and Your Salad)!: A Composed Salad Recipe with Baby Arugula, Red Pear and Shallot

I used to laugh at that term—a composed salad—when I was a kid.  Personification would kick in, and all I could think of was a salad sitting up straight and tall, eyes downcast, hands in her lap, waiting with great grace for her turn to be eaten.

Salads are not my favorite thing to make.  I like to eat them, but I struggle with being too impatient to put one together at the end of meal prep; I just want to eat.

Thank God for those little boxes of organic lettuces and leaves.  I know they are more expensive, but 1) they are organic, 2) I don't have to rinse any damn leaves, and 3) I don't have to chop any damn leaves.  The only thing I'm left to do is cut up some tomato and cucumber, and I can call it a day.

And the-e-e-e-en there's my husband.  Salad creation is his specialty.  He reminds me of Jonathan in the old '80s movie, Splash, who gets fired for being too artistic with his pizza-making.  That's Chef Reiton.  His salads are gorgeous.  And he looks so relaxed making them.  I bang away at the cutting board to hurry up and get it done, and he stands and meditavely slices and minces and slivers and chops.  It makes me jealous.

So the other night I determined: I was going to make a killer salad.  Not the tossed green salads I always make.  No.  I was going to make a composed salad.  A little work of art on a salad plate.

I took three ingredients:

  • a red pear with the flower blossom end sliced off and discarded
  • baby arugula
  • a small shallot, peeled, with the root end trimmed

With my mandoline on the thinnest setting, I sliced the red pear crosswise into circles until I started to hit the seeds (about half the pear).  Next I sliced the shallot into circles.

Now came the composing: 
  1. I lay the pear slices in a ring on the salad plate, overlapping the edges a bit.
  2. I placed a nice little mound of baby arugula in the center of the ring.
  3. I sprinkled the little shaved rings of shallot on top of the arugula mound. 
That was it.  To dress it I sprinkled it with a little bit of olive oil, a little bit of balsamic vinegar, a few grinds of fresh black pepper, and a teensy bit of kosher salt.

The result? GOR-GEOUS!!!!

And it took, like, 2 minutes to make! AND it was delicious! 

a composed salad with red pear, arugula and shallots

I think I may have found my new favorite thing to create! Folks, get ready for some serious salad composure! 

Sunday, October 4, 2015

Figs with Bleu Cheese and Pecans: A Fancy Schmancy but Easy Peasy Appetizer Recipe

It's fig season, people!!! Woohoooo!

Regardless of this article my brother sent me recently from Knowledge Nuts, I love fresh figs.  Second only to a warm, heavy peach dripping with juice, figs are probably my favorite fruit.  They are exquisite, if you've never had one.  Exotic.  Sensual. Bite into one and you will understand why the Renaissance painters used them in their paintings to allude to sex.

And they were $3.99 at the grocery store the other day! Imagine! $3.99 for nine plump little parcels of heaven.

I snatched up a package and a wedge of good bleu cheese, then came home and created a little appetizer to nibble in front of the fire with Chef Reiton while our chicken finished its roasting:

appetizer of figs with bleu cheese and pecans

They're pretty, aren't they? If you want an appetizer to impress that takes a whole 10 minutes to prepare from start to finish, try these out.  Here's what you've got to do (adjust quantities to suit your party size.  I used 4 whole figs for the 2 of us):

Ingredients:

  • fresh figs, halved through the stem so you've got a little "handle" to pick them up with
  • good bleu cheese
  • pecan halves

To prepare:


Heat your oven to 400° OR you can toast these if you have a toaster oven.

Lay the figs on a foil or parchment-lined cookie sheet.  I used the little pan that fits in our toaster oven.

With a butter knife and your finger, place a tiny plop of bleu cheese on top of each fig half.  You don't need much; bleu cheese is very pungent.  The size of two really big peas is a good amount.

Gently press a pecan half on top of the bleu cheese on each fig.

Roast or toast your figs for about 4 minutes.  The nuts will be toasty and the cheese bubbly.

Let them cool a minute, then plate and serve warm.

Give them a try and let me know what you think! I think you might be surprised by the wonderful mix of flavors and textures.  Soft figs with crunchy pecans.  Sweet and toasty and salty and earthy.  Delightful!

appetizer of blue cheese and pecans

Wednesday, September 30, 2015

The Power of Pot Roast: The Recipe That Needs No Recipe

So I've decided: if there were to be a king of the slow cooking world, it would be Pot Roast.

Pot Roast comes from humble beginnings, and so he understands the ways of those who don't have much.  He was born, after all, in the home of a peasant.  True, his fame is known world over (with varying degrees of acceptance), but despite his frequent appearance in magazines and television, he has remained true to his roots and the belief that simple and slow is best.

Yesterday, Pot Roast ruled in my kitchen.

Before I headed out to run errands all day, out came my trusty old Crock-Pot and in went the following:

the ingredients for pot roast

  • random beef cuts (I will blog about that later...) to feed 2 people, seared on both sides with a bit of olive oil and kosher salt
  • 2 giant carrots from the farmers market, halved lengthwise and chunked
  • 1/2 a large yellow onion, sliced
  • 2 garlic cloves, smashed
  • about 15 small cherry tomatoes

I placed all my ingredients in layers in the Crock-Pot (tomatoes on the bottom to burst first and create a pool of juice), then sprinkled it all with kosher salt, freshly ground pepper, and a bit of Italian seasoning (and a random quarter of a lemon I had leftover from last night's Sidecars), turned the C-P on to low, and walked out of the house for the rest of the day.

ingredients for pot roast layered in the Crock Pot

When I walked back in the door after picking up Captain Reiton from the airport, I took several deep whiffs of deliciousness before making a quick batch of "fauxtatoes."  

To do this, I cut large florets from half a head of cauliflower, placed them in a pot filled with about 1 inch of water, added a garlic clove and some kosher salt, then covered the pot and set it on the stove over medium-high heat to steam for about 10 minutes.  When I could easily stab through the largest floret with a knife, I strained the florets and garlic clove and dumped it all in the food processor with half a stick of butter and some salt and pepper and pureed away until everything was super smooth.  These "fauxtatoes" (they taste better than potatoes, I swear) became the bed for King Pot Roast.  

pot roast on pureed caulifulower

(I didn't have any parsley to garnish.  Sorry.)

Now.  Here's what I love about Pot Roast.  The next time I make this? The meat will be a totally different cut.  I might not even sear it because I don't have the time.  I might decide to add in some mushrooms.  Or use real potatoes in the pot instead of making a bed of fauxtatoes.  Or nix the tomatoes and use more garlic instead.  Or use a bunch of fresh herbs instead of the dried mix.  I might even skip the Crock-Pot and decide to dump everything in a Dutch oven and put it in my oven instead at 250°.

POT ROAST DOESN'T CARE.  Whatever you feel like throwing in there, throw in there! Use the cooking method you like the most (or have available).  The miracle of pot roast is that it all promises to taste goooooooooood no matter what you use or how you do it.  Just remember: low heat, a bit of salt, and a long period of time are powers in the kitchen that can't be denied.

Hail to the king!

Tuesday, September 29, 2015

The Delicate Delicata Squash: Learning to Prepare It in 3-2-1!

Do you remember the days when you went grocery shopping and your fresh veggie options were beets, broccoli, cauliflower, carrots, and zucchini?

Now not only do we find brussels sprouts on the stalk, kohlrabi, and kale in stores, but we have farmers markets popping up in every town, big and small, on the map, providing us with a huge variety of some rather random vegetables, some of which I've never heard of.

One of those random varieties that I have read about in my food magazines for awhile now but have never been able to find in any of my stores is the delicata squash...and lo, and behold! What does Inge give me as we were leaving her home/our short term boarding house but some delicata squash! Imagine!

So, the other night I followed her directions on how to cook it:

1) Take a fork and stab the squash, Psycho-style, repeatedly, all over:

delicata squash

2) Put the whole squash on a plate in the microwave and microwave for 5-6 minutes:

Microwave delicata squash.

3) Let the squash rest and cool for a couple minutes, then slice it in half lengthwise, scoop out the seeds with a spoon, slather on the butter, salt and pepper, and enjoy!

delicata squash with butter, salt and pepper

I have to say, I was pleasantly surprised.  Winter squashes tend to scare me a little.  They usually are so much work and require whacking with cleavers/mallets/other implements of squash destruction... It makes me nervous.

But this guy? Easy peasy to prepare! And the flavor? Wonderfully mild.  Slightly sweet and with the texture of a very fine spaghetti squash.  You could eat it with a spoon.  You can even eat the skin, unlike other hard squashes.  How's that for a winter squash that breaks all the rules?

All good reasons to call it the delicat(e)-a...  Give it a try! And let me know if you come up with any creative ways to use it...

Monday, September 28, 2015

Gluten-Free, Grain-Free Zucchini Lasagna Speaks: "Don't Judge Me. Just Eat Me."

No matter how hard I try, when it comes to capturing the deliciousness of lasagna on film...it's nearly impossible.  Some of it may be my photography skills, but I think the true reason it can't be done is this: photographed melted cheese is just GROSS.  Your lasagna can be straight-out-of-the-oven, lava-hot—and it looks God awful:

zucchini lasagna plated

Let it rest for just a few minutes to set, and it looks like the rubber from an old pair of tennis shoes:

zucchini lasagna

There just seems to be no way to visually appreciate the culinary wonder that is lasagna.  

You just have to eat it.

I did some experimenting the other night with making a pasta-free lasagna.  I think it was one of the best lasagnas I have ever made.  Instead of using lasagna noodles, Chef Reiton sliced zucchinis lengthwise on the mandoline, the blade set at the thinnest setting.  Out came "noodles" that we layered raw in the pan.  (He only sliced about halfway through each zucchini to avoid any accidents with the mandoline blade.  We saved the leftover halves to use for another "pasta" meal a few days later).

I made the mistake of forgetting to salt the zucchini noodles before using them, so the lasagna came out a bit wet.  Salting zucchini after you cut or slice it helps to draw out their water (sprinkle zucchini with some kosher salt and let them sit for a good 20 minutes, then rinse and pat dry).  Other than that goof, we were very happy with the flavors.  Robust, cheesy, and a bit spicy.

Here are the items that I layered into our small lasagna pan for 2-4 people:
  • 3 small-to-medium sized zucchinis, about 1 1/2 to 2-in. in diameter, ends trimmed, then sliced LENGTHWISE on a mandoline set at the thinnest setting (salt the slices while you are sautéing up your 'shrooms and onions, then rinse and pat them dry)
  • 1/2 lb. chopped and sauteed baby bella mushrooms
  • 1 small onion, very thinly sliced on the mandoline into rings, then lightly caramelized on medium-low heat
  • 2 links of hot Italian sausage, crumbled and browned
  • whole milk ricotta cheese (forget lowfat, people! Full fat is better for you and tastes 100% better!)
  • provolone slices (not smoked)
  • mozzarella slices (not fresh)
  • homemade tomato sauce (recipe below)
  • Parmesan to grate on top

Lasagna is an as-you-like-it meal, so change the ingredients, layering tactics, and quantities to suit your own tastes.  

As for the sauce, it is quick and easy.  I figured the Italians keep things simple, so I did, too.  You ready?

Dump in the bowl of a food processor:
  • a 28-oz. can of peeled whole tomatoes (yes, Marzanos if you can do them), juice included
  • 2 peeled garlic cloves, cut into quarters
  • 1 tsp. fennel seeds
  • 1 tsp. oregano
  • 1 tsp. kosher salt
  • 1 heavy drizzle extra virgin olive oil
  • 1 heavy drizzle balsamic vinegar
  • the leaves of one large sprig of basil
Puree until everything looks smooth.  You can use the sauce straight from the bowl or simmer it to allow it to thicken and the flavors marry, if you have the time.

That's it.  Our lasagna got baked at 350° for a good half hour.  Just make sure the whole thing is bubbly, not just the edges.  

And if it looks U.G.L.Y. when you plate it? Don't judge.  Just eat.

Thursday, September 24, 2015

San Marzano Meatballs: A Recipe of Comfort

Despite our move-in day last Friday being pretty dang hot, the past few days have been fallish-ly cool.  Cool = cozy, in my brain (I admit it: I’m already getting the holiday itch), and this translates in the kitchen to cooking up some serious comfort food.  I’m dreaming of gloriously herbed and roasted meats and veggies, slowly simmered stews and soups, the occasional heaven of warm, yeasty sourdough bread or the buttery crust of pot pie.  Anything that compliments my desire to revel in the warmth and slowness of life is bound to find its way onto my dining room table.

That being said, it is only natural that Chef Reiton’s and my first home-cooked meal in our new little house fell into the comfort category. I found Marzano tomatoes for a great price at our little local grocery, so I used them to make a meal I am calling Marzano Meatballs (and, yes, everything about this town is little).

San Marzano tomato sauce with meatballs, parmesan and basil


While this meal isn’t necessarily fast in cooking time, it is very quick to get on the stove and is pretty hands-off and easy.  If you can smash, stir, and sprinkle, you’re good.  I've included the recipe below.  If you can’t find Marzano tomatoes in the canned tomato section of your grocery store (or you can but they are so fricking expensive in your area that you just can't do it), you can use any other canned whole peeled tomato—not the end of the world.  And BTW, now that we have an organized house and are back to cooking again, we are back to eating our mostly grain-free diet, so we ate these "plain."  They could be served over zucchini noodles or a pasta of your choice.

These quantities (as well as small green salads) nicely served 2 people.

Equipment needed: medium bowl, 10-in. skillet or larger (cast iron is best), slotted spatula, paper-towel lined plate, vegetable peeler

Nice, if you have it: 1 1/2-in. ice cream scoop (#40)

Ingredients:
  • 1/4 lb.-ish ground beef
  • 1/4 lb.-ish ground pork or lamb
  • 1/2 tsp. kosher salt
  • 1/2 tsp. fennel seeds
  • 1/4 tsp. freshly ground black pepper
  • 1 egg
  • 1 large garlic clove, crushed or finely minced

  • big glug of extra virgin olive oil
  • 1 28-oz. can of whole Marzano peeled tomatoes
  • half a medium yellow or sweet onion (the root end is best, to keep the pieces all together), cut into two quarters (don't cut off the roots)
  • 2 cloves of garlic, smashed and broken open with the heel of your palm
  • a big drizzle of extra virgin olive oil
  • a big drizzle of balsamic vinegar

  • a big sprig of fresh basil, medium and large leaves removed, stacked, then slivered
  • a hunk of Parmesan cheese
  • baby/torn basil leaves from the above sprig for garnish/extra flavor

Here’s what you do:

Place the meats, salt, fennel, pepper, egg, and crushed garlic into the medium bowl.  Using your hands (or a wooden spoon if you don’t like to get dirty), gently mix and knead the ingredients together until well blended.

Wash your hands.

Heat up the skillet over medium heat.  Pour in a big glug of olive oil, then let it get hot and shimmery but not smoky (about 30 seconds).  

Using the ice cream scoop or your hands, make about 10 small 1 1/2-in. meatballs, dropping them into the pan one at a time as you make them.  Roll the balls around every couple minutes and brown as many of the sides as you can.  (The meatballs do not need to cook the whole way through.  They will be simmering in tomatoes shortly and will finish cooking then.) 

When a meatball is browned all over, take it out of the skillet and place it on the paper-towel lined plate to drain.  When all the meatballs are finished, pour the hot fat from the skillet into an old glass jar or tin can, but don’t wipe out or clean the skillet.  You want to use those residual brown bits and a smidge of meaty fat to help flavor the sauce.

Put the skillet back on the stove over medium heat, then add your can of tomatoes, juice and all.  Taking the edge of your spatula, gently cut each of the tomatoes in half (watch for shooting tomato guts!), then cut each of the halves in half.

Now take the meatballs and nestle them into the tomatoes.  Sprinkle everything with a pinch or two of kosher salt.  Drizzle the olive oil and balsamic vinegar into the tomatoes.  Next toss in the two quarters of onion and two smashed garlic cloves.  Gently give everything a good mix, using the edge of your spatula to scrape up the browned bits from the bottom of the pan and mixing them into the sauce.  When everything is well coated with tomato juices, turn the heat down to medium-low, go pour yourself a glass of wine, and wait.  

meatballs simmering with San Marzano tomatoes and onions

Time is of the essence here.  The longer this simmers, the better it tastes/the more the tomatoes break down/the thicker the sauce will be/etc., etc., etc.—so really enjoy that wine, set the table, and make a nice salad.  Stir everything occasionally to keep the parts all blended.  If you are in a rush, 20 minutes of simmering will suffice.  

When you are about ready to serve, sprinkle in the basil slivers and give the saucy balls one final good mix.  Scoop everything into one large bowl or individual serving bowls.  Take your hunk of Parm and your vegetable peeler and gently peel/shave Parmesan cheese into a mound on top of the whole mess.  Sprinkle everything with the baby basil leaves, and you're done.

Serve your masterpiece immediately and get ready to make some yummy noises!

Tuesday, July 28, 2015

1,000 Chicken Salads: Yet Another (Summery!) Chicken Salad Recipe

Chicken salad recipes are like... well, you can look up the proverbial quote of Simone Elkeles to get my comparison.  To keep the title of this blog kosher, let's just leave it at: everybody's got one.

So I know that the recipe I am sharing with you tonight is not going to necessarily be a recipe that you've been gagging for, nor is it one that you will find yourself passing on to your children's children.

But I will tell you this: it is good.  It is different.  It is summery.  You should try it.

Here are the ingredients before they were blended with the dressing:


The chicken was leftover from my spatchcocking last night, as any good chicken salad chicken is (leftover, not necessarily spatchcocked...). And I ate the salad plain.  No bread.  You get the real taste of it that way (and you aren't eating any grain).

Here's the recipe for 2 servings:

You will need: a medium bowl; a small bowl; a small whisk; a fork

Put the salad ingredients into the medium bowl:
  • 2 chicken thighs, meat diced
  • 2 chicken legs, meat diced
  • 1/2 chicken breast, meat diced
  • cut into 1/4-in. cubes:
    • 1/2 small cucumber, seeded
    • 1 large radish
  • 1 green onion, sliced thinly
  • 3 large basil leaves, slivered
  • 1/4 cup blueberries
  • 1/4-in. piece of jalapeno, minced
Put the dressing ingredients into the small bowl:
  • juice of half a lemon
  • 2 Tblsp. sour cream
  • dash of nutmeg
  • kosher salt and fresh ground pepper to taste

Whisk the dressing ingredients until completely blended.  Pour over the salad ingredients and toss until everything is coated evenly.  Chill if making ahead, then plate, garnish with baby basil leaves and blueberries, and serve.


Enjoy!

Related Posts Plugin for WordPress, Blogger...

Visit Me on Pinterest!