Monday, October 26, 2015

My Latest Project: A Recipe Index

When I started writing this blog six years ago, I had no idea what the hell I was doing.

Okay, wait.  Let me rephrase that: As I am writing this blog today, I have no idea what the hell I am doing. I write because I love to and because I want to share my thoughts and love, but when it comes to making a really cool blog, I feel pretty clueless.  I fumble my way through it a lot, to be honest.

Regardless, I want all of you to have an enjoyable experience while hanging out with me online, so I've always been open for suggestions and ideas on how to make our time together better.  A lot of you have told me (for years) that I need to have a recipe section.  And I LOVED the idea.  I just didn't know how to go about adding one that was attractive, organized, and not going to be impossible to keep up with.

Well, after lots and lots of research and futzing around, I think I have finally figured out how to create a recipe index that I like, so I'm taking the big leap and starting the process.  It will be a work in progress for quite some time, but I hope you will bear with me as I plod along.  I will be starting with the most recent recipe posts first and working backwards—just an FYI.

To get to it, click on the "Recipe & Inspiration Index" tab underneath my blog title.  That will open up the different categories of foods I've written about.  Select what you are interested in, and then choose which food post you want to read.

That's it! Let me (and Marley) know what you think.  I am VERY open to suggestions!


Thursday, October 22, 2015

Learning to Make Your Own (Gluten-Free!) Stock

After watching the leaves out here on the East Coast go through a wardrobe change that I have never witnessed before (and I cannot believe I am going to be able to witness it year after year), I am officially getting ready to hunker down for winter.  With the flip flops put away, the toasty knee socks pulled up, and the fireplace popping comes the cold weather longings of soups and stews and all things warm and slow.  And that means replenishing the stock stockpile.

No, I just didn't stutter (although I do do that on occasion.  Wait.  No, seriously.  I just didn't do it again to be funny...).  Stock is the incredibly practical and insanely delicious kitchen staple made from—wait for it... SCRAPS.

Mmmmmmm.... Sounds delish, right? Let's take all our nasty peels and bones and pieces of veggie that we just trimmed off because we don't want to eat it and turn it all into food!

Well, that's not quite true.  You do take all your nasty peels and bones and trimmed veggie bits, but you simmer them for a really long time to extract all of their flavors, then discard them when you are finished.

For example, this is what I found in my fridge one morning last week: 
  • half a rotisserie chicken
  • a bag of kale that I hadn't liked the texture of (not trimmed well)
  • 3 old, rubbery carrots with their tops
  • 2 old onion halves with the skin and roots still attached
  • half a lemon
  • some mushrooms that were all leathery but still smelled okay...
I cut the chicken meat off of the bones to use for lunch, then took the carcass and all of those random items and squished them into my Crock-Pot.  I poured water into the pot until it was filled to the brim, then covered it with the lid, turned it on to Low, and let it go aaaaaaaaaaaaaaall day, aaaaaaaaaaaaaaall night, and almost all of the next day.

If I wanted to, I could have let it go much, MUCH longer.  I've let stocks go for days.  Like, almost a week.  I just keep adding water until the stock is almost smelling burnt.  In this case, I needed the stock for a meal I was making that night, so I just strained it through a colander into a big Pyrex measuring cup, and this is what I got: 8 cups of amber brown chicken stock.   

gluten-free stock

None of this pale yellow wussy crap you buy at the store that tastes like—um—NOTHING and costs at least $2.00 a quart.  This stuff? It's basically FREE since you were going to be wasteful and throw that shit out, anyway.  And NOW look what you've made!

gluten-free stock

Just wait until you taste it! Your grandma would be proud.  Really.

For shits and giggles, let's look to see what's left in the colander after I strained all that gorgeousness away:
scraps used to make gluten-free stock

Now THAT you can throw away!

If you don't use all your stock in one recipe, you can freeze it in smaller containers or you can can it (no stuttering).  Just remember (as Chef Reiton had to remind me once), this is a product made from meat, so you want to pressure can it to make sure that any residual bacteria is dead dead dead (although the chances of there being any after 24+ hours of simmering are very slim.  But still.  Better safe than hugging a toilet bowl.).

You can also use any kind of bones you want.  Sometimes I buy those creepy soup bones at the grocery store that you know are cow legs and use those to make beef stock.  I have used leftover rib bones from rib night and made pork stock.  You can use all veggies if you want and no meat.  Again, remember the true rules of a real kitchen: DO WHATEVER THE HELL YOU WANT.  Your food is yours to play with, test out, and sometimes never be able to duplicate again.  You are the boss.

So.  Bring that Crock-Pot up from the basement.  Go dig through the fridge.  Dump whatever you find in there into the pot and add some water.  Then come back tomorrow and comment to me how awesome you and your stock are.


Monday, October 19, 2015

Pan Sauces Forever: Learning the Magic of Scraping Up the Brown Bits

Have you ever eaten something and wondered how on earth it came to be considered a food?

Like beer.  Someone boiled or soaked grain in a bunch of water, but then, upon straining out the grain, left the sugary water out for so long that it fermented and got all funky. 

Then someone decided to go and drink it.  

GOD BLESS HIM.

I kind-of imagine the same thing happening with preparing meat.  Some foodie peasant daredevil was roasting his chicken/beef/pork/whatever over the fire, and, upon plating his meat, poured some water into the pan to let it soak while he was eating—and then decided to pour that water on his meat instead.

The miraculous birth of pan sauces!

I love making pan sauces.  They can be made simply with water, or they can be trumped up to all hell with wine, herbs, 'shrooms, you name it.  There is an infinite number of ways to make it, but they all have one delicious goal: to take your meat from boring to brilliant in about 30 seconds flat.

Here are some chicken cutlets I made the other night when I was bach-ing it and just wanted something super simple to make along with my roasted veggies: 

chicken cutlets with pan sauce and herbs

See those yummy juices dripping off the meat? Yeah?

I made them.

They didn't exist when I took the chicken out of the skillet.  The skillet was completely dry.  HOT and dry.

Unfortunately and most likely, so would be my chicken.

So here is why I love pan sauces so so so much.  You know what I did? 
  1. I took my skillet over to the sink.
  2. I put the pan under the faucet and turned the water on for about 2 seconds.
  3. I put the skillet back on the burner.  
  4. As the water rapidly simmered off, I madly scraped with a metal spatula at all the yummy, crusty crud that had browned and crisped itself to the bottom of the pan, stirring all the bits into the simmering water to dissolve.  
  5. When the amount of liquid in the pan boiled down to look like the amount I needed, I turned off the heat, scooped up a big blob of butter (I keep softened butter by the stove; you should, too), and plopped that into the sauce, whisking it in until it had melted.

And then I poured that deliciousness all over my chicken.  

Now.  That is a very basic pan sauce.  It is delightfully delicious, made with two ingredients that I KNOW you have in your kitchen, and it is damn fast to make.  You will love it.

If you want to get even more fancy schmancy, but not any more difficult (I swear!), try browning some sliced or chopped mushrooms or shallots or garlic in the pan before you add the water.  Or instead of using water, use broth or wine.  Or use a mix of both! There is no right or wrong.  Just do what you feel like or have on hand.

But no matter what additions you make or what you use as your liquid, always whisk in a plop of butter after you turn off the heat.  It thickens the sauce up a bit and just adds a nice richness to the flavor.

To top it all off—literally—try sprinkling on some fresh herbs after you pour on the sauce.  I used cilantro in the pic above because I had seasoned my chicken with some cumin and cayenne.  (If you aren't sure if an herb will go well with your seasonings, tear open a leaf and then sniff it together with your spices.  If it smells good together, it will taste good together.)

And that is that, my friend.  

PSF!

(Pan Sauces Forever)

Tuesday, October 13, 2015

Clarified Butter: The Truth of Ghee Matter

I know I've blogged about ghee before in Thank Ghee for Reading, but I just finished making another batch this very minute, and I thought I'd post again to encourage some ghee making out there.

Ghee is a cooking fat made from heating unsalted butter reeeeeeeeeeeeally slowly and NOT TOUCHING IT.  While the butter is melting, the butterfat (the clear stuff) separates from the milk solids (the stuff that looks like tiny cheese curds).  If you stop the process after the milk solids separate from the fat, the leftover yellow oil is clarified butter.  It's the stuff that you seafood lovers love to dunk your lobster and crab into.

If you keep the process going, however, the water in the butter will begin to evaporate off (you will hear and see it simmering off, sputtering and popping away), and the milk solids will begin to brown and settle to the bottom of the pot, leaving a clear brownish oil that is ghee.  This cooking fat is  highly heat tolerant as well as rich in flavor, but it also wonderfully rid of the things that make some of our bellies not feel so great (the milk stuff such as casein and lactose).

To strain the ghee from the solids, simply pour the liquid in the pot through a cheesecloth-lined sieve into a bowl, then let the oil cool. Voila! You've got your ghee!

ghee

The quantity of ghee you get will depend on the quality of the butter you use.  European butters with a higher butterfat content will yield more ghee than the cheaper butters that contain a bit more water. They are more expensive, but they are worth it—not just for the amount of ghee produced but also for the flavor.  This is an area where cheap ass me doesn't skimp.

Once your ghee has cooled, you can store it in a jar on the counter or in the fridge.  It will become harder in the fridge, but it will last longer (about 12 months vs. 6 months on the counter).  If you are like me, it doesn't last 6 weeks much less 6 months, but you do what works for you.

For more info about ghee, check out What's Cooking, America's page all about it.

And give a shout if you make a batch! I'd love to hear your thoughts and how you are using it!

Monday, October 12, 2015

Pepper Delirious: A Cocktail?

I don't know that there is any other cocktail in the world that has a name that actually makes me not want to drink it other than the Pepper Delirious.  (Okay, maybe Sex on the Beach.  That poor cocktail's name is just too inane to even consider seriously drinking, although, YES, I had it once.  The cocktail, I mean.)

First off, the name "Pepper Delirious" sounds like it is referencing something—and it sounds like I should KNOW what it is referencing—but I don't.  So I feel stupid every time I say it.

Secondly, pepper? In a cocktail??? Ewww.  Who wants bell pepper in their cocktail? I mean, I love veggies.  But putting veggies (with the exception of a cucumber) in your cocktail is like putting meat in your cocktail (hello, Añejo MANhattan).  It just sounds totally wrong.

Until you actually taste a Pepper Delirious.  Veggies or not, I have come to love this drink and would not hesitate in serving you one, no matter how much you objected, if you were to grace my presence some evening.  It is refreshing.  It is daringly different.  It is delicious.

The drink was created by Ryan Magarian (also the developer of the Añejo MANhattan).  He is part creator in Aviation American Gin, a gin that I would love to drink but have never had the opportunity to try.  Regardless of the fact that he is a bartender and obvious mixologist, I have adapted this recipe slightly to suit my own tastes.  His original recipe can be found in one of my most perused cocktail books by Robert Hess, The Essential Bartender's Guide (which I see now is out of print.  That is a damn crying shame.  Wow.  Mud Puddle Books—somebody! Bring this book back into print!)

ANYWAY.  (Let me put my soapbox away...)  In case you are a daring soul like my husband who made me this drink in the first place, I am putting my adaptation of the recipe below; it's a little less minty and a little less sweet than Ryan created, but that's just how I like things.

So, here you go:

Muddle in the bottom of a shaker:

  • 2 thin yellow BELL pepper rings (not sweet pepper--it doesn't taste the same. We tried it.)
  • half a package of organic mint (about 10 grams--Ryan's recipe calls for 40 grams; that's TWO packages! And you thought I was crazy!)
  • 2 oz. gin
  • 3/4 oz. freshly squeeze lemon juice (NO BOTTLED JUICE)
  • 1/2 oz. simple syrup (equal parts sugar and water, dissolved)
When everything is nicely smooshed and broken down, add ice and shake like hell for 30 seconds.

Hess doesn't say to, but I double-strain this cocktail, pouring the drink into your frosty glass through this type of doodad.  It helps keep most of the chunks out (and your teeth clean as you are drinking). 

Garnish with a mint sprig (Hess says to also use a pepper ring garnish, but I don't want that slapping me in the face as I drink).

Below is a photo of my version, attempted with sweet peppers instead of bell (but again, don't do it.  They just don't add the necessary zing or color.):

a Pepper Delirious cocktail

Let me know if you have the gumption to try it, and tell me what you think.  Regardless of the name and those veggies, I am pretty sure you will be wonderfully surprised.

Friday, October 9, 2015

Handheld Citrus Juicers — A Kitchen Gadget Recommendation

It's coming on to Friday night, and my Captain is HOME!

That means it is almost time for some serious cocktails and a round or two of cribbage in front of the fire after a dinner of some leftover lasagna (I made it again, but it was better the last time.  Note to self: sweet peppers and bacon don't work too well in lasagna... Oh, well.  If you don't try, you don't know, right?).

Given all those factors (Friday night/husband time/I'm hungry), I decided that I would do a quick post—but an important one.  I want to show you all a picture of my artistic (i.e. chaotic) tool drawer in order to show you the cocktail tools I love the most: my citrus juicers.

lemon juicer, orange juicer, lime juicer

I know you've all seen these in the stores.  If you don't have one (even if you don't drink cocktails)—GET ONE.  At least the lemon one.  Lemon juice is a vital part of a kitchen.  And this handy little squeezer will help you eke out every last little drop to make your lemonade, or your lemon meringue pie, or your lemon bars, or your lemon-y whatever.

AND you can even use it to juice limes.  I know! The limes out there are gettin' pretty large, if you haven't noticed of late.  So large, in fact, that they tend to not fit in the damn lime juicer. So there! Kill two birds with one tool!

Go on! Go on out and buy yourself a lemon juicer, and then call me and I'll walk you through your first Sidecar creation... You will be SO happy you bought that little guy.

Tuesday, October 6, 2015

How to Compose Yourself (and Your Salad)!: A Composed Salad Recipe with Baby Arugula, Red Pear and Shallot

I used to laugh at that term—a composed salad—when I was a kid.  Personification would kick in, and all I could think of was a salad sitting up straight and tall, eyes downcast, hands in her lap, waiting with great grace for her turn to be eaten.

Salads are not my favorite thing to make.  I like to eat them, but I struggle with being too impatient to put one together at the end of meal prep; I just want to eat.

Thank God for those little boxes of organic lettuces and leaves.  I know they are more expensive, but 1) they are organic, 2) I don't have to rinse any damn leaves, and 3) I don't have to chop any damn leaves.  The only thing I'm left to do is cut up some tomato and cucumber, and I can call it a day.

And the-e-e-e-en there's my husband.  Salad creation is his specialty.  He reminds me of Jonathan in the old '80s movie, Splash, who gets fired for being too artistic with his pizza-making.  That's Chef Reiton.  His salads are gorgeous.  And he looks so relaxed making them.  I bang away at the cutting board to hurry up and get it done, and he stands and meditavely slices and minces and slivers and chops.  It makes me jealous.

So the other night I determined: I was going to make a killer salad.  Not the tossed green salads I always make.  No.  I was going to make a composed salad.  A little work of art on a salad plate.

I took three ingredients:

  • a red pear with the flower blossom end sliced off and discarded
  • baby arugula
  • a small shallot, peeled, with the root end trimmed

With my mandoline on the thinnest setting, I sliced the red pear crosswise into circles until I started to hit the seeds (about half the pear).  Next I sliced the shallot into circles.

Now came the composing: 
  1. I lay the pear slices in a ring on the salad plate, overlapping the edges a bit.
  2. I placed a nice little mound of baby arugula in the center of the ring.
  3. I sprinkled the little shaved rings of shallot on top of the arugula mound. 
That was it.  To dress it I sprinkled it with a little bit of olive oil, a little bit of balsamic vinegar, a few grinds of fresh black pepper, and a teensy bit of kosher salt.

The result? GOR-GEOUS!!!!

And it took, like, 2 minutes to make! AND it was delicious! 

a composed salad with red pear, arugula and shallots

I think I may have found my new favorite thing to create! Folks, get ready for some serious salad composure! 

Sunday, October 4, 2015

Figs with Bleu Cheese and Pecans: A Fancy Schmancy but Easy Peasy Appetizer Recipe

It's fig season, people!!! Woohoooo!

Regardless of this article my brother sent me recently from Knowledge Nuts, I love fresh figs.  Second only to a warm, heavy peach dripping with juice, figs are probably my favorite fruit.  They are exquisite, if you've never had one.  Exotic.  Sensual. Bite into one and you will understand why the Renaissance painters used them in their paintings to allude to sex.

And they were $3.99 at the grocery store the other day! Imagine! $3.99 for nine plump little parcels of heaven.

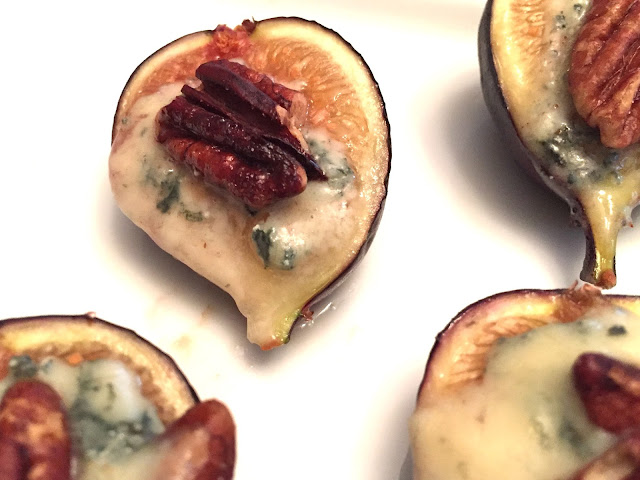
I snatched up a package and a wedge of good bleu cheese, then came home and created a little appetizer to nibble in front of the fire with Chef Reiton while our chicken finished its roasting:

appetizer of figs with bleu cheese and pecans

They're pretty, aren't they? If you want an appetizer to impress that takes a whole 10 minutes to prepare from start to finish, try these out.  Here's what you've got to do (adjust quantities to suit your party size.  I used 4 whole figs for the 2 of us):

Ingredients:

  • fresh figs, halved through the stem so you've got a little "handle" to pick them up with
  • good bleu cheese
  • pecan halves

To prepare:


Heat your oven to 400° OR you can toast these if you have a toaster oven.

Lay the figs on a foil or parchment-lined cookie sheet.  I used the little pan that fits in our toaster oven.

With a butter knife and your finger, place a tiny plop of bleu cheese on top of each fig half.  You don't need much; bleu cheese is very pungent.  The size of two really big peas is a good amount.

Gently press a pecan half on top of the bleu cheese on each fig.

Roast or toast your figs for about 4 minutes.  The nuts will be toasty and the cheese bubbly.

Let them cool a minute, then plate and serve warm.

Give them a try and let me know what you think! I think you might be surprised by the wonderful mix of flavors and textures.  Soft figs with crunchy pecans.  Sweet and toasty and salty and earthy.  Delightful!

appetizer of blue cheese and pecans

Friday, October 2, 2015

Brandied Peaches and Cream at Midnight: Learning the Magic of Maceration (with Liquor)

I have a new Italian grandma.

Her name is Paula, and she lives next door.  I had the absolute pleasure of hanging out with her and her daughter, Annette, and their family this past weekend.  Derrick and I were taking out the trash (with wine glasses in hand—I know...), when they called over the fence and said to bring our wine glasses and come on over to sit by the fire!

Am I ever glad we said 'yes.'  First off, I could have only dreamed that we would have next door neighbors as nice as they.  I mean, they are the kind of people that are just genuine, you know? Nobody will ever be able to replace our Trevinos, but Paula and Annette and Justin and James look like they are certainly going to give them a run for their money.

Secondly,—well, let's just get back to Paula.  She absolutely warmed my heart.  I think I could sit and talk to her for hours.  In the 15 minutes that we were alone together conversing, I felt like I got a glimpse into an extraordinary life lived by a woman with a strength that most of us could only hope to have.  I can't wait to get to know her better.  And to cook with her...  I hear her arancini are to die for.

There are many more reasons I'm glad we said 'yes' to the fire invitation, but the one that relates the most to why I'm writing you all is because that night Paula handed me a bag of peaches picked from a very special tree in their backyard.  Yes, HOMEGROWN peaches.  Holy tamole! She told me that they were a little hard, yet, and to give them a few days...

Well, I did, and yesterday I decided that they were ready to be eaten.  TODAY.  Chef Reiton had a Chicago trip that would have him leaving just before dinner and not coming home until close to midnight, so we decided to do like we did when were dating and have a midnight dinner.  We made a big batch of chili to simmer for hours on the stove while he would be working, and while he was gone, I hatched a secret peachy dessert plan and took Paula's peaches and made this:

chopped peaces in brandy with whipped ricotta cheese and Greek yogurt

There they are, waiting in the fridge.  I'm calling my little dessert creation brandied peaches and cream, but there's not a drop of cream in there.  The "cream" is really whole milk ricotta cheese and Greek yogurt whisked together until the mixture is silky smooth (no sugar added).  The peaches I cut up really small then macerated them for a couple hours with a drizzle of organic honey, a sprinkle of nutmeg, a teensy pinch of salt, and a splash of brandy.  Then I just layered everything in little juice glasses and topped each of them with a sprig o' mint.

brandied peaches and cream

Chef Reiton and I really liked the results.  The "cream" mixture was nice and smooth and creamy.  The peaches were just peachy! But there are a few things we decided would make it even better:
  1. Use a little more Greek yogurt and a little less ricotta to get a bit more tang.  So maybe instead of doing equal parts of 1:1, maybe do 2:1.  And I could have added a couple drops of vanilla for some flavor.
  2. I plated these after only a couple hours of maceration.  Allowing the fruit to macerate for a much longer time and plating them closer to serving time would make the fruit taste that much better and keep the yummy brandied juices more evenly distributed throughout the dish as you are eating it, instead of having them settle to the bottom and only getting the best at the last...
  3. This dessert would work with lots of fruits.  I've got some raspberries in the fridge right now.  Those would be awesome.  Strawberries? Heck, yeah.  Blueberries.  Blackberries.  Plums.  Oh, man... Change the spice sprinkle to suit the fruit, and you are good to go!
  4. Another cheese to try? Mascarpone.  That's got the silk and tang going for it already.  Blend the mascarpone and yogurt in equal parts? Hmm...
Give it a try! And if you don't have brandy or honey to macerate the fruit in, try using some brown sugar to get a bit of that caramel-y flavor involved.  Yummy!

And now I am off to continue getting this little house set-up.  I want Paula to come over...

Thursday, October 1, 2015

Dear Butchers of America... An Open Letter Regarding the Labeling of Meat

Dear Butchers of America,

I am writing with a question that has perplexed me for quite some time now.  It is regarding beef cuts, so I am hoping that you can help me.

I am a home cook; I've not been formally trained in any way in identifying parts of meat.  And while I like to experiment with recipe creation, I generally use recipes from my cookbooks and warped and spattered Bon Appetit magazines to cook my meals.  

When I am reading recipes to create my shopping lists, I see cuts of meat listed such as "flank steak," "brisket," "rib roast," etc.  But when I get to the grocery store, I see labels like this:


"Boneless Beef Chuck Steak Grillers???" What the HELL are those??? 

Chuck, okay—I get that part.  But "chuck steak grillers???" Do you guys, just for shits and giggles, sit in the back and come up with made-up beef part names to confuse us home cooks? You know we are looking for "2-3 lb. chuck roast."  Do you guys put hidden cameras in the cases so you can laugh hysterically at our confused, perplexed faces as we pour over the meat selections and wonder what the hell half of them are?

And it seems that this is further affected by national region.  Out here in Boston, everyone talks about "steak tips."  Never heard of them before in my life, but apparently "marinated steak tips" are just the shit.  But when I ask anyone what exact cut of beef they are, no one seems to know! It's just "beef."

My dear butchers, I have a request to make: how about a universal chart that all U.S. butchers use to label their meat, so no matter what state I travel to, no matter what store I shop in, all meat is labeled with real beef cut names that match up with my recipes.  If you want to have some fun because your job hacking up animals has gotten to be too much, maybe make a "mystery meat" case? Put the hidden cameras there?

That would be AWESOME.

Thank you so much for your concern and assistance,

Rachael

Related Posts Plugin for WordPress, Blogger...

Visit Me on Pinterest!