Wednesday, September 7, 2016

Playing Around with Paletas: A Peach-Basil Popsicle Recipe

What a summer this has been! For those of you who visit often, you've gathered that I've been a bit out of my usual loop these past few months. I would make excuses, but I can't because I've had so much fun this summer that my excuses would be a farce. I've missed writing, but I certainly have not missed my family and friends. It's been a summer to make up some seriously lost time, and I've had a blast.

One of my favorite events this summer was having Michael come visit twice! I love cooking for him again when he is back, and this second summer visit from him prompted me to buy something that I have been wanting to buy in a long, LONG time: namely, a popsicle mold. 

I know, I know... How old am I? (cough) Do I have small children? (NO.) 

It's just...every time the heat of summer rolls around and I see photographs of frosty, melty, fruity paletas (i.e. Spanish for "popsicles," kind-of), I have this longing to pureé a bunch of fruit and make some myself.

The only problem? I have never been able to find a popsicle mold that suits my tastes, and I've been SUPER picky about what I want in one. It must:
  • be easy to clean
  • be BPA-free
  • use popsicle sticks that can get accidentally tossed/lost and not ruin the entire set
  • be warp-free
  • be easy to freeze without making a huge mess of my freezer
  • be the classic popsicle shape
Some of you are probably wondering how on earth I ever found my husband if my laundry list for a POPSICLE MOLD is this stringent.

Well. Regardless of what you may think of my picky nature, I FOUND ONE. I paid a small fortune for it, true. But I believe it is going to last me just short of forever. Check it out:
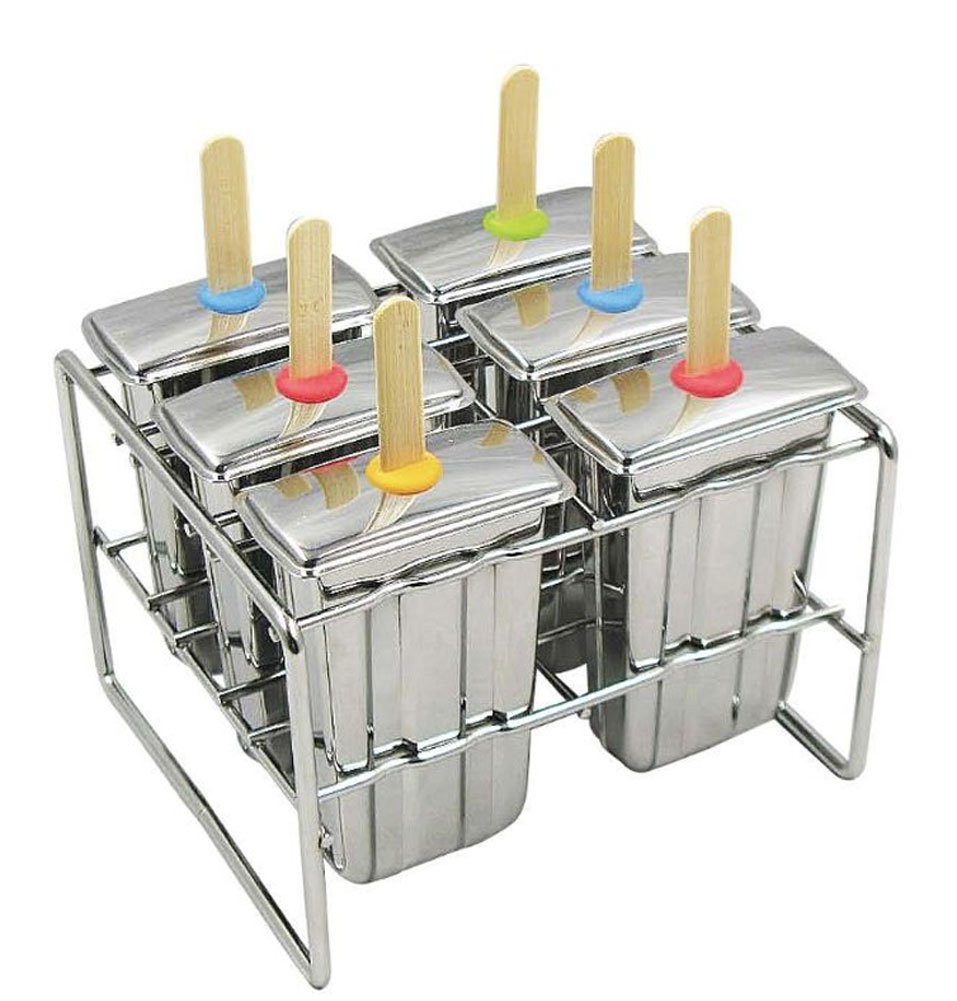
Onyx Stainless Steel Popsicle Mold Set

It's the Onyx Stainless Steel Popsicle Mold from Amazon. It currently costs about $40, but DUDE. Look at it! It's STAINLESS STEEL. It comes with its own super-stable holder. The little silicon rings in the lids hold the (included!!!) bamboo sticks perfectly in place. No crooked popsicles/too-short handles/wimpy plastic here! I am seriously in love. A mom designed it because she couldn't find the perfect popsicle mold, either. Figures. GO, MOMS!

SO. I ordered the popsicle mold, got it in the mail a few days before Michael got into town the second time, and whipped up a couple trial recipes that I concocted after reading around on the internet. NO, they were not recipes for adult-flavored popsicles. I made them from mostly fruit with yogurt or herbs and a little bit of sugar. That's it. Not even water (I hate icy ice-pops...). The blueberry-yogurt one pictured below that Chef Reiton is not sure of (and the one farther down with Marley longingly gazing on) still needs some work, but here's a quick recipe to use up those late summer peaches and basil that are still hanging on—a recipe for peach-basil paletas that got the family approval!

Playing Around with Paletas: A Popsicle Recipe

Peach-Basil Paletas (makes 6 pops or 2 cups of pureé):

Peel 4 medium ripe peaches with a paring knife and cut them into chunks. Place the peach chunks into a small pot and simmer them with 1/4 cup sugar for 10 minutes, stirring occasionally. Remove the pot from the heat, then add 8 fresh basil leaves. Pour the mixture into a blender (or use an immersion blender) and blend until smooth. Pour the mixture into a glass measuring cup (for easy pouring) and pour into the molds evenly. Let cool to room temperature. Freeze overnight.

Let me know if you try them out or do something different! I'm thinking about trying a strawberry-basil one next...

Playing Around with Paletas: A Popsicle Recipe

Thursday, June 30, 2016

How to Make Homemade Croutons

I will be the first to declare you a big, fat liar if you say this has never happened to you: you buy (or bake!) a delicious loaf of Italian/French/rye/whatever bread to top off your yummy homemade dinner—only to be left with a hunk of quickly staling bread the next day...

If you are like me, the thought of throwing it away makes you partially wither inside. Bread, considering it is basically flour and water, is SO HARD to throw away. Those memories of last night's dinner, when it was warm and soft...

And now? Huh. You could make French toast, but it's the middle of the week, and who has time for that except on weekends? You could freeze it, but frozen bread always gets weird.

Soooooo.... What do you do?

Make homemade croutons, baby! It takes five minutes to prep while the oven is warming, and in 45 minutes you can have toasty, crispity, delicious croutons for FREE. Who wants croutons out of a box when you can have these???

How to make homemade croutons from stale bread

I know, right???

And they are ridiculously easy to make. Here's how I do it, BUT (everyone say it with me) you can do it however the hell you want. It's not going to make a life-changing difference. Swears.

Ingredients:

  • hunk or slices of bread of any sort
  • olive oil
  • kosher salt
  • dried herbs, fresh ground black pepper, spices (optional)

Tools You Will Need:
  • a large-ish bowl, a large cookie sheet, a serrated (the one with teeth) knife, a cutting board, a metal spatula

Steps to Make:

1.  Preheat your oven to 275° F.

2.  As your oven is heating up, cut your bread into slices. I do mine about an inch thick. If you like smaller croutons, slice thinner. Then take each piece, lay it flat, and slice lengthwise and then across so that you now have bread cubes. Try to make them all relatively the same size.

3.  Dump the bread cubes in the bowl. Pour several really good glugs of olive oil into the bowl over the bread cubes. Sprinkle on the kosher salt and any additional flavors you want to add, then get in there with your hands and toss, toss, toss! You really want to make sure that all the cubes are really well-coated.

(NOTE: The amount of oil used is going to depend on the amount of bread cubes you have and how much you personally want to coat your cubes. I like to really coat mine well. I find the flavor to be better if the cubes have a good soaking of oil. You may feel differently. Try it out and see what you think. No matter what you do, they are going to taste great.)

4.  Pour the cubes out onto the baking sheet, and spread them out into an even layer with some space between them. Pop them in the oven and set the timer for 20 minutes (for smaller croutons, set it for 10). When the timer goes off, give them a toss with the metal spatula to flip them over. Shake them back into an even layer, then toast them for another 20 minutes. Larger croutons are probably going to be done at this point. If you are doing smaller croutons in 10-minute intervals, you are probably going to want to do three (3) 10-minute intervals. Just test them with a good ol' bite-test to see if they are as crispy as you desire.

Let them cool on the baking sheet on a wire rack, then seal them up in a Ziploc bag with the air squeezed out. They will remain nice and crunchy for quite awhile...

Hope you enjoy them! Store-bought ones don't even compare...

Monday, June 27, 2016

Ginger-Lime Shrimp (and a Lesson in "Deveining")

There are so many things I love about living on the ocean, but I have to say that one of the best things is the insanely fresh seafood that I can get at a seafood shop that is on the way home from picking up Captain Reiton at the airport.

The first time I went into this restaurant/shop—Belle Isle Seafood—I (somehow? There are only signs EVERYWHERE) didn't notice that they only take cash. When I went to pay with my CREDIT CARD, the girl very graciously explained that she was unable to accept it as a form of payment—this being after a five minute conversation about how much I loved living here after being in the Midwest for so long, and blah blah blah....

So, being embarrassed but being me, I made fun of myself and then asked her if she could just keep my salmon in the case and I would run back later with cash to pick it up. To this she responded (and I quote):
"Oh, no, just take it with you. You can just pay later."

Am I serious??? Yes, I'm serious.  This is the kind of town I live in. It's small. People trust you, or they will kick your ass. And I love it.

So. As I was saying: I also love the seafood, so the other night I bought a pound of fresh shrimp at Belle Isle to sauté up for dinner.  Being fresh, the shrimp weren't processed like they are when you buy them frozen or from the seafood case at the grocery store. That meant they simply had their heads cut off, and that was it. They still had their little legs. Their full, unsplit shells. Their little poopy intestine down the center of their back...

So I shelled them. Ripped off their little legs. And then—I discovered the BEST way to "devein" the shrimp!!! 

(Why is it called "deveining," by the way? It's an intestine, NOT a vein. Are they afraid to call it "de-pooping" a shrimp? Because that is what you are doing, really...)

Now, here's the problem that I've always had about shrimp that I have bought frozen that have been deveined: in the processing of the shrimp, they are practically butterflied. They are sliced open the whole way down their spine so that they flay open when they cook.

I don't want shrimp that look like butterflies on my plate. I want shrimp that look like shrimp on my plate, damn it. Appearance is very much a big deal to me when it comes to cooking, and I have always found it so unattractive to be eating shrimp that look like they've been attacked by the SNL Samurai.

SO. As I was finishing peeling and de-legging my shrimp, I wondered if I really had to slice a shrimp the entire way down it's spine to devein it...

I took a paring knife, inserted the tip blade-up into the middle of the shrimp "neck," so to speak, and sliced upwards, making about a quarter-inch long cut.  Now I could see the poop tract laying right there...

I reached in with my fingertips, grabbed the end of the "vein," and very gently but firmly pulled...

VOILA!!! It slid out! The whole thing! I had an entire shrimp in my left hand and an intestine dangling from my right! No flaying necessary!

Now I had perfectly whole, beautiful shrimp, ready to be marinated and sautéed for dinner. 

And speaking of dinner, wowzers, have I got a shrimp dish that will knock your socks off. I very slightly adapted it from Melissa Joulwan's cookbook, Well Fed. If you are looking for flavorful but easy and fast, this is it. 

If you are in a super rush, make the marinade first before you deal with your shrimp, then toss your shrimp into the marinade bowl as you clean them up. Then, as your shrimp are marinating for 20 minutes or so, you can get the rest of your sides together. Shrimp only take a few minutes to cook completely, so depending on your sides, you could have dinner on the table in about 45 minutes, from start to chow-time.

As I've pointed out with so many recipes lately, use the quantities and ingredients you have. You do NOT need to follow ingredients and measurements here exactly. It will still taste good, I promise. But here's what I used:

Ingredients for 2-3 people:
  • 1 lb. of fresh shrimp, shelled completely and "deveined" (I also give them a rinse)
  • juice from 2 juicy limes (smooth skin, heavy, feel squishy)
  • fresh ginger root, peeled and finely grated on a zester or minced up, about 1 1/2-in. worth
  • a jalapeño, seeded and minced, or a tsp. of crushed red pepper flakes
  • 3 peeled garlic cloves, finely grated on a zester or minced
  • about a quarter cup of minced cilantro
  • 1/2 tsp. kosher salt
  • 1/4 tsp. freshly ground pepper
  • 2 Tblsp. olive oil

Steps to Make:

1.  Combine the lime juice, ginger root, jalapeño or flakes, garlic, cilantro, salt and pepper in a medium bowl and whisk together with a fork. Drizzle in the olive oil and whisk rapidly to blend with the juice mixture. This is your marinade.

2.  Add the shrimp to the marinade and toss really, really well. Cover the bowl with plastic wrap and stick in the fridge for 20-30 minutes but nor really any more than 45 minutes. The lime juice will cook the shrimp. Really.

3. When your sides for dinner are almost done, heat up a large skillet on the stove on medium-high. When it is nice and hot, dump the entire contents of the bowl into the skillet. Shake the skillet to create a single even layer of shrimp. Cook for about two minutes. You will see the shrimp turning pink and starting to curl. Stir the shrimp to blend them with the sauce and to flip them onto their other side (you might need to help some of them a little). Shake the pan to make your even layer again, and cook for another 2 minutes or so.

4. Platter the shrimp and garnish with some cilantro fronds or torn cilantro leaves.


That's it! Super fast. Super easy. Super delicious! You could also skewer the shrimp and grill them, too... YUM.

Word of advice: just don't overcook them. Fresh shrimp are so tender. I had no idea. If you cook them too long, they will get rubbery and weird. Don't panic about the short cooking time. If the shrimp is all pink and curling, it's DONE.

And I promise to make something shrimpy this week and video the whole de-pooping for you...

*UPDATE: I made the video! Click here to read a more descriptive post on how to devein shrimp and to watch the video

Sunday, June 26, 2016

The Baldwin & Sons Trading Company — Woburn, MA — A Restaurant Recommendation

NOTE TO READER: The following letter is private. It is addressed to the new bar/love of my life. However, due to the nature of its delivery, I guess I am going to have to let you read it. 

Actually, please DO read it. It just may change your life forever, as well...


~          ~          ~          ~          ~          ~          ~          ~          ~

My dearest Baldwin & Sons,

I know we only met last night, but like Romeo and Juliet, one meeting is all it appears to have taken for you to become, in my book—how shall I put it?

IT.

As Shakespeare so astutely says, so will I:

How do I love thee?
Let me count the ways...

So, here we go:

Reason #1 - You are beautiful.  I know that sounds incredibly shallow, but let's be honest: no one ever is immediately struck in a GOOD way with how ugly something is. Unless it is cute-ugly. Which you are not. You are striking. Well-kempt. Hip but classy. Well-balanced. Golden. Shall I keep going?...

The Baldwin & Sons Trading Company in Woburn, MA

Reason #2 - You are kind.  See? I'm not all about the looks. In fact, I believe I have to say that your kindness is more attractive than your beauty. (It's just that I didn't know it at first, and I'm going in order of occurrence.) Your genuine interest in my husband and I upon our meeting was rare in an establishment. We weren't just clients last night; we were friends. (Am I making you blush, yet?)

Reason #3 - You serve wickedly outstanding Sichuan dishes.  And as we all know, Sichuan is hot.  Enough said.

Reason #4 - Nika.  She corresponds about reservations and other such related matters at all hours of the day or night. Who ever heard of a bar hostess doing such a thing??? I actually forwarded her notes to my husband before we even met and said, "I love these people already..." See? It was a premonition.

Reason #5 - Van.  He made me my first cocktail (see below) and then proceeded to steer the rest of my dinner-time into an experience I will not forget in a long, long time...

Reason #6 - The Trader Vic.  What an opener! A Mai Tai that shook my notion of Mai Tais to its very foundations!

Reason #7 - The Southern Belle.  Can I just say that this was a revelation as to why I need to make cinnamon syrup TODAY??? She is a cocktail that is exactly as Van designed her to be: soft and demurely sweet but who can most certainly hold her own.

Reason #8 - Mick.  He quotes The Princess Bride.  Instant soul-attraction.

Reason #9 - You are generous. 

The Baldwin & Sons Trading Company menu, Woburn, Massachusetts

Reason #10 - The Prescription Sour.  Oh, glory be... Rum and scotch together? Who knew? (Sigh.)

Reason #11 - Patrick.  He, like Van, is a master. Truly, truly a master.  I could just watch and watch and watch...

Pouring a masterpiece at The Baldwin & Sons Trading Company in Woburn, MA

Reason #12 - The Baldwin Apple Revised.  Everything about her was so sweetly irresistable: the foam. The little egg cup. The apple chips.  [asideThe frosting.

The Baldwin Apple Revised at The Baldwin & Sons Trading Company in Woburn, Massachusetts

Reason #13 - You are unlike any other bar I've ever met.  And I've been to a lot.  A LOT.


Reason #14 -  Tyler.  How do you not love chatting about cocktails with someone who has a beard that rivals the finest of all beards? How?

Reason #15 - Ran.  The giant behind it all is THE one to thank, I know. I mean, you all run like the finest piece of clockwork. It's amazing to behold. And to enjoy...

Reason #16 - You are perfection.  So don't change. Ever. Unless you want to add some more life-altering cocktails. Then I'm okay with that.


I hope that the evening was as enjoyable for you... When we awoke this morning, the first thing Derrick and I said to each other was, "Last night was awesome." And we were talking about YOU.

Thank you, thank you, thank you.

With many happy thoughts and fond memories, until we meet again,

Yours truly,

Rachael

Thursday, June 23, 2016

A Strawberry Tequila Shrub: A Refreshing Change of a Cocktail

Well, folks, summer is finally upon us. I've been spending a lot of it with friends and family so far, hence the temporary disappearance and lack of CAF-related writing (although I've done a little freshening up—like the new header...).

It's been fun, but the burn to write never leaves me. This morning's to-do list of house-cleaning and laundry is being ditched.  I concocted the most delicious summer cocktail the other day, and I have to write about it. I can fold laundry later, damn it—while sipping a strawberry tequila shrub.

Remember when I wrote about making a strawberry shrub last summer? (If not, you will find the post HERE, then click the link that connects to the Bon Appétit recipe and make one! It's easy!) Well, I made a batch for a spring party we went to, and the leftover bit has been staring me in the face every time I open the fridge.

The other afternoon I couldn't take it anymore, and I mixed up 1 oz. reposado tequila and 1 1/2 oz. strawberry shrub over ice in a Collins glass (use a highball if you don't have a Collins), then topped it off with 6 oz. ginger ale and garnished it with half a strawberry.

Oh, happy day, it worked! Fruity and zingy with that tequila bite. Delightful. Refreshing. A perfect drink for a hot summer day.

Even the dog was happy with it.

Strawberry Tequila Shrub cocktail

Give it a try. I think you will be happy you did.

Wednesday, May 11, 2016

Creating a Foodie is on Pinterest!

Well, folks, I spent the last few rainy days/week working on getting Creating a Foodie set up on Pinterest, and I am proud to announce that she is far enough along that I would call her "up-and-running!"

SO. If following Creating a Foodie through email is not your thing (which, if you ARE interested, just type in your email address in the sidebar under Get CAF in Your Inbox!), you can now follow on Pinterest at https://www.pinterest.com/creatingafoodie/.

Or maybe you will sign up for BOTH! Whoa! Then I would be, like, "You love me! You really, really love me!"

Thanks for reading, folks.

XOXO,
rach


Monday, May 9, 2016

Learning to Easily Prepare Beets: A How-To Video

Well, folks, I'm a day late, but hopefully no one was a dollar short—nor waiting by their iPad with beets in hand, waiting for me to have posted this video yesterday. I do apologize, however; time just got ahead of me.

ANYWAY. As I promised, I have made another very homemade video demonstrating how I prepare beets the easiest (i.e. laziest) way I know how. I just got tired of peeling my knuckles, not to mention more of the beet than was necessary, with a peeler. I hope you find this very helpful in making that delicious beet salad I just posted for you all (wink wink).

By the way, give me a shout if there's ever anything you want me to show you how to do. If I don't know, I'll learn with you!

Without further adieu, here's your beet prep video. Enjoy!

Saturday, May 7, 2016

The Beet Salad Recipe of Your Dreams

I don't know about you, but when dealing with vegetables, rarely does the word 'gorgeous' come to mind. Vegetables tend to look a bit—well, not the most attractive. Stand in the produce section, and take a look around. Fruit definitely wins out in the looks category. Veggies tend to remind you of gawky, bad-skinned, knob-kneed teenagers with consistently bad hair-days.

That is, until you look inside.

Suddenly, some veggies become positively striking. Like the beet I couldn't help but share in my old post Talk About Random.  Take a look at that beauty!

Maybe their gorgeousness is part of the reason why I've become addicted, but beets have suddenly turned into my go-to veggie for an easy lunch salad. Chef Reiton hates beets, no matter how hard he tries to like them, so my only way of eating them is when he isn't here. Lunchtime has become perfect for that.

"So—a beet salad???you say (I can see that lip tweaking...).

Believe me, yes, and it's delish and incredibly easy. That is, after you roast the beets. Which is also easy. I'll even show you how tomorrow because I'm going to roast some tonight (please note: TONIGHT is key in my easy roasting and peeling method).

Alright, so back to the salad. In Real Simple's November 2015 issue there was an article on easy side dishes to create for the holidays. Modestly introducing their beet salad recipe was a small notation that their beet salad is so good, the RS crew make it all the time for their gatherings.  Intrigued, I made it for our Christmas dinner, and the entire family gave a resounding 'YES!' to it's deliciousness—despite it being made with beets.

Since then I have tweaked the recipe to fit with ingredients that I tend to have at home and that I can quickly toss together for lunch. Almost all of the ingredient amounts are to what I'm in the mood for that day. So, here you go: a beet salad that is remarkably good for you, gorgeous, and incredibly delicious.

beet salad with ricotta salata, parsley and toasted pecans

Ingredients:

  • 1 roasted beet, cooled, skinned and cut into wedges
  • a small (1-in. x 1 in.-ish) hunk of ricotta salata, a firm ricotta cheese, sold in wedges in the "nice cheese" section
  • a small pinch of the tops of some fresh Italian, flat-leaf parsley sprigs, roughly chopped 
  • chopped pecans, toasted (toss in a small skillet over medium heat until they smell nutty)
  • kosher salt and freshly ground black pepper
  • olive oil
  • red wine vinegar

Directions:
  1. Place beet wedges on a plate or in a bowl.
  2. Crumble ricotta salata over the beet wedges.
  3. Sprinkle with chopped parsley.
  4. Sprinkle with chopped, toasted pecans.
  5. Drizzle with olive oil and red wine vinegar.
  6. Sprinkle with salt and pepper.
  7. EAT!
If you want to print the recipe, click "Print this recipe" below for a download and/or a print option.

beet salad printable recipe card

Come back tomorrow for a quick how-to video on roasting and peeling beets–something I used to hate doing because the damn peel never came off easily. No more! I'll show you how.

Until then, here's to those of us who may be knob-kneed with lots of bad hair-days but strive to be beautiful on the inside! Yeah, beets!

Wednesday, April 13, 2016

A Kitchen Flashback—and Some Thoughts

Last week here in Boston, it was pretty crappy. Weather-wise, that is.

When it came to the Reiton household, however, we were great! My parents were here! Woohoo! It's always so fun to have my mom and my dad here: they appreciate everything, they love to eat, and my dad grew up here, so it's like he is coming home. It's just awesome.

What was like coming home for me, this week, was cooking with my mom.  Actually, I specifically mean baking with my mom.

Until this weekend, dear readers, this was a sight I had not seen in 25 years:

Learning to knead dough from my mom

The only difference 25 years ago was that my mom's bowl was much bigger because she was most likely making a double batch. And maybe she wasn't so vein-y 25 years ago. That's about it. What I do remember being exactly the same: she was always on the floor with the bowl between her knees. Her sleeves were rolled up. And she was madly kneading dough for the week's bread.

That bread dough is something that I have dreamt about for years.  I've tried to make it, but it just doesn't come out the same as Mom's.  I think she has done it for so long, she's just got that thing where she just knows when it is right. Which only comes with practice. And failures. And lots of French toast and croutons.

But you know what? That's what makes cooking worth it. Things never come out perfectly the first time

And you know what? Who the hell cares??? It's food for YOU. You aren't cooking in the Queen's kitchen, for God's sake. And if it all really comes out crappy, it still fills your belly AND is a cooking lesson, to boot.  So if you just can't get your fill because it's just too God-damn-AWFUL, go eat a bowl of cereal, for crying out loud! Quit complaining! There are people who will have eaten nothing for a week in this world, so get over it. Seriously. 

Those whiny words: "I can't..." ??? 

Pffffft.

If you keep practicing, one day it will come out great. No doubt about it. Pay attention and keep trying.

And that's my cooking lesson for you for today. Straight from my mom. Who has no idea that she's influenced this sailor-mouthed, gin-and-tonic-influenced blog post about trying and failing in the kitchen.

And learning. Always, always learning.

Friday, March 18, 2016

Dry Your Beef!: A Lesson on Browning, Involving Some Beef and a Towel

It's almost spring here in Boston.  I was clearing out the yard yesterday, and I uncovered all kinds of buds peeping up out of the ground.  I even saw my first robin the other day! Woohoo!

But although the weather is teasing, my stomach isn't quite there, yet.  The air is still cool enough on a regular basis that I'm still enjoying my soups and stews and hot yerba mate lattes.  And with stew-making comes beef browning, and holy cow (no pun intended), have I learned a fabulous lesson!

Regardless of the fact that I write a food blog, I can be the world's dumbest cook.  I forget steps all the time.  Like--a biggee: TASTE to season before you serve.

Nope.  Forget to do that ALL THE TIME. Even for my guests when you would think I would want to show off.  I just get too damn excited, and I put out the meal, and then when I go to take my first bite, I find myself thinking, "Damn it! I forgot again!"

Sigh.

Another one? Mise en place. That is the fancy French way of saying get your shit together before you start to cook.  It is also why I have a plethora of ramekins and small bowls: to measure out all the ingredients first so that when the clock is ticking down the two minutes I have before I need to add the minced garlic, I'm not left still trying to frantically peel that persnickety paper off the garlic clove as my timer goes off to now please add the garlic...  Again, I just get too excited about starting, or I'll think, "Oh, this first step takes 10 minutes to brown? I've got plenty of time to get everything else together, then..."

Yeah, no. Fail.  EVERY TIME.

BUT.  I think I may have cured myself of another one of my "I-always-forget"s for good, and that is drying off the beef before I brown it.

Always forget that.  Always.  Except for the other night.  Not sure what made me remember...BUT, I did.  And, wowzers, NOW I know why Julia obsesses about this so much! Because the end results are BEAUTIFUL.


Drying beef before browning makes a difference!

Look at that color! That crust! No squishy, steamy-grey beef chunks here! No, sir! 

You take that paper towel and go pat that beef dry before you salt it and drop it into the hot, oily stew pot (or skillet or whatever), and this is what you get! Tell me you aren't in love! 

My only other tips: if you are browning cubes for stew, do the cubes in batches so they don't touch. Touching means steaming.  Ew.  And I don't brown every side.  I'm too impatient.  I just brown two sides.  So there.

Want to show off your browned beauties? Send us a picture in the comments below!

Related Posts Plugin for WordPress, Blogger...

Visit Me on Pinterest!